Custom Dashboard Operations
- 12 Jul 2022
- 5 Minutes to read
- Print
- DarkLight
- PDF
Custom Dashboard Operations
- Updated on 12 Jul 2022
- 5 Minutes to read
- Print
- DarkLight
- PDF
Article Summary
Share feedback
Thanks for sharing your feedback!
In this section, we will try to understand what is a Custom Dashboard in BizTalk360. BizTalk360 ships with a 'Default Dashboard' that is pre-loaded with 5 Default widgets. We have provided the capability for you to be able to add more widgets to the default dashboard. However, there may be certain business scenarios where let's say, you are the business user with the responsibility to monitor the health of 2 applications (Acme and Contoso). You only have access to these applications in the system and your primary responsibility is to make sure both these applications are running healthily at any point in time. With BizTalk360 v8.0 Dashboard, we have provided unique widgets for specific operations in the environment, say, like Running Service Instances Count, Suspended Service Instances Count, and so on. You can choose to add these widgets to the 'Default Dashboard' and keep a watch on these applications. The challenge with this approach is that, if there are lots of widgets on the default dashboard, it may result in a cluttered look and you may face the need to scroll up/down to view the information about your applications.
To avoid the above problem, you can use an alternate approach where you can choose to create multiple custom dashboards for, say, one dashboard for having shortcuts to the application artifacts, and the other dashboard to quickly view the suspended instances depending on different filter options. By doing this, it becomes easy for you to manage your dashboards in an efficient way and operate on BizTalk360.
The below screenshots show custom dashboards for a business user having access to two applications, and how easily he can access the different areas of the application through the dashboard.


Adding a New (Custom) Dashboard
BizTalk360 allows users to be able to create their own dashboards to personalize their experience of working with BizTalk360. In this article, we will explain the detailed steps in adding a new (custom) dashboard in BizTalk360.
Follow the steps as shown below to create a custom dashboard:
- Log in to BizTalk360
- Select the environment from the environmental panel
- On the Administration Dashboard screen, click 'Add Dashboard'
- In the Add New Dashboard blade,
- Dashboard Name - Enter a meaningful name for the dashboard that you are creating in the environment
The dashboard name field only accepts space and hyphen as special characters. No other special characters are allowed.
The dashboard name can only contain 50 characters. If you enter more than 50 characters, you will notice an error message as "Please enter no more than 50 characters." - Do you want to fill in default widgets? - Toggle the slider to enable the default widgets in the dashboard
- Global Dashboard - Toggle the slider to make it a global dashboard , this dashboard can be accessible to user based on the access permission
Only Super Users will have the permissions to make a custom dashboard to be visible to all users in the environment. Normal users will not see this option while creating the dashboard. - Save - Click Save to save the dashboard. If there are any validation errors (in Dashboard name), you will notice a message as Please correct all the validation errors. Once all errors are fixed, your dashboard will be created successfully and you will notice the message as Dashboard created successfully
- Cancel - Click Cancel to cancel the dashboard creation process
You cannot edit a dashboard once you have created it. You only have the option of either creating a new dashboard or delete the current dashboard if you want to make any changes.

Points to Remember while Deleting a Dashboard
- Only a custom dashboard can be deleted. The Home Dashboard cannot be deleted. However, you can add/remove widgets from the Home Dashboard
- When Super Users delete a Global dashboard, the dashboard will be completely deleted from the database and will not be visible for any other user in the system
- If the dashboard (that you are deleting) is the only (custom) dashboard in the environment, once the dashboard has been deleted, you will not see the Dashboards section on the left navigation menu. The Dashboards section will reappear when you create a new custom dashboard
- Normal users will need to follow the same procedure to delete a custom dashboard
- Only Super Users have the capability to delete a global custom dashboard
- Once the dashboard has been deleted, all the associated widgets within the dashboard will also be automatically deleted
Set As Default Dashboard
As mentioned above you can create your own custom dashboard and map the widgets which are required to get an insight into your environment. The required widgets may vary based on your roles so you can customize and create your own custom dashboard and set that as a default dashboard, which will be loaded first when you navigate to the dashboard section. By default the Overview dashboard is set as the default dashboard, you can change it as per your business need. This is user-specific.
Set the dashboard as default by clicking the star icon near the dashboard selection drop down.

What is new in v10.3?
The custom dashboard can be set as the default dashboard. With this you can launch BizTalk360 with specific dashboard.
When one user starts customizing the dashboard, that will be moved to lock mode. So that other users cannot edit the same dashboard till the user saves that dashboard.
Dashboard Access permission
The user access policy for the dashboard is introduced in v10.1.
Now the global dashboard can be accessed only with permission, So after upgrading to v10.1, no global dashboard will be visible to Normal users. Admin needs to provide dashboard access for the normal user in the Team Management section to view and manage the global dashboard.
Admin can provide access permission for the global dashboard based on the user roles by following the below steps,
- Navigate to Settings ->Team Management ->Add new user/Edit existing user
- Select permissions for application access and click next to provide feature access permission
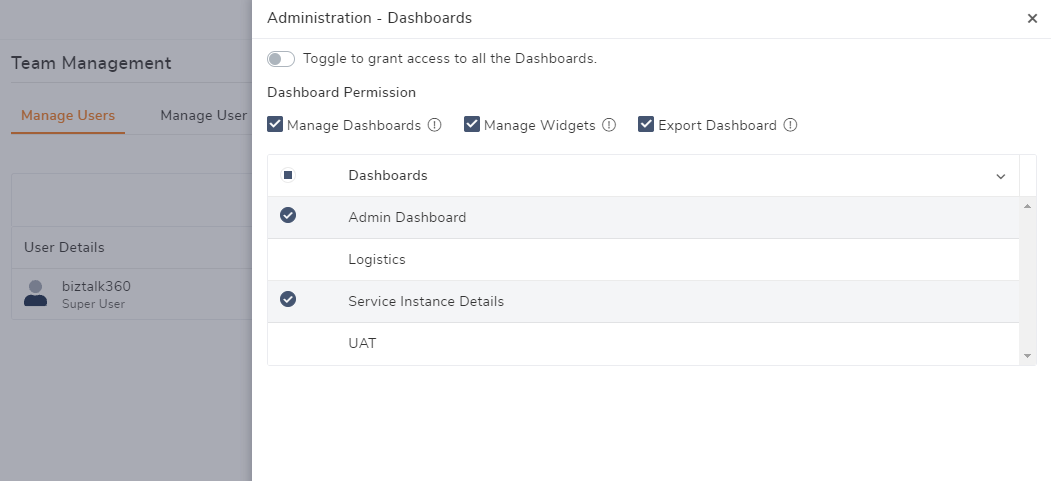
- In the feature permission screen click on the custom selection, Enable Administration->select Administration dashboard->click on the gear icon near the administration dashboard which opens the dashboard access permission screen
- In the dashboard access permission screen, you can select the dashboards in which you wish to provide access to the user and also you can provide access to manage dashboard and widgets
- Manage dashboard - User can create/edit/delete the selected dashboard
- Manage widget -User can Add/remove/customize the widgets in the selected dashboard
- Export Dashboard - The user can export the dashboard as pdf.

Was this article helpful?