Process Monitoring
- 26 Oct 2023
- 6 Minutes to read
- Print
- DarkLight
- PDF
Process Monitoring
- Updated on 26 Oct 2023
- 6 Minutes to read
- Print
- DarkLight
- PDF
Article Summary
Share feedback
Thanks for sharing your feedback!
You can create Process monitors for monitoring the activity of specific Receive Locations and/or Send Ports during a particular period of time (say a specific hour in the day or once in every 15 minutes and so on).
In this section, the following is discussed:
- Process Monitoring Prerequisites
- Setting up a Process Monitor
- Process Monitoring Email Notifications
Process Monitoring Prerequisites
At times, the process monitoring may not be working as expected - say, for example, you would have processed a lot of messages during the time frame, but the email notification mentions the opposite - a false alert saying there were no messages during the time frame. To avoid these kinds of situations, ensure that the following prerequisites are met.
Make sure the Tracking settings are working as expected - BizTalk360 Process Monitoring relies on BizTalk Server Tracking data to calculate the transaction volume. So, in order for the process monitoring to work correctly, the tracking settings in the environment must be working correctly.
Setting up a Process Monitor
Follow the steps as shown below to create a Process Monitoring alarm
Let's take a deep dive into the Process Monitoring screen to understand the functionality of every option and control present on that page. The following screenshot depicts the complete process monitoring screen in BizTalk360.

Let's take a look at each item on the screen, in detail:
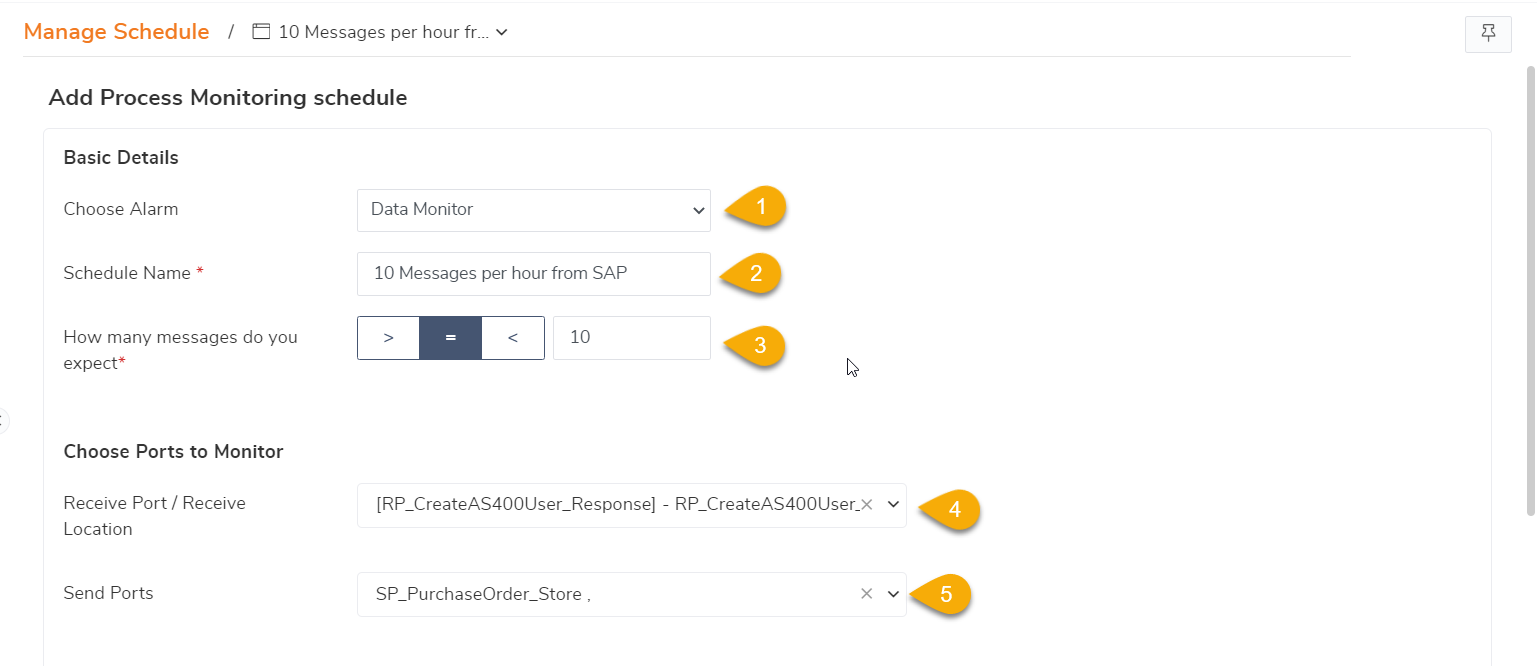
- Alarm Name - As mentioned above, the first step to set up process monitoring is to create an alarm and map the alarm for process monitor alerts. Once the alarm is created and mapped, the alarm name will be displayed in the drop-down
- Schedule Name - A meaningful name for the Process Monitor. Say, as per your business requirement you are expecting at least 10 messages every hour from the SAP system. The monitor name can be set as "10 Messages per hour from SAP"
- How many messages you expect - Enter the number of messages (count) you are expecting during a time frame. As per the above scenario in step 3, enter the value of 100/50
- Receive Port/Receive Location - Select the receive ports/locations that you wish to monitor with the process monitoring functionality. You need to select at least one receive location/send port in order to set up process monitoring. Say, you have one receive port (Contoso_ReceivePort) that is mapped to 10 receive locations (Contoso_ReceivePort_ReceiveLocation1, Contoso_ReceivePort_ReceiveLocation2, and so on) and you wish to monitor each of these receive locations separately. In this case, select the different receive locations from the drop-down one by one
You can choose more than one receive location to be monitored for a specific data monitor.
When the value is selected from the drop-down, you will notice both the receive port name and the receive location name displayed in the space provided. This is because a single receive port can have multiple receive locations. - Send Ports - Select the send ports that you wish to monitor with the process (data) monitoring functionality
- How often you want to monitor - Select the duration how often you want to monitor the state of the receive location and/or send port. The options are - Daily, Weekly, and Monthly. Depending on the selection, you can add further filter criteria on how often you want to monitor:
- Daily - will set up the process (data) monitor to execute everyday
- Weekly - The process (data) monitor will execute on the selected days of the week (Every Day, Monday-Friday, or the selected day of choice). To add a single day of the week, click the control and select the day of your choice
- Monthly - The process (data) monitor will execute on the selected day of the month. To add a specific day of the month, enter the date in the space provided or select the date from the drop-down.
What's New in v10.7 ?
The monthly Data Monitoring schedule configuration now includes an additional option called "End-of-Month." By selecting this option, the schedule will be executed at the end of the month, considering the complete month's data for monitoring purposes.
7. When during the day - Select the time when the process (data) monitor must execute on a particular day during business hours. You can customize your business hours by selecting the values from the Business Day Start/Day End options. By default, the business day start time is 9 AM and the business day end time is 5 PM. Depending on the business hour selection, the following options are available when you want the process monitor to execute on a particular day
- At what time
- At the end of the business day - If this option is chosen, the process (data) monitor will execute depending on the value chosen in the Business Day End field. For e.g, if the business end time specified is 5 PM (default value), the process monitor will execute exactly at 5 PM
- Monitor every X minutes/hours - You can define specific intervals during the business hours when the process (data) monitor should execute. The options available are Minutes and Hours
- Minutes - Select the number of minutes after which the process (data) monitor should execute. E.g., 30 minutes means the process monitor will execute once every 30 minutes
- The minimum time interval supported is 15 minutes, which means the process (data) monitor will execute 4 times (15 minutes x 4 = 60 minutes) in an hour
- Hours - Select the number of hours after which the process (data) monitor should execute during the business hours. E.g., 2 hours means the process monitor will execute once in 2 hours between 9 AM and 5 PM
- The minimum time interval supported is 1 hour
9. Start and End Time - This section can be used to define advanced settings for process monitoring. You can define a date range (from the date and to date) when you want the process (data) monitor to execute. For e.g., you are expecting a bunch of 100 files from your trading partner next week between Monday and Tuesday. You can set up a process monitor defining the start date to be next Monday and the end date to be next Tuesday. In addition to this, you can set up the other settings mentioned above in the previous steps. This means the process monitor will only start to run next Monday and will not execute after Tuesday
- Summary - The summary information will automatically be populated based on the information selected in the previous columns
- Save - Once all the values are selected in the previous steps, click Save to save the settings
Process Monitoring Email Notifications
The email alert(s) will contain the Process Monitoring Execution results of the Process Monitor. By default, if you only selected the 'Use this alarm for Process Monitor Alerts' option, you will only receive the Failure emails to the configured email address(es). Alternatively, if you also selected the 'Notify on Success as well' option, you will receive the success alert emails as well to your mailbox. The following screenshots depict success and a failure email notifications received for a configured Process (Data) Monitor.

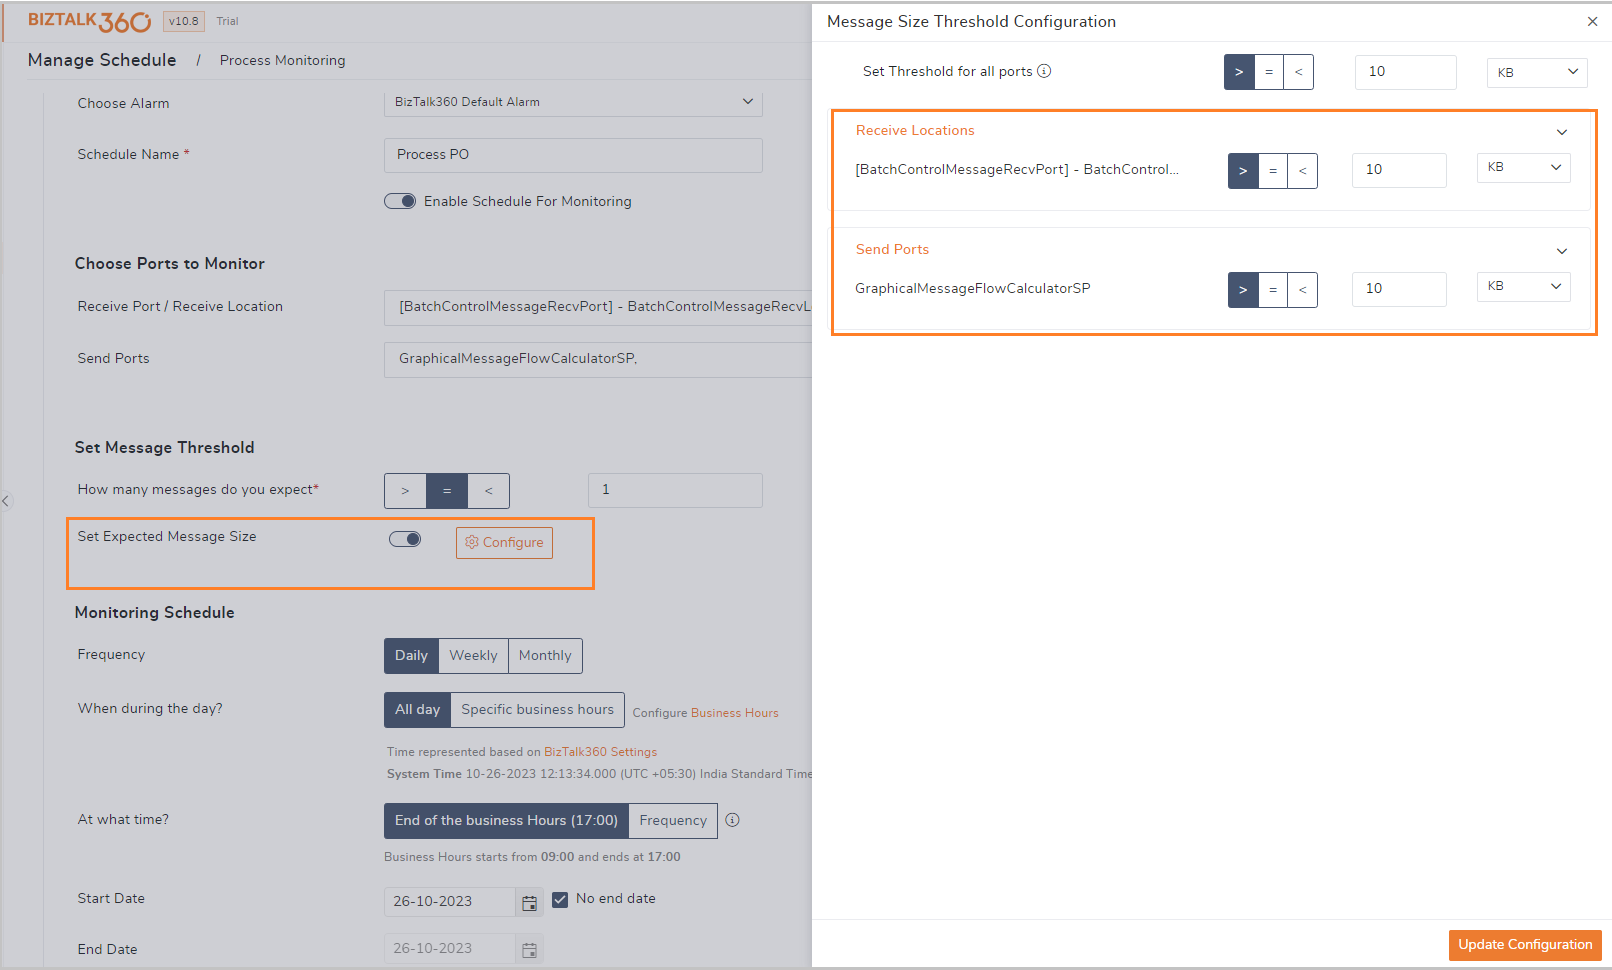
Message Content Size Monitoring
In addition to keeping track of the transmitted message count, you can now also monitor the size of messages transmitted between the receive location and the send port. To do this, you can enable the "Set Expected Message Size" within the "Message Threshold" in process monitoring and configuring the desired message size for each port by clicking the configure button. By default,the expected size is set to be greater than 0 bytes.
Let's say you have an integration process that usually receives XML messages of 10 KB to 50 KB, but you receive a message that's only 100 bytes, it indicates a potential issue. By monitoring the size of message content, any deviations above or below a defined threshold will prompt user alerts. In this case, you can set the expected message size within process monitoring to greater than 10KB. Then you will be notified if a message with below 10 kb is transmitted.
Was this article helpful?