SQL Collation support
- 14 Jun 2023
- 17 Minutes to read
- Print
- DarkLight
- PDF
SQL Collation support
- Updated on 14 Jun 2023
- 17 Minutes to read
- Print
- DarkLight
- PDF
Article Summary
Share feedback
Thanks for sharing your feedback!
This section describes different installation options. It consists of the following parts:
- Important Installation Instructions
- Installing BizTalk360 - What are the options
- Migration And Deployment Best Practices
- Installing BizTalk360 On A BizTalk Server
- Installing BizTalk360 On A Stand-Alone (non-BizTalk) Server
- How To Install Just The BizTalk360 Monitoring Service
- How To Install Just The BizTalk360 Analytics Service
- Installing BizTalk360 on High Availability BizTalk Servers
- Uninstalling BizTalk360
Important Installation Instructions
Please make sure the IIS application pool account you are going to use during installation is part of:
- Local Administrators Group (in all servers)
- BizTalk Server Administrators Group
- BizTalk Application Users Group
- BizTalk Isolated Host Users Group
- SSO Administrators Group
- IIS_IUSRS group
In addition, SELECT permission need to be granted to BizTalk Admin Role for few tables in BizTalkMgmtDb using the below script:
GRANT SELECT ON dbo.adm_OtherDatabases TO BTS_ADMIN_USERS GRANT SELECT ON dbo.adm_Server2HostMapping TO BTS_ADMIN_USERS GRANT SELECT ON dbo.adm_ServiceClass TO BTS_ADMIN_USERS GRANT SELECT ON dbo.BizTalkDbVersion TO BTS_ADMIN_USERS GRANT SELECT ON dbo.adm_BackupHistory TO BTS_ADMIN_USERS GRANT SELECT ON dbo.adm_MessageBox TO BTS_ADMIN_USERS
For BizTalk Server 2013 ONLY (grant access to following two tables):
GRANT SELECT ON dbo.bts_dynamicport_subids TO BTS_ADMIN_USERS GRANT SELECT ON dbo.bts_dynamic_sendport_handlers TO BTS_ADMIN_USERS SELECT permission required for BTS_ADMIN_USERS ON msdb.dbo.SysSchedules (for backup/DR visualizer to work properly)
Please run the MSI from an Administrator Command Prompt
For further prerequisites, you can also consult the Prerequisites section.
Installing BizTalk360 - What are the options
One of the common questions that customers raise to us is about the various deployment choices for BizTalk360. This is one of the common questions we have seen recently on our customer engagements. Here are the options:
- option 1 - Installation on the BizTalk Server environment
- option 2 - Installation on a stand-alone server
Option 1 - Installation on the BizTalk Server environment
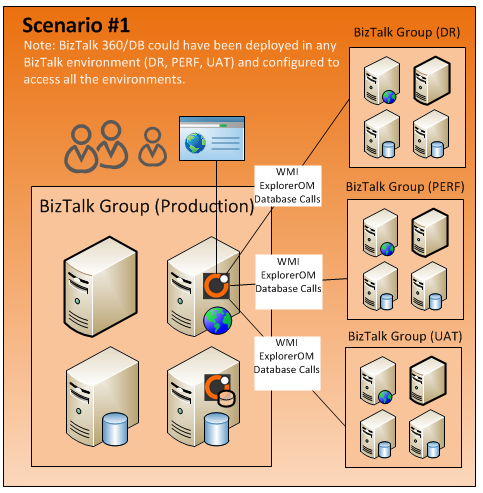
You can install BizTalk360 in one of the BizTalk Server environments (production, non-production etc) and configure all the environments using the administration module. The user can then access BizTalk360 via a URL (something like http://production/biztalk360) and access all the configured environments. The super user will have the ability to assign various fine-grained authorization to the users for various environments using User Access Policies which can be found in the Settings screen.
Option 2 - installation on a stand-alone server
This is another common scenario where customers don’t want to install any third party products like BizTalk360 directly on their production environment. BizTalk360 supports this scenario by allowing customers to install BizTalk360 on a standalone server and point to various environments. In this case, customers need to install BizTalk administration components (only) in the standalone server.

Migration And Deployment Best Practices
A couple of Best practices apply:
- Best Practice #1 - Take a backup of the BizTalk360 database
- Best Practice #2 - Do not add all your BizTalk environments in the same BizTalk360 instance
Best Practice #1 - Take a backup of the BizTalk360 database
Before you start upgrading BizTalk360 to the latest version, you always take a backup of the 'BizTalk360' database. This is just a best practice and it will come handy if something goes wrong and you want to roll back to the previous version.
Best Practice #2 - Do not add all your BizTalk environments in the same BizTalk360 instance
BizTalk360 allows you to configure and manage multiple BizTalk environments (Production, SIT, UAT, etc.) from a single place with one instance of BizTalk360. As a best practice, we recommend customers not to add all the BizTalk environments to single instance and instead group them logically. Example: Production/Disaster Recovery can be in one instance. Important QA environments like Staging/UAT can be in one instance, and non-important environments like Development testing, Integration testing etc can be in another.
BizTalk360 is designed as a central monitoring solution, rather than agent based solution. There are pros and cons in having a central monitoring solution. One of the great advantage of having a central monitoring solution is that you do not need to install any additional agents in your important servers, and also it avoid the whole complexity of managing the agents, agents doing duplicate work etc. On the negative side, you need to watch out for scalability. The way we scale BizTalk360 is by installing multiple instances of BizTalk360 for different environments. Hence it's also important you do not add all your available BizTalk environments to a single installation of BizTalk360.
Installing BizTalk360 On A BizTalk Server
This section explains how to install and configure BizTalk360 in a server on which Microsoft BizTalk Server is installed. You can download the latest version installer of BizTalk360 from http://www.biztalk360.com/free-trial/.You must enter the registration information in the form before downloading the BizTalk360 MSI.
- Start a Command Prompt with 'Run as Administrator'
- Use the CD command to navigate to the drive/folder where the BizTalk360 MSI file is saved

- Execute the BizTalk360 MSI
- In the Welcome to BizTalk360 Setup Wizard screen, click ‘Next’ to continue
- Read the End User License Agreement and select ‘I accept the terms in the License Agreement’ to accept the license agreement. Click 'Next'
- In the Prerequisite Checks screen, check whether all the prerequisites have been verified and a green tick mark is placed next to every item. If something is wrong, please cancel the setup, correct the errors, and rerun the setup. If everything is correct, click 'Next' to proceed to the next step

- In the IIS Virtual Directory Settings page, select the IIS website where you want to create the virtual directory. Enter the application pool settings such as Name, username, and password. Once you have entered the information, click 'Next' to proceed further. Make sure the user is a part of the local groups (refer the Prerequisites section)
- In the Access for creating BizTalk360 Database screen page, specify the SQL Server Name and Database name. You have the option to test whether the connection to the database is successful. (As a best practice, leave this section with the default values). Click 'Next' to proceed to the next screen
- BizTalk360, allows users to install Biztalk360 with Azure database. In the case of using Azure database, select SQL Server Authentication option under Authentication Mode and enter the Username and Password

- In the Custom Setup screen, you can pretty much leave everything as default. Make sure you select a valid location to save BizTalk360 on your computer. When you do this, also make sure you change the Website and Windows service component information as changing one will not automatically change the other. Once ready, click 'Next' for the final installation verification step.

Review the information and click ‘Install’ to start the installation process. Once the installation is complete (it takes about 1-2 minutes), click 'Finish' to complete the process
Verifying The Installation
Once you have completed the installation process, and if everything went well, the installation wizard will open BizTalk360 application in a browser (http://localhost/BizTalk360) and you will see a screen as below.

If you do not see the page as above, kindly refer the Troubleshooting sections.
Activating the License Key
When BizTalk360 is installed, a default environment gets created in BizTalk360 (with the same name as the SQL server instance). The administrators need to Activate the license for the environment, click here to understand the BizTalk360 License Management. Once the new key is applied, the license will change to appropriate license type.
To activate the license key, you need to follow the below steps:
- Navigate to ‘Settings’ page from the BizTalk360 Dashboard page
- Click ‘Licenses’ from the left menu
- Select the check box against the environment name and click ‘Activate’ button
- Enter the Order Number, License code and other fields
- Click ‘Activate’ to activate the license information for the selected environment
For more details on licensing, check this section.
Installing BizTalk360 On A Stand-Alone (non-BizTalk) Server
Installing BizTalk360 on one of the existing BizTalk servers is a straight forward task. Most of the prerequisites will be present and you can simply run the MSI file from a Administrator command prompt. But some customers prefer to install BizTalk360 on a standalone server and point to various remote environments. This gives them bit of confidence since nothing gets installed on the production BizTalk servers. BizTalk360 doesn't use any agents, so there won’t be any footprint on the real BizTalk servers. The only requirement is for the service account to have adequate permission to query the remote servers. In this article we will cover in detail the steps required to install BizTalk360 on a stand-alone (non BizTalk) server.
To understand the setup process, let us start from a clean setup of Windows Server 2008 R2. You can download the latest version of BizTalk360 MSI file from the website http://www.biztalk360.com/free-trial/. You must enter the registration information in the form before downloading the BizTalk360 MSI.
- Start a Command Prompt with 'Run as Administrator'
- Use the CD command to navigate to the drive/folder where the BizTalk360 MSI file is saved
(1).png)
Install .NET 4.5.1
To install .NET 4.5.1 on your server, follow the steps as shown below:
- Open the Server Manager interface. Select Features from the left menu, and click Add Features. This displays the list of features.
- In the Select Features interface, expand .NET Framework 4.5.1 Features
- Once you expand .NET Framework 4.5.1 Features, you will see two check boxes. One for .NET Framework 4.5.1 and other for WCF Activation. Select the check box next to .NET Framework 4.5.1 and click Next.
- Click 'Install' in the Confirmation page. You will see the installation progress
- Click 'Close' to close the wizard once the framework has been installed
Add IIS Roles
Once you have set up the .NET 4.5.1 Framework, the next step is to install IIS (Web Server) and the required modules to support running BizTalk360. To install IIS, follow the steps as shown below:
- Open the Server Manager interface. Select Roles from the left menu, and click Add Roles. Click 'Next' in the Before You Begin screen
- Select Web Server from the list and click Next
- On the Role Services screen, select ASP.NET. This will bring a new popup window to resolve the dependencies as shown below. Click on Add Required Role Services
- Select the following Role Services in addition to the default ones already selected — Security > Basic Authentication, Windows Authentication, Complete IIS 7 Management Compatibility (select all the items in the list)
- Click 'Install' in the Confirmation screen
- Click 'Close' to close the wizard once the roles have been set up
- Once you have done Step 2 and Step 3, try to run the BizTalk360 Installer MSI once again. In the prerequisite checks section, you will notice that now most of the items will be verified and have the green tick mark against them. The only one item that will have the Red Error mark is Supported BizTalk servers (2006 R2, 2009, 2010, 2010 R2). To resolve this issue, you need to install the BizTalk server in your server.
Installing BizTalk Administration Components
To resolve the issue mentioned above, run the original BizTalk Server installation Setup.exe file. On the component selection screen, just select Administration Tools and Monitoring section. As you can witness, you don’t need to install any other components of BizTalk server. Make sure you install the correct version of BizTalk administration components. Ex: If you are going to monitor a remote BizTalk 2016 environment, then you need to install BizTalk Server 2016 administration components.
If the WCF under Administration Tools & Monitoring is greyed out, you need to go to Windows Features to select the checkbox against the WCF services under the .NET Framework and click OK.
Service Account Requirement
Once all the prerequisite validations are over, run the MSI again. On the IIS virtual directory screen, you’ll be able to provide the IIS application pool name and the identity. You need to provide a domain account, since you are going to access a remote environment. The service account should have adequate rights to access the remote environment. Click here to know how to set up the following prerequisites on your server environment.
Once you have made the prerequisite settings, in addition, make sure the service account is having “Log on as Service” rights in the server where you are installing BizTalk360. Use the same domain account when configuring the monitoring services screen.
If you encounter the following error during installation, click on “Ignore” button, we can start the service later via the services snap in.

Launching BizTalk360 For The First Time
After successful installation, when you launch BizTalk360 for the first time, you may see an error message as follows:
Unable to access the selected environment. If you have installed BizTalk360 on a standalone server, where BizTalk server is not configured you will receive this error. You can correct this by updating the environment details and activating the license.
Click here to read the steps involved in activating a commercial license.
How To Install Just The BizTalk360 Monitoring Service
In BizTalk360, the monitoring service plays the key role as it is responsible to fetch the status of artefacts from the BizTalk server.
Installing BizTalk360 monitoring service on the BizTalk servers is a straight forward task. It is same like installing BizTalk360 MSI file from an Administrator command prompt. Follow the steps as shown below to install the monitoring service alone:
- Run Command prompt in the "Run As Administrator" mode
- Use the CD command to navigate to the drive/folder where the BizTalk360 MSI file is saved
- Execute the MSI from an Administrator Command Prompt
- In the Welcome to BizTalk360 Setup Wizard screen, click ‘Next’ to continue
- Read the End User License Agreement and select ‘I accept the terms in the License Agreement’ to accept the license agreement. Click 'Next'.
- In the Prerequisite Checks screen, check whether all the prerequisites have been verified and a green tick mark is placed next to every item. If something is wrong, please cancel the setup, correct the errors, and rerun the setup. If everything is correct, click 'Next' to proceed to the next step.
- In the IIS Virtual Directory Settings page, select the IIS website where you want to create the virtual directory. Enter the application pool settings such as Name, username, and password. Once you have entered the information, click 'Next' to proceed further. Make sure the user is a part of the local groups (refer the Prerequisites section).
- In the 'Access for creating BizTalk360 Database screen' page, specify the SQL Server Name and Database name. You have the option to test whether the connection to the database is successful. Click 'Next' to proceed to the next screen
- In the Custom Setup screen, deselect BizTalk360 Website, BizTalk Analytics Service and BizTalk360 Database options by selecting "Entire feature will be unavailable", then click 'Next' for the final installation verification step
- Review the information and click ‘Install’ to start the installation process. Once the installation is complete (it takes about 1-2 minutes), click to complete the process.

How To Install Just The BizTalk360 Analytics Service
Installing BizTalk360 analytics service on the BizTalk servers is a straight forward task. It is the same like installing BizTalk360 MSI file from an Administrator command prompt. Follow the steps as shown below to install the analytics service alone
- Run Command prompt in the "Run As Administrator" mode
- Use the CD command to navigate to the drive/folder where the BizTalk360 MSI file is saved
- Execute the MSI
- In the Welcome to BizTalk360 Setup Wizard screen, click ‘Next’ to continue
- Read the End User License Agreement and select ‘I accept the terms in the License Agreement’ to accept the license agreement. Click 'Next'.
- In the Prerequisite Checks screen, check whether all the prerequisites have been verified and a green tick mark is placed next to every item. If something is wrong, please cancel the setup, correct the errors, and rerun the setup. If everything is correct, click 'Next' to proceed to the next step.
- In the IIS Virtual Directory Settings page, select the IIS website where you want to create the virtual directory. Enter the application pool settings such as Name, username, and password. Once you have entered the information, click 'Next' to proceed further. Make sure the user is a part of the local groups (refer thePrerequisites.
- In the 'Access for creating BizTalk360 Database screen' page, specify the SQL Server Name and Database name. You have the option to test whether the connection to the database is successful. Click 'Next' to proceed to the next screen
- In the Windows Service Settings page, leave the default values and click Next. BizTalk360 uses a background Windows service for certain tasks like creating event log data and persisting in the back end SQL server database, taking care of data purging and so on.
- In the Custom Setup screen, deselect BizTalk360 Website, BizTalk360 Monitoring Service and BizTalk360 Database by selecting "Entire feature will be unavailable", then click 'Next'.

- Review the information and click ‘Install’ to start the installation process. Once the installation is complete (it takes about 1-2 minutes), click 'Finish' to complete the process
Installing BizTalk360 on High Availability BizTalk Servers
Installing BizTalk360 on the single server environment is a straight forward task when the BizTalk server and database are existing in same machine. You can simply run the MSI from the Administrator Command prompt. But in most of the cases, we have seen our customers use BizTalk360 in a High Availability mode where there are at least two BizTalk servers and clustered SQL servers. The prerequisites for installing BizTalk360 in a High Availability network is the same as that of a single server environment. This section explains the detailed steps to install and configure BizTalk360 on a High Availability BizTalk server.
As a first step, you can download the latest version of BizTalk360 MSI file by filling the Registration form on the BizTalk360 Free Trial page. Follow the steps as shown below to perform the installation of BizTalk360 in a High Availability BizTalk server setup.
Installing BizTalk360 On The First Server (say, Server 1)
- Run Command prompt in the "Run As Administrator" mode
- Use the CD command to navigate to the drive/folder where the BizTalk360 MSI file is saved
- Execute the MSI
- In the Welcome to BizTalk360 Setup Wizard screen, click ‘Next’ to continue
- Read the End User License Agreement and select ‘I accept the terms in the License Agreement’ to accept the license agreement. Click ‘Next’.
- In the Prerequisite Checks screen, check whether all the prerequisites have been verified and a green tick mark is placed next to every item. If something is wrong, please cancel the setup, correct the errors, and rerun the setup. If everything is correct, click ‘Next’ to proceed to the next step.
- In the IIS Virtual Directory Settings page, select the IIS website where you want to create the virtual directory. Enter the application pool settings such as Name, username, and password. Once you have entered the information, click ‘Next’ to proceed further. Make sure the user is a part of the local groups (refer the Prerequisites section).
- In the 'Access for creating BizTalk360 Database screen' page, specify the SQL Server Name and Database name. You have the option to test whether the connection to the database is successful. Click ‘Next’ to proceed to the next screen
- In the Custom Setup screen, you can pretty much leave everything as default. Click ‘Next’ for the final installation verification step

Review the information and click ‘Install’ to start the installation process. Once the installation is complete (it takes about 1-2 minutes), click 'Finish' to complete the process.
Installing BizTalk360 On The Second Server (say, Server 2)
- Run Command prompt in the "Run As Administrator" mode
- Use the CD command to navigate to the drive/folder where the BizTalk360 MSI file is saved
- Execute the MSI
- In the Welcome to BizTalk360 Setup Wizard screen, click ‘Next’ to continue
- Read the End User License Agreement and select ‘I accept the terms in the License Agreement’ to accept the license agreement. Click 'Next'.
- In the Prerequisite Checks screen, check whether all the prerequisites have been verified and a green tick mark is placed next to every item. If something is wrong, please cancel the setup, correct the errors, and rerun the setup. If everything is correct, click 'Next' to proceed to the next step.
- In the IIS Virtual Directory Settings page, select the IIS website where you want to create the virtual directory. Enter the application pool settings such as Name, username, and password. Once you have entered the information, click 'Next' to proceed further. Make sure the user is a part of the local groups (refer the Prerequisites section).
- In the 'Access for creating BizTalk360 Database screen' page, specify the SQL Server Name and Database name. You have the option to test whether the connection to the database is successful. Click 'Next' to proceed to the next screen
- In the Custom Setup screen, deselect BizTalk360 Database by selecting Entire feature will be unavailable" and then click 'Next' for the final installation verification step

- Review the information and click ‘Install’ to start the installation process. Once the installation is complete (it takes about 1-2 minutes), click 'Finish' to complete the process.
If you simply want the BizTalk servers in High availability configuration to be monitored and you do not want to host the website in the IIS of other machines, you can just install the monitoring service in the other servers by deselecting both BizTalk360 Website and BizTalk360 Database in 'Custom Setup' page. Click the link to know How to Install BizTalk360 Monitoring service alone..
Uninstalling BizTalk360
You can uninstall BizTalk360 through the following ways:
- From the control panel -> Programs -> Add/Remove program
- From the msi directly by rightclicking on the msi and selecting uninstall
Note:
It is recommended to login to the BizTalk360 server with the BizTalk360 service account for performing install/upgrade/uninstall operations to avoid any permission errors.
Was this article helpful?