FTP, FTPS, SFTP Location
- 02 Nov 2018
- 7 Minutes to read
- Print
- DarkLight
- PDF
FTP, FTPS, SFTP Location
- Updated on 02 Nov 2018
- 7 Minutes to read
- Print
- DarkLight
- PDF
Article Summary
Share feedback
Thanks for sharing your feedback!
In this article the following topics are discussed:
- Setting up FTP Monitoring
- Setting up SFTP Monitoring
Setting up FTP Monitoring
We will have a detailed look at configuring FTP monitoring in BizTalk360. The scenarios for FTP (File Transfer Protocol) monitoring are:
- FTP with password authentication
- FTP with anonymous authentication (without username/password)
- FTP with SSL (Secure Socket Layer protection) enabled
- With explicit SSL
- With implicit SSL
- With a proxy server running. Our application can use default proxy settings which is given in “Settings -> Gateway/Proxy settings” or can the user can manually type in the details
FTP with password authentication
- Log into BizTalk360 application
- Click the Monitoring tab in the navigation bar
- Click the expand button in the Manage Mapping section
- Select the Alarm name (see Creating an alarm) from the drop down, which you would like to associate the FTP location for monitoring
- Click File Locations (File, FTP, SFTP) tab . You can see three tabs each containing port details of their respective adapters, which are File, FTP, and SFTP.
- Click FTP to monitor FTP locations

- The port(s) (Send port or Receive port) created in BizTalk admin console it will be displayed in a grid with a gear icon in the config column
- Click the Gear icon to open the FTP Details blade to enter the password for the FTP location and click Next
- If the username and password columns are blank, it will be considered as anonymous authentication. The user can adjust the Connection Timeout settings between 5 to 300 seconds in BizTalk360.
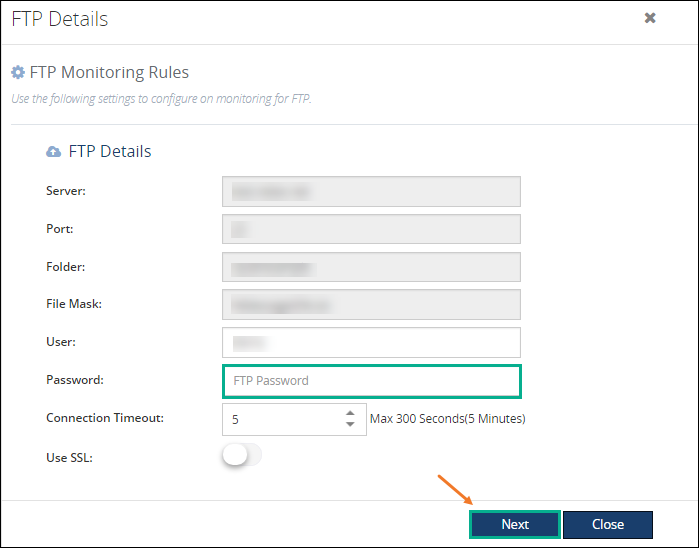
- Toggle on Use SSL option for choosing between Explicit or Implicit SSL


- In the Firewall settings blade, Choose the Mode (Active or Passive) and Type (Socks_4 and Socks_5)
- The user can fill in gateway proxy details or just leave it as blank. If the user wants to use default proxy configuration given in “Settings -> Gateway/Proxy settings”, the user can click “Use Gateway Proxy” option
- In the FTP monitoring configurations section, the user can add conditions like trigger warning or error based on the file count in the target server
- Click Save Configurations button to complete the process
- If the username and password are valid the server will respond with the number of files with the file mask
- If the credentials are wrong, then the server will respond with an error code and details. This will be displayed in the name column with a small orange icon, and when you hover over it, it will show the error occurred during the connection
The Count and the Directory Size will be displayed in the Alarm - File Location grid, only after the successful configuration of the FTP location. The values of the Count and Directory Size columns depend on the File Mask
The FTP location will be moved to orphaned if the configuration is not successful
FTP with Implicit or Explicit
- Log into BizTalk360 application
- Click the Monitoring tab in the navigation bar
- Click the expand button in the Manage Mapping section
- Click File Locations (File, FTP, SFTP) tab . You can see three tabs each containing port details of their respective adapters, which are File, FTP, and SFTP
- Select the Alarm name (see Creating an alarm) from the drop down, which you would like to associate the FTP location for monitoring
- Click FTP to monitor FTP locations
- The port(s) (Send port or Receive port) created in BizTalk admin console it will be displayed in a grid with a gear icon in the config column
- Click the Gear icon to open the FTP Details blade to enter the password for the FTP location. If the password section is not enabled, then Use SSL toggle button and select “implicit” or “explicit” option and click Next
- If the username and password columns are blank, it will be considered as anonymous authentication

- In the next blade, the user can fill in gateway proxy details or just leave it as blank. If the user wants to use default proxy configuration given in “Settings -> Gateway/Proxy settings”, the user should click “Use Gateway Proxy” option
- In the FTP monitoring configurations section, the user can add conditions like trigger warning or error based on the file count in the target server
- Click Save Configurations button to complete the process
- If the username and password are valid the server will respond with the number of files with the file mask
- If the credentials are wrong, then the server will respond with an error code and details. This will be displayed in the name column with a small orange icon, and when you hover over it, it will show the error occurred during the connection
Setup SFTP Monitoring
The scenarios for SFTP (Secure Shell File Transfer Protocol) monitoring are:
- SFTP with password authentication
- SFTP with public key authentication
- The above scenarios with a proxy server running. BizTalk360 can use default proxy settings which are given in “Settings -> Gateway/Proxy settings” or can manually enter in the details
SFTP with password authentication
- Log into BizTalk360 application
- Click the Monitoring tab in the navigation bar
- Click the expand button in the Manage Mapping section
- Click File Locations (File, FTP, SFTP) tab. You can see three tabs each containing port details of their respective adapters, which are File, FTP, and SFTP.
- Select the Alarm name (see Creating an alarm) from the drop down, which you would like to associate the SFTP location for monitoring
- Click SFTP to monitor SFTP locations

- The port(s) (Send port or Receive port) created in BizTalk admin console it will be displayed in a grid with a gear icon in the config column. Click the Gear icon to open the SFTP Details blade to enter the password for the SFTP location and click Next

- If the username and password columns are blank, it will be considered as anonymous authentication. The user can adjust the Connection Timeout settings between 5 to 300 seconds in BizTalk360.
- In the next blade, the user can fill in gateway proxy details or just leave it as blank. If the user wants to use default proxy configuration given in “Settings -> Gateway/Proxy settings”, the user can click “Use Gateway Proxy” option.
- The adapter properties which is configured in BizTalk admin console will appear in the blade under Security details. The user must enter the password in this blade

- The user has the option to set the condition “Accept Any SSH key”. If the toggle button is green, then the user doesn’t need to fill the “SSH Server Host Key Finger Print” box. If the button is white or off, then the box “SSH Server Host Key Finger Print” needs to be filled.
- In the SFTP monitoring configurations section, the user can add conditions like trigger warning or error based on the file count in the target server

- Click Save Configurations button to complete the process
The Count and the Directory Size will be displayed in the Alarm - File Location grid only after the successful configuration of the SFTP location. The values of the Count and Directory Size depend on the File Mask
The SFTP location will be moved to orphaned if the configuration is not successful
- If the username and password are valid the server will respond with the number of files with the file mask
- If the credentials are wrong, then the server will respond with an error code and details. This will be displayed in the name column with a small orange icon, and when you hover over it, it will show the error occurred during the connection
SFTP with public key authentication
- Log into BizTalk360 application
- Click the Monitoring tab in the navigation bar
- Click the expand button in the Manage Mapping section
- Click File Locations (File, FTP, SFTP) tab . You can see three tabs each containing port details of their respective adapters, which are File, FTP, and SFTP
- Select the Alarm name (see Creating an alarm) from the drop down, which you would like to associate the SFTP location for monitoring
- Click SFTP to monitor SFTP locations
- The port(s) (Send port or Receive port) created in BizTalk admin console it will be displayed in a grid with a gear icon in the config column. Click the Gear icon to open the SFTP Details blade to enter the password for the SFTP location and click Next
- If the username and password columns are blank, it will be considered as anonymous authentication.
- In the next blade, the user can fill in gateway proxy details or just leave it as blank. If the user wants to use default proxy configuration given in “Settings -> Gateway/Proxy settings”, the user can click “Use Gateway Proxy” option.
- The user has the option to set the condition “Accept Any SSH key”. If the toggle button is green, then the user doesn’t need to fill the “SSH Server Host Key Finger Print” box. If the button is white or off, then the box “SSH Server Host Key Finger Print” need to be filled.
- In the SFTP monitoring configurations section, the user can select Client Authentication Mode as Public Key Authentication and enter other details

- Click the Save Configurations button to complete the process
- If the username and password are valid, the server will respond with the number of files with the file mask
- If the credentials are wrong, then the server will respond with an error code and details. This will be displayed in the name column with a small orange icon, and when you hover over it, it will show the error occurred during the connection
Was this article helpful?