In BizTalk360, alarms are essential components for effective monitoring. They act as comprehensive packages containing all necessary configurations and settings required to monitor various aspects of BizTalk applications.
For instance, you may need to monitor multiple artifacts across several BizTalk applications together at the same time. Alarms help you to achieve this objective. While creating the alarm, you can also configure how you want to receive the alerts, by configuring one or more of the available Notification channels, like e-mail, SMS, Slack, ServiceNow, and so on.
Alarm Type
In BizTalk360, at the top level there are 3 main types of alarms you can create:
- Threshold violation alarms - Trigger an alert when a condition is violated, for example, a disabled Receive Location.
- Health Check Notification alarms - used for scheduled Health/Status check. Say , you can create health check alarm to trigger alert everyday 9 AM , to check all the artifacts are up and running before you start your day.
- Data Monitoring alarms - used to set up monitoring against message processing.
Basic settings
To create an alarm in BizTalk360, you need to follow the steps below:
- Log in to the BizTalk360 application as a Super User
- Click 'Monitoring' tab in the Navigation panel on the left side of the screen
- Click 'Manage Alarms' tab
- In the toolbar, click 'New Alarm' and select the alarm type from the drop-down. At the right side of the screen, the ‘Alarm - Basic’ pane appears
.png)
- Alarm Name – A descriptive name of the alarm
- Description – A detailed description of the purpose of this alarm
- Disable Alarm for Maintenance – This allows you to temporarily disable the alarm. As long as the alarm is disabled, you won’t receive notifications
Notification Settings:
- Notification Priority - Notification priority-enabled alarms are essential for alerting administrators to critical issues in real-time. These alarms highlight urgent situations that require immediate attention. When setting up a notification priority, users can select from different levels: Critical, Warning, Healthy, and None. When a high-priority alarm is triggered, it ensures prompt notifications through configured email and other notification channels. Conversely, setting the priority to None means the notification is sent without a specific priority. On the manage alarm page, the notification priority is displayed with an icon, and users can easily change the priority by selecting the desired level from a dropdown menu. This feature allows for quick adjustments to priority levels based on the urgency and severity of the situation.
- Email ids – The email addresses which need to receive the email notifications.
- Email Template – Select one of the available templates
- Configure Email Template – By clicking on this button, you will be redirected to a screen where you can create new, make changes to or delete existing Email templates
- Custom Notification Channels – Besides receiving notifications by email, you can receive notifications by other channels. Configure them here, to receive notifications from this alarm
- Next – Navigates you to the following screen. It has the following fields:
- Log events to Event Viewer – Select if you want to write events from this alarm to the Event Log. If the Event Log option is enabled, Down and Up alert notifications are written to the BizTalk360 Monitor source in the Application Log.
- EventId – Once the previous field is selected, this field is enabled, and a numeric value is required. When a notification from the alarm becomes sent, also an Event Log entry is written in the Application Log, with the EventId configured here
- Enable Test Mode – Select this field to run this alarm once per minute. If applicable, notifications will be sent.
- Previous – Navigates back to the previous screen
- OK – Stores the alarm in the BizTalk360 database
Enter/select any of the optional fields and click OK to save the alarm.
Threshold Alarm Configuration
You need to follow the steps below to set up threshold-based monitoring:
- Follow the steps as mentioned in the Basic Settings section in this article
- Turn on the 'Alert on threshold violation' option. If you do not turn it on, you will not be able to make any threshold violation settings.
Monitoring the number of suspended instances in a critical BizTalk application is important for maintaining smooth performance. By setting up a threshold alarm, users can establish a limit for the number of suspended instances the application can handle effectively. If this limit is exceeded, the alarm notifies the users immediately to investigate and resolve any issues raised in their environment promptly.
- Violation Persistence: You can set the duration after which you want to receive notifications in case of a violation. For instance, you must receive notifications if the violation persists for 10 minutes. This avoids sending notifications too quickly as the violations may quickly resolve and return back to the normal state.
- Limit the number of notifications per exception: You can set the number of alerts you wish to receive per violation, say, 3 alerts per violation with an interval of 10 minutes between every notification. This will avoid getting an indefinite number of notifications and annoying the users.

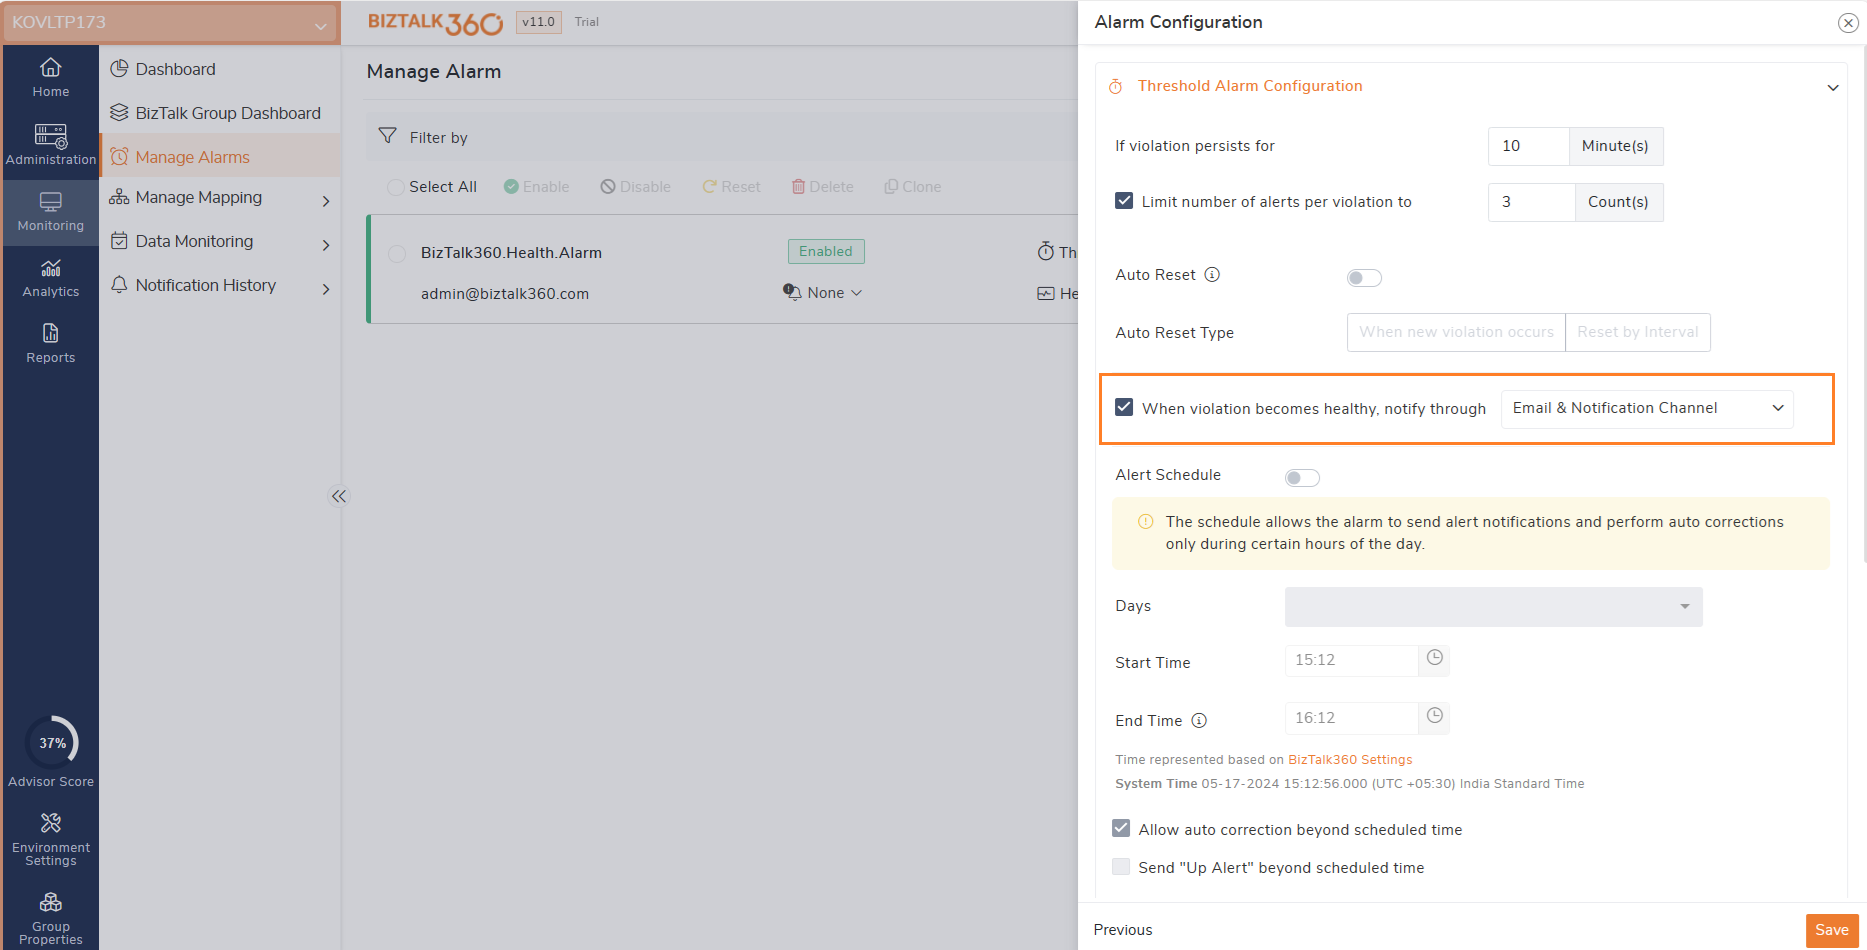
- Back to Normal Notification: The up alert will be sent once the alarm mappings become healthy along with the details of resolved issues. So that you don't have to revisit the down alerts. You can configure that up alert can be sent to email & Notification channel or email only. These alerts would offer you a deeper understanding of the changes made. kkBy including this information, you can gain insights into the corrections or updates.
- Auto Reset: Users can enable the "Auto reset" option if they want the alarm to reset automatically. Users can select to reset it either "by a specified time interval" or "when a new violation occurs."BizTalk360 provides an option to limit the number of alerts sent for a specific alarm, preventing an endless stream of alerts for the same violation.
In case, when there is any suspended message in BizTalk for the Orchestration. This sends 3 Down alert email for the instance suspended in BizTalk in the interval of 10mins. When another orchestration instance suspended after 30mins of down alerts, there is no further alerts being sent because it's reached to the maximum limit 3. In this situation you can utilize the alarm auto reset that is another main functionality helps to reset the alarm once the specified notification limit is reached. So, the alarm will be reset either by "new violation" or "by mentioned time interval".
To address this limitation, users can enable the alarm auto-reset option. This option allows the alarm to reset automatically once the specified limit is reached, preventing alarm exhaustion. Users can enable auto-reset using two options. Users can choose either "When new violation occurs" or "Reset by interval".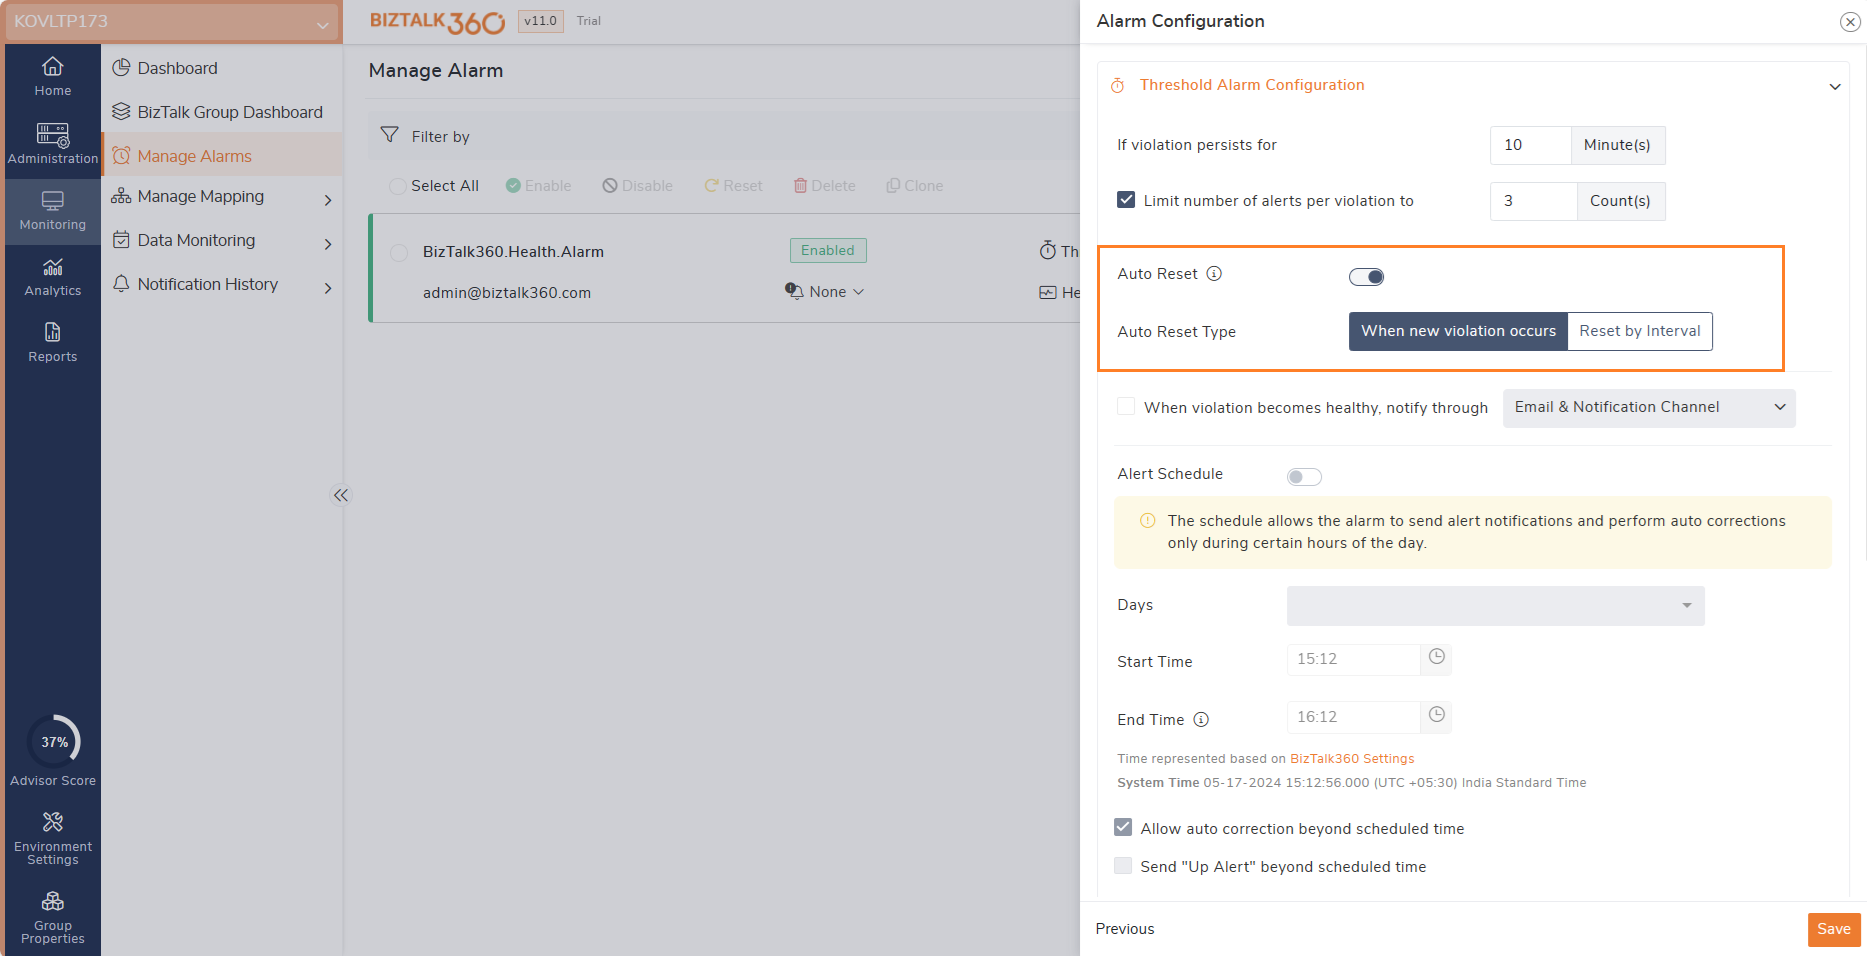
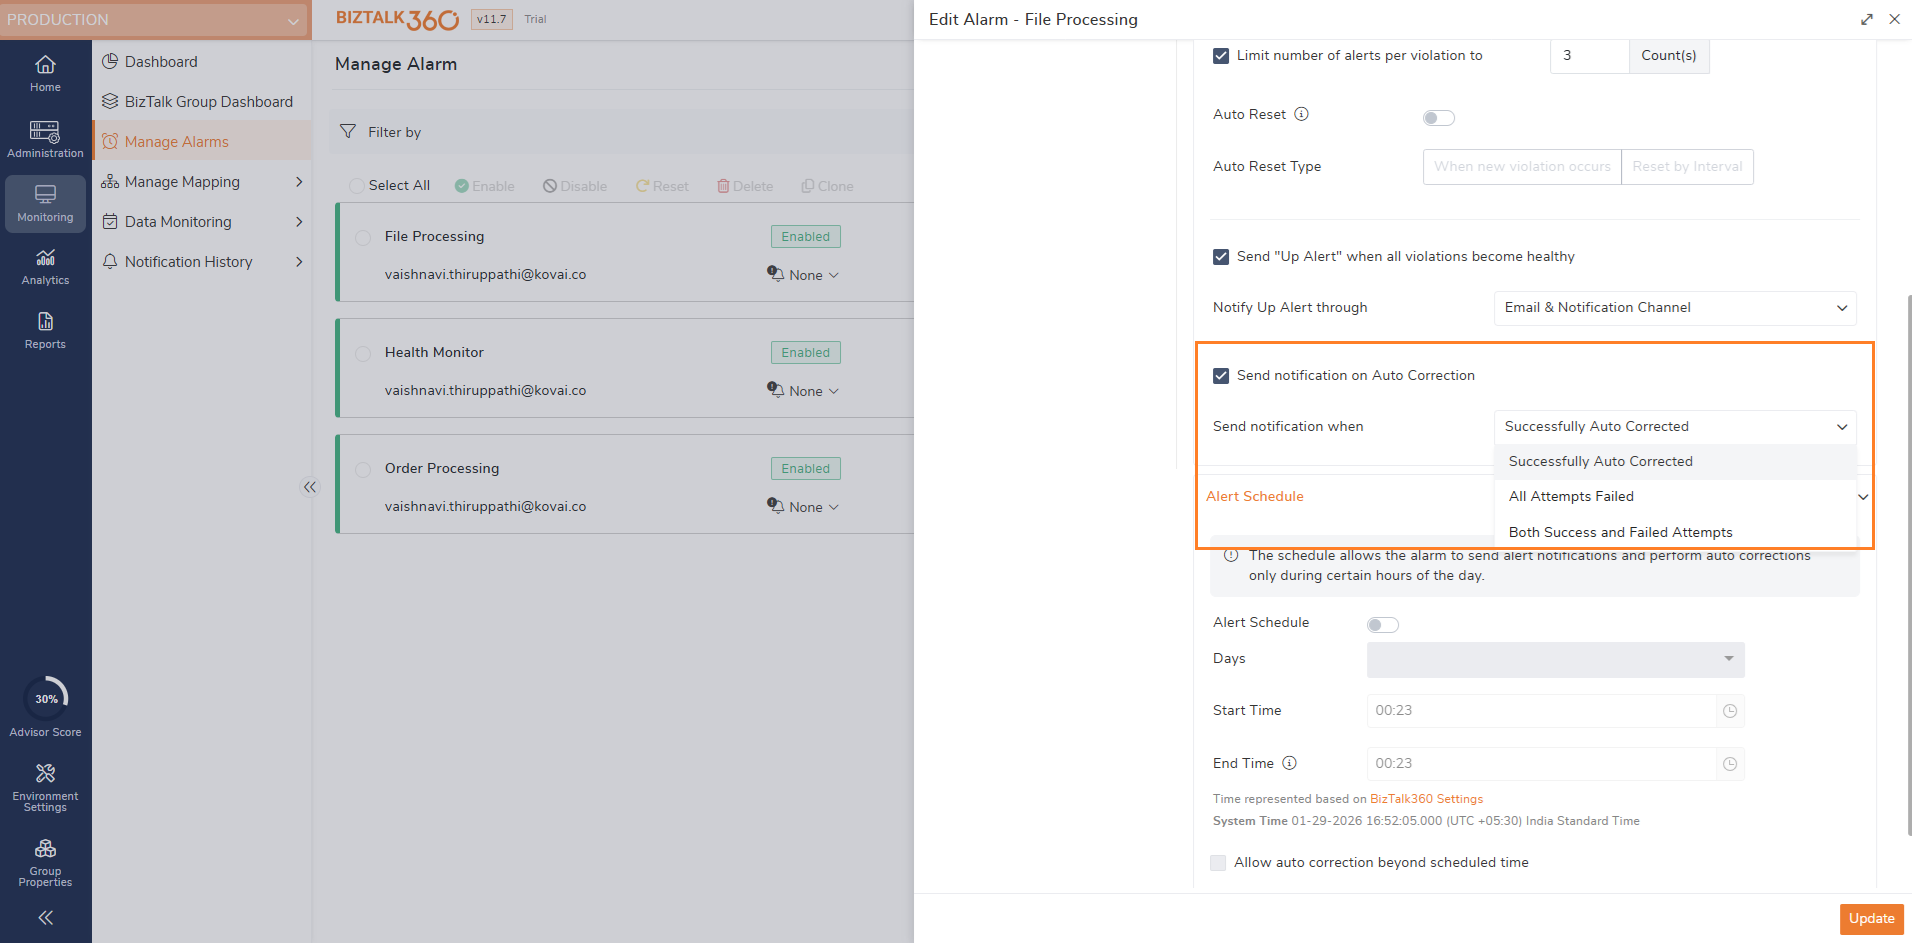
- Send Notification on Auto Correct - The Auto Correction Notification setting allows users to control when alerts are sent for auto-correction actions executed by an alarm. When this option is enabled, notifications will be triggered based on the selected condition in the Send notification dropdown.
- Successfully Auto Corrected - Sends a notification only when the auto-correction action taken successfully.
- All Attempts Failed - Sends a notification only if all configured auto-correction attempts fail.
- Both Success and Failed Attempts - Sends notifications for both successful auto-corrections and failed attempts.
- Alert Schedule: In the "Alert schedule" section, users can activate the toggle if they want the threshold alert to activate only on certain days and within specific time intervals.You can configure threshold alarms with an alert schedule to control when you want to be notified of threshold violations. This feature allows you to set specific days and times when the alerts should be active and when they should remain silent. This way, you can avoid receiving notifications during non-business hours or when they are not needed.
For instance, when you do not want to be notified of threshold violation all day and have a bunch of notifications. You can configure the alert schedule for only during specific times on days (Monday-Friday, between 09:00 and 17:00), If you want to monitor between specific business hours and you enter a Start Time, BizTalk360 automatically sets the End Time to one hour later than the Start time.
Adding to that, we have a customized option like if you want to receive the auto-correct and up alerts beyond the scheduled time. This can be beneficial for users who prefer to stay updated and receive immediate alerts whenever there are changes available.
Think of a scenario, where you configured for threshold alert schedule only on business hours 9-5 pm and an error occurs at 3 pm and gets down alerts. The error may get fixed by 6 pm, and you won't be getting up alert instantly.
In this case, by enabling the "Send up alert beyond the schedule" option. You will be notified immediately when things become normal even out of schedule timing as well.We have another powerful feature "Auto Correct", You can enable it to make things as expected(normal) by BizTalk360(monitoring service) itself. By enabling the "Send Auto correct alert beyond the schedule" option. You will be notified immediately when things become normal even out of schedule timing as well.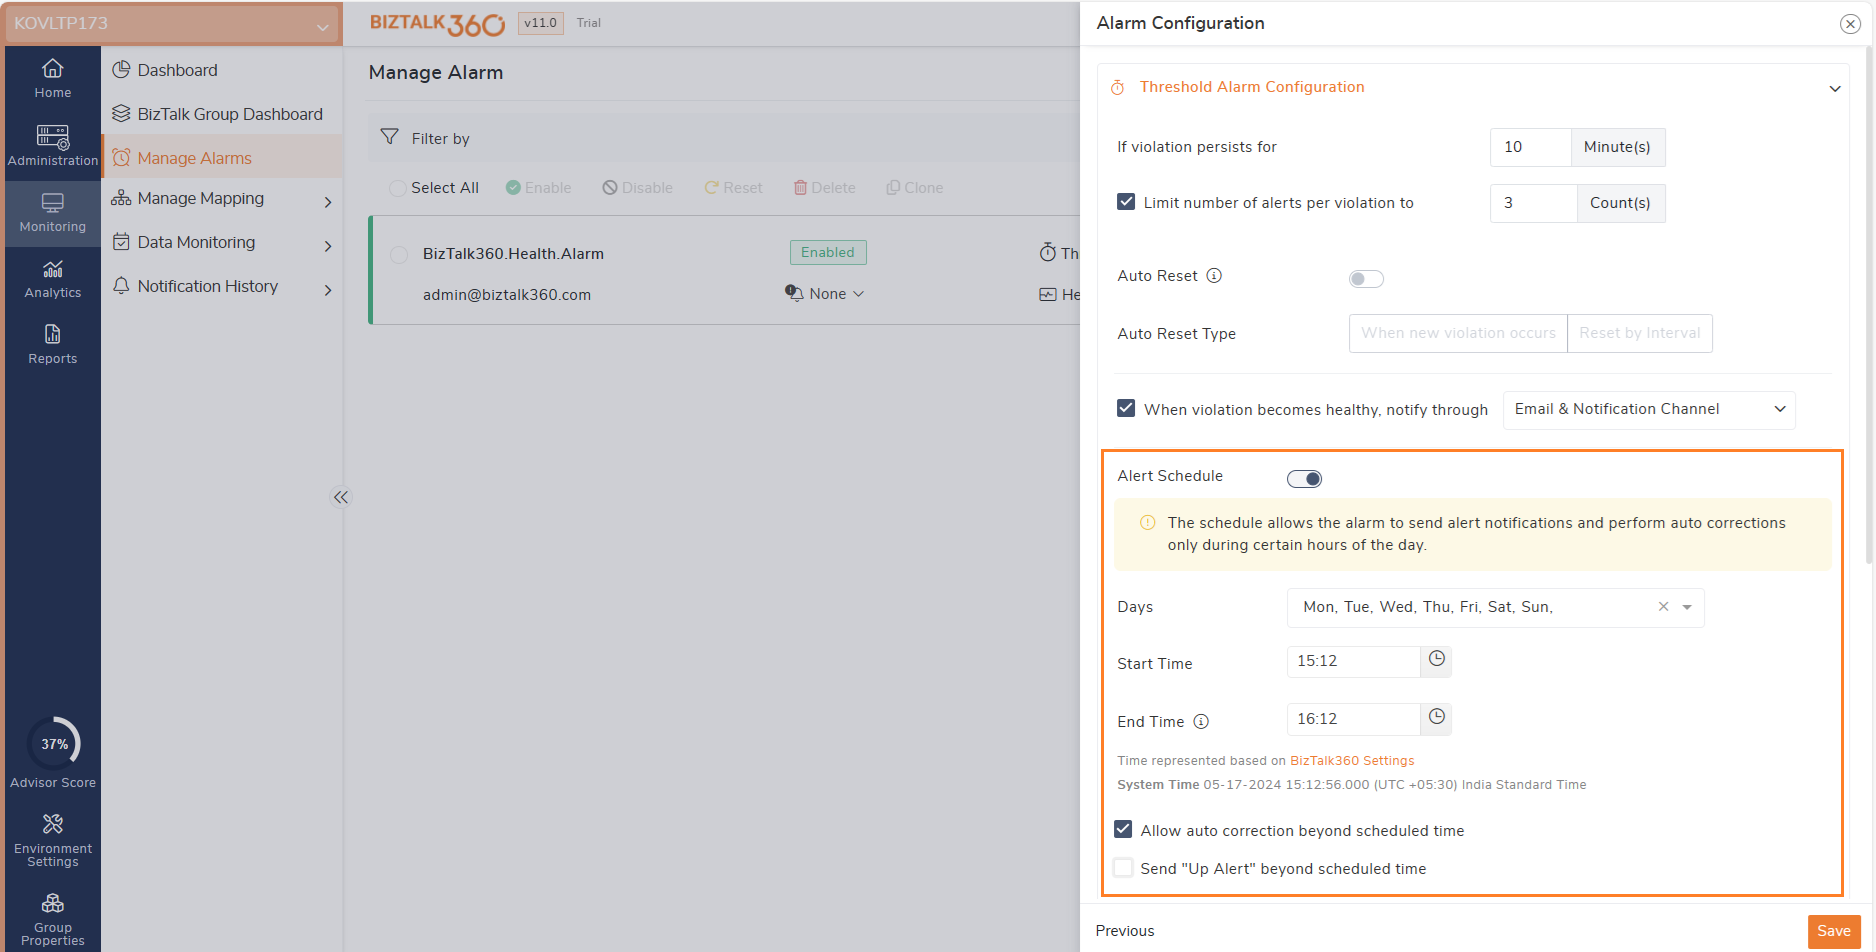
- Finally, click "OK" to save the alarm.
Data Monitoring Alarm configuration
Data Monitoring alarms in BizTalk360 allow users to automate monitoring for different aspects of BizTalk Server and related components. Along with manual search capabilities, users can monitor various data points and activities using these alarms.
BizTalk360 provides several query builders for various purposes. For instance, users can use them to search the Message Box database for running and suspended service instances, track Tracked Service Instances and Tracked Message Events, query BAM views, conduct EDI activity searches, and filter ESB exceptions.
Setting up a Data Monitoring Alarm in BizTalk360 is a great way to ensure the smooth functioning of user's data processes and to promptly address any issues that may arise. Here's how users can set it up:
- Follow the steps as mentioned in the 'Basic Settings' section in this article
- On the Alarm - Data Monitoring page, select the check box 'Use this alarm for Data Monitor Alerts' if you wish to associate the current alarm with Data Monitors
- Select the check box 'Notify on Success as well' to receive success email alerts for the configured Data Monitors. If you do not choose the second check box, you will only receive email alerts in case the expected data load did not take place.
- Enable the 'Turn off notification for action taken schedules' toggle to stop sending alerts for message box schedules that automatically resume, suspend, or terminate instances.
Health Check alarm configuration
The Health Check Notification Alarms feature in BizTalk360 Monitoring stands out as one of its most valuable assets. By configuring these alarms within their business environment, users can effectively monitor the overall health status of artifacts associated with their BizTalk environments. This feature grants users the flexibility to tailor alarms to execute at specific days and times according to their operational requirements.
For instance, users can opt to schedule alarms exclusively for weekends or set them to run daily at designated times. BizTalk360 automates the triggering of these health check alarms as per the configured schedule. Should any issues meet the alarm criteria, notifications are generated based on the severity level predefined by users. This ensures that users promptly receive alerts containing a concise summary of the health status of all configured artifacts within their BizTalk environments.
By setting up regular health check notification alarms, users or support personnel can promptly identify issues in the BizTalk environment and address them on a periodic basis. This ensures smooth operations within the business, and it avoids the risk of business downtime or failures. By setting up Health check alarms, users can address any issues raised and ensure optimal performance of systems and processes.
To receive scheduled Health Monitoring notifications, you can set up a Health Monitoring alert. The steps below explain how that is done:
- Follow the steps as mentioned in the 'Basic Settings' section in this article
- On the 'Alarm - Health' page you can choose the days and times when you want to receive a periodic update about the health of the components that are monitored in this alarm
- You can either click 'OK' or Click 'Next' to move to the last screen to add Advanced Settings like SMS configuration, HPOM configuration, etc.
The alarm will be created and you will be redirected to the Manage Alarms page. The Manage Alarms page will list the alarms that have been created for the environment
Consolidated Alarm configuration
If users require detailed monitoring of a specific receive location, including tracking transferred file counts and ensuring the overall health of associated alarms, Consolidated Alarms in BizTalk360 is the ideal solution. This feature provides comprehensive alerts: threshold alerts notify users when configured thresholds are violated, data monitoring alerts detect issues in message processes, and regular alerts indicate the health status of mapped artifacts within the alarm.
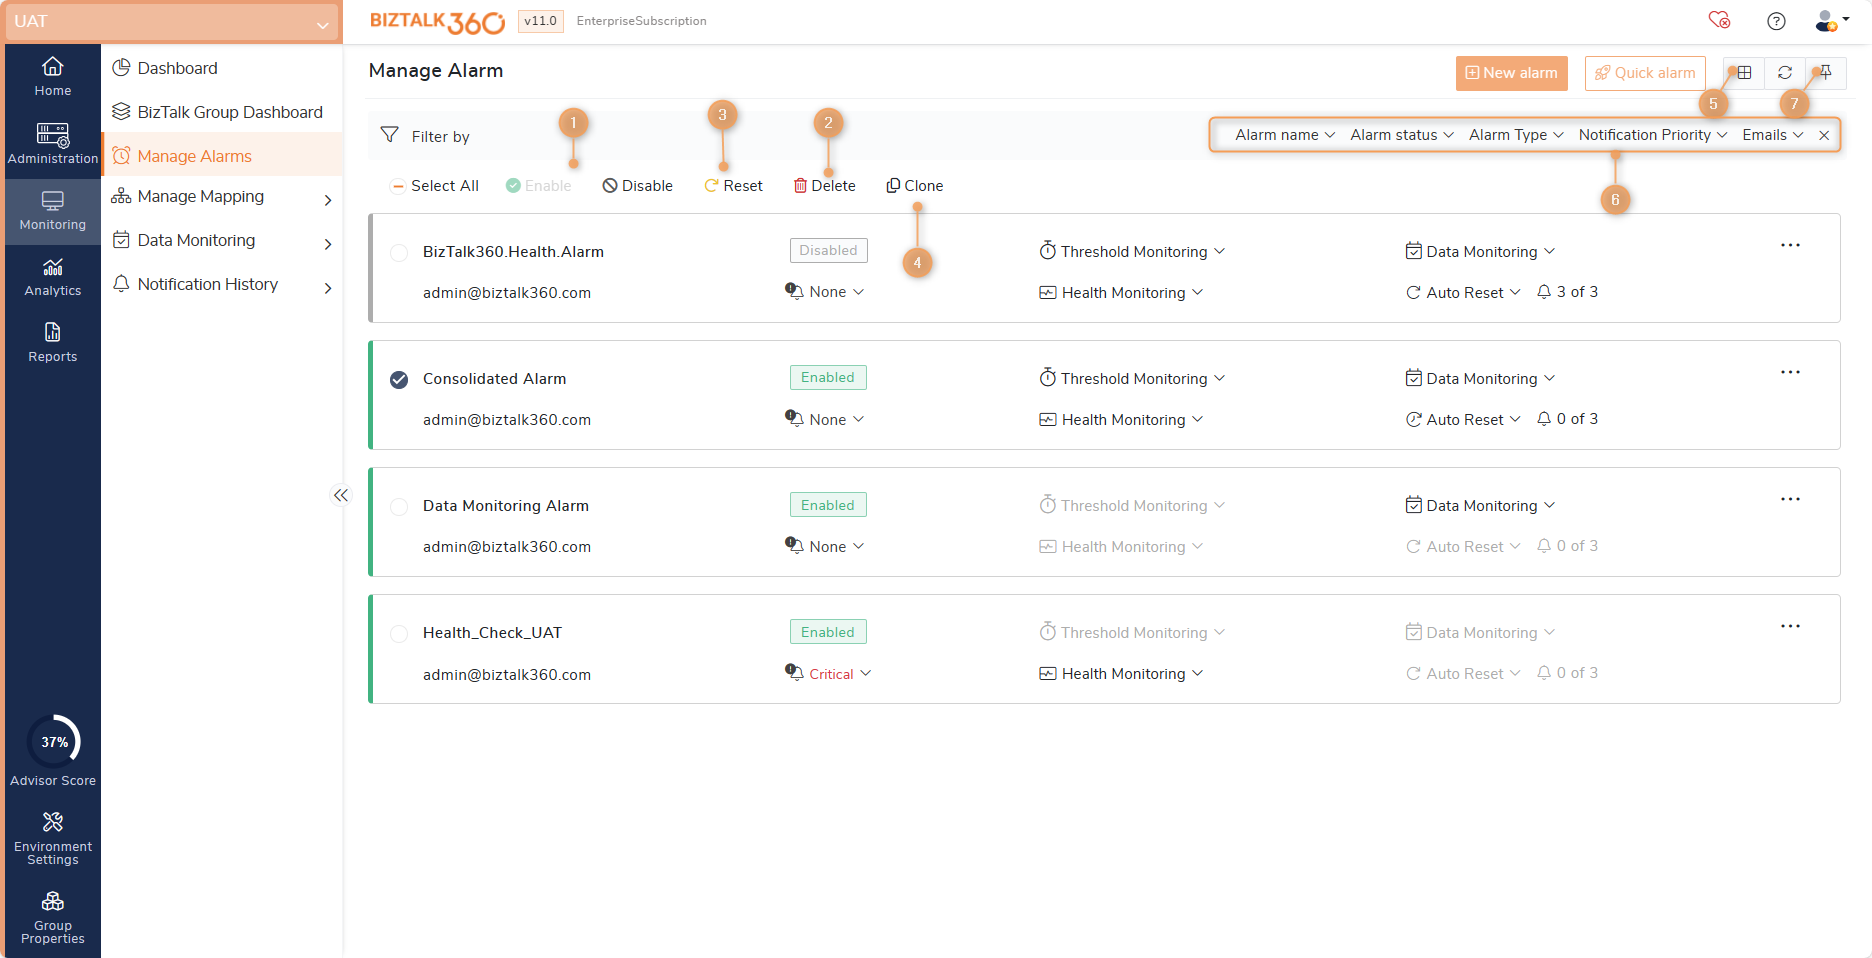
Manage Alarms
For the betterment of user experience, BizTalk360 has implemented various operations that can be used to manage the alarms. Let us discuss each of them in detail.
- Enable/Disable: Users have the flexibility to enable or disable alarms based on current operational priorities. Disabling alarms temporarily can be useful during maintenance activities.
- Delete: When alarms are no longer needed, users can easily delete them from the system. This helps maintain a clutter-free environment and ensures that only relevant alarms are active. Alarm deletion cannot be reversed and the artifact mappings with the particular will be lost after deleting an alarm.
- Reset: If the user wants to revert an alarm's settings to their default state or initial configuration, they can reset the alarm.
- Clone: The Clone Alarm option allows users to copy all settings from one alarm to another, including configuration about all the monitored components. To copy artifact mappings along with the alarm configuration, enable the 'Clone Alarm with Artifacts Mappings' option.
- Switch View: The Switch View option in BizTalk360 provides users with the ability to toggle between different display formats, such as a card or list view, on the Manage Alarms page. Once a view is selected, it remains consistent until the user decides to change it again for subsequent use. This feature allows users to customize their experience based on their preferences and workflow needs, enhancing usability and efficiency within the application. By selecting the switch view users are allowed to change from Card view to List view.
- Filters: The filtering options for managing alarms now adapt dynamically based on the selected view or theme. For instance, when opting for the Card View, the filtering controls are conveniently located in the right corner of the view. This design allows users to easily filter their alarm listings based on specific criteria, enhancing usability and efficiency within the system. When choosing the List View, the filtering options are conveniently placed at the top within the list display. This setup allows users to quickly apply filters to filtering their alarm listings directly from the list view, optimizing their workflow and ease of use.
- Pin to Dashboard: The "Pin to Dashboard" functionality enables users to pin the Manage Alarms page to both the Administration and Analytics dashboards. This feature provides a convenient way to access the Manage Alarms page directly from the Monitoring or Analytics dashboard, streamlining navigation and facilitating quick access to alarm management page.
Alarm User Access Policy
Superusers have the authority to specify which alarms are accessible to different levels of users. Normal or NT group users can view specific alarms and their details within sections like Manage Alarms, Dashboard, Group Dashboard, Manage Mapping, Data Monitoring, Notification History, and Governance & Audit, but only if they have access to those particular alarms. However, their access is limited to read-only mode. To manage or create a new alarm, users must have access to the 'Manage Alarm' section.
For example, if a regular user has access to Alarm 1 and Alarm 2, they can view the mappings and status of these alarms in the dashboard and other areas. However, they cannot manage these alarms. To edit or delete Alarm 1 and Alarm 2, the regular user must have access to the 'Manage Alarm' section.
Access to any of the monitoring features requires users to have access to the Manage Alarm section or at least one of the alarms.
Note: Normal User has some limitations to manage alarms. However, Super Users can provide access to Normal users or NT group users to create, manage and monitor alarms with its monitoring dashboard.
Map the Escalation policy to an alarm
Escalation policy can be created under environment settings. Follow this article to create an Escalation Policy article.
After adding the Escalation policy, users can associate it with an alarm.
- To link the policy with an alarm, go to the alarm configuration page and select the alarm.
- In the selected Alarm configuration, under notification settings select the "Threshold Notification Type" as Escalation and choose the policy created.
- The Escalation Policy is applicable only for Threshold notifications.
- The first escalation alert will be triggered based on the "Violation persist duration time " in the Threshold alarm configuration. i.e. if the violation persists duration is set to 10 minutes, then only after 10 minutes the alert will be triggered to Level 1.
.gif)
New Alarm Configuration Layout (v11.5)
Create New Alarm – Updated UI
In the latest version, the Create New Alarm screen has been redesigned to deliver a cleaner, more user-friendly experience. The available options and functionalities remain the same, but the layout has been improved to make configuration simpler and faster.
What’s New in the UI?
- Consolidated Layout - All types of alarm configuration options are now brought together in a single screen with a left-hand navigation menu (Threshold Monitoring, Health Check Notification, Data Monitoring, Notification Settings). With this new layout, you no longer need to switch between multiple screens while setting up an alarm.
- Clear Sectioning - Key details such as Alarm Name, Description, Alarm Type, and Maintenance Toggle are grouped at the top for quick entry. The Threshold Notification Configuration is now shown in an expanded panel, making it easier to view and configure settings.
- Easy Navigation - You can move between different sections like Threshold Monitoring, Health Check, Data Monitoring, and Notification Settings directly from the side menu without leaving the page.
- Save Button Placement - The Save button is always visible at the bottom-right corner, allowing you to quickly save changes no matter where you are in the configuration.
Recommendation on Configuration
The new Recommendation feature suggests configuration patterns based on your previously created alarms. This makes it easier to reuse common settings and ensures you don’t miss any important configurations.
For example, if you had earlier created a Data Monitoring alarm with the “Notify on Success” option enabled, the system will highlight this when you create or update another alarm later. This way, you are reminded of the settings you’ve already used in past configurations.
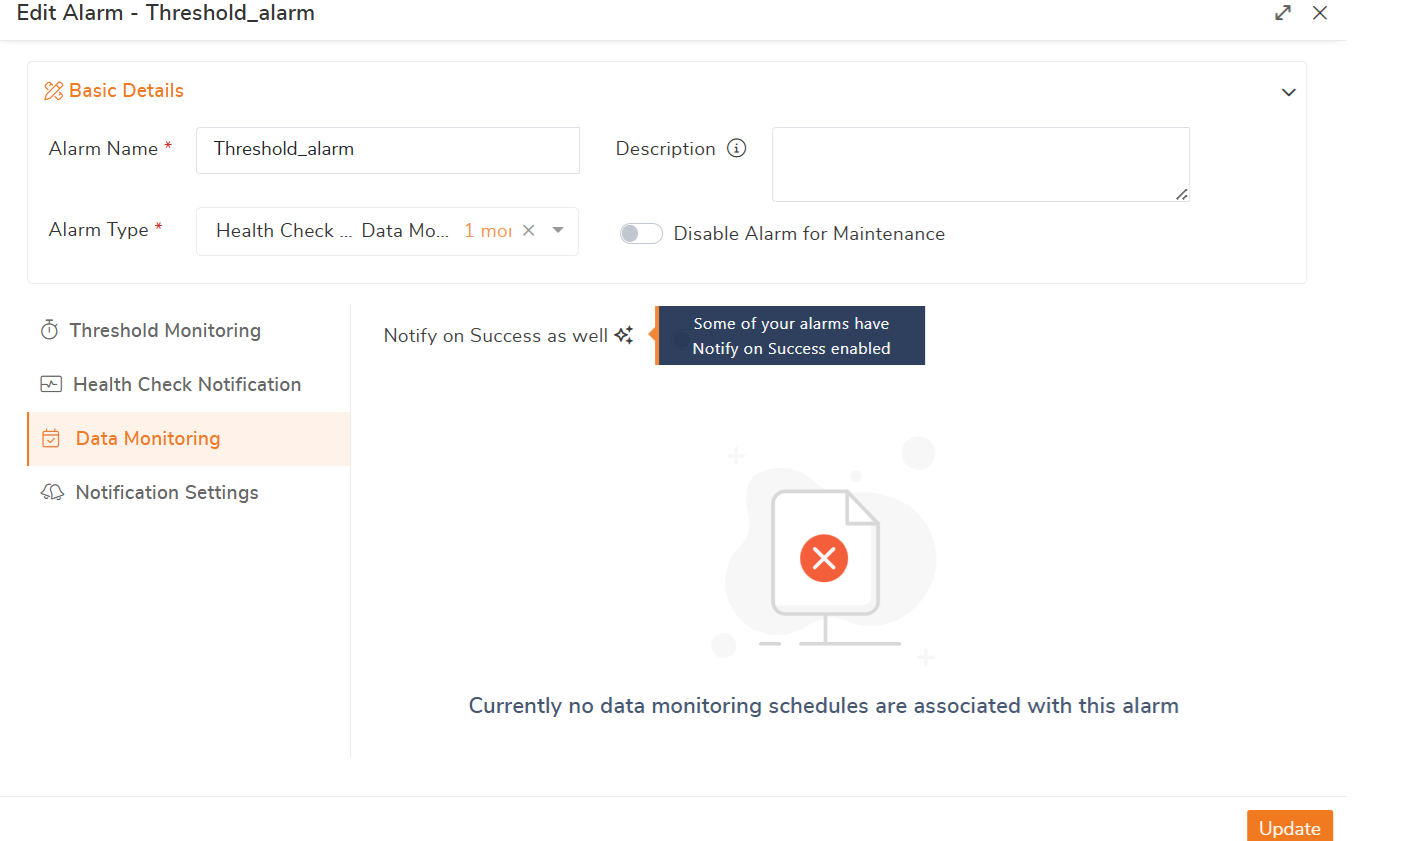
Alarm Cloning
Cloning an existing alarm along with all its configurations and mappings. When you clone, the alarm opens in the configuration screen, where you can review the details, make any necessary changes, and then save it as a new alarm.
Note: If an alarm is configured with both Threshold and Health Check types and has notification mappings assigned, you will not be able to unselect either type until those mappings are removed.