In BizTalk terms, a BizTalk Application is a feature that simplifies the process of deploying, managing, and troubleshooting business integration solutions. A BizTalk application is a logical grouping of items referred to as "Artifacts". There are different types of artifacts in a BizTalk solution such as:
- Send Ports/Send Port Groups
- Receive Locations/Receive Ports
- Orchestrations
- Pipelines
- Schemas
- Policies
- Maps
The application and artifacts can be managed from BizTalk360 without switching to the BizTalk admin console.
Follow the below steps, to access the application from BizTalk360.
- Select the respective environment in BizTalk360
- Select Administration and navigate to BizTalk Service->Applications.
- On the Application page you can see all the available applications in the environment
- Click Administration in the environmental panel
- Click the expand button against BizTalk services and then hit Applications
- Click on the application name to view the status of the artifacts associated with the application
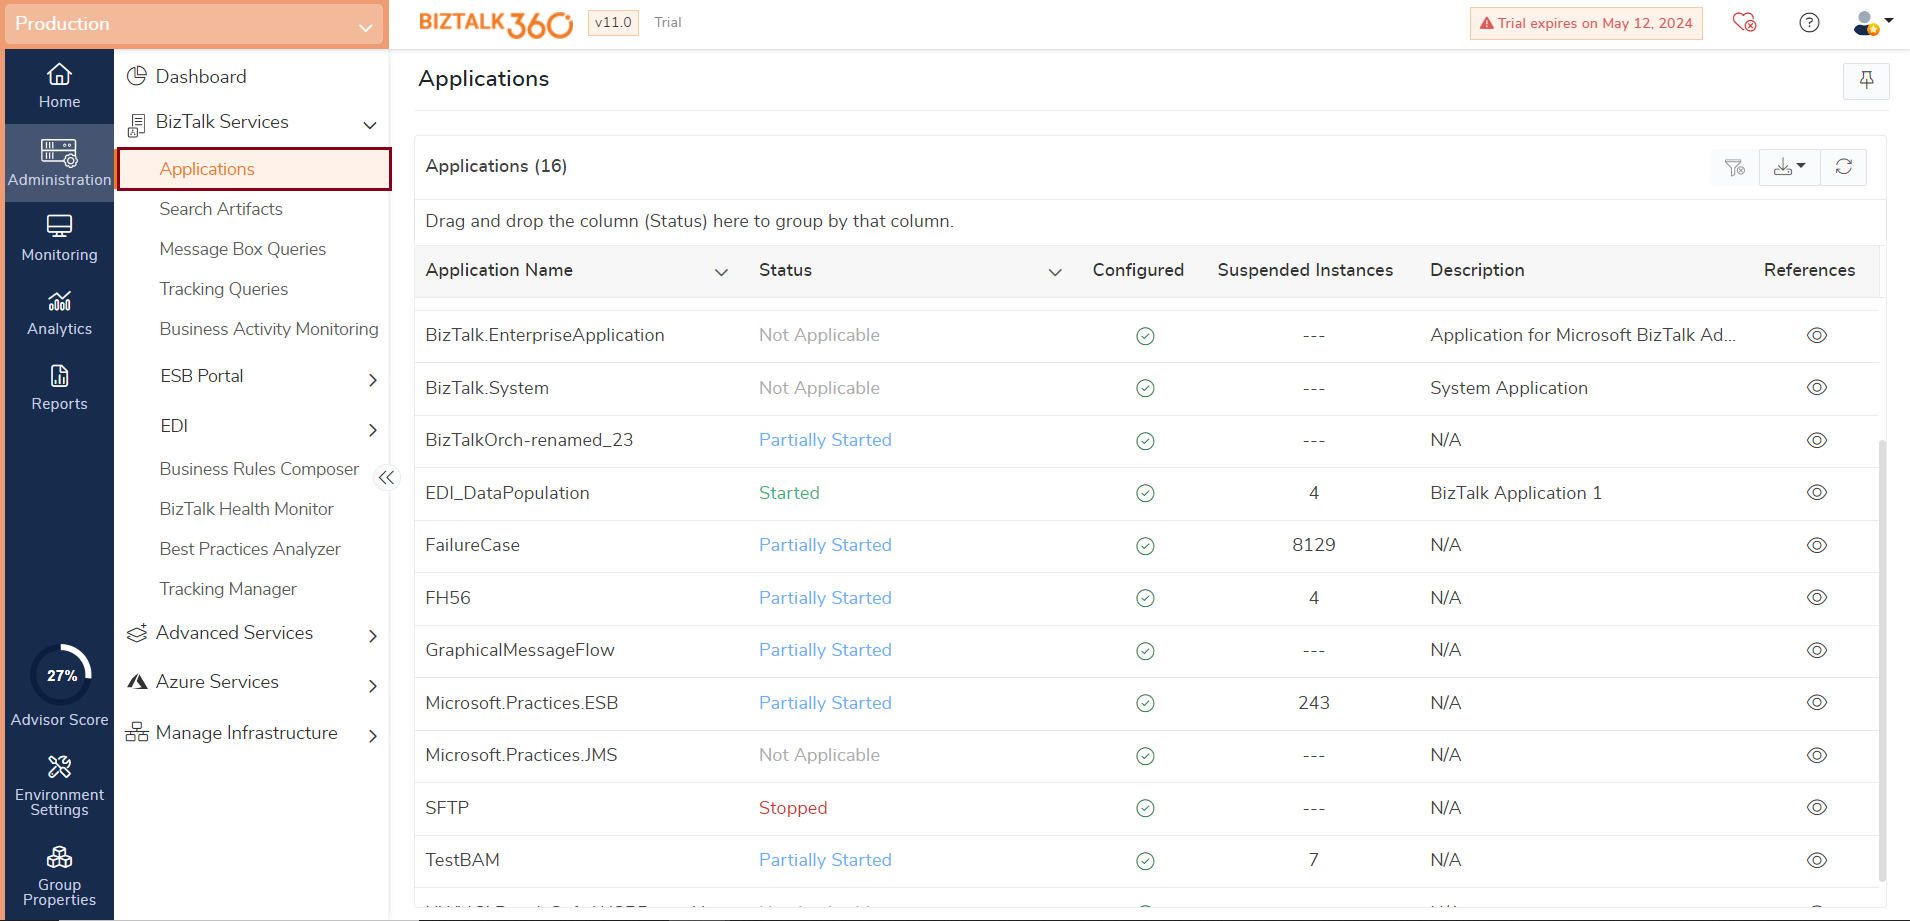
The applications list view contains the following information:
- Application Name - The name of the application. Click the application name to view the status of different associated artifacts
- Status - Current running status of the application (Started/Stopped/Partially Stopped/Not Applicable/Orphaned)
- Configured - Whether the application is configured or not. If the application is configured, a visual cue (tick mark) will be visible in the column
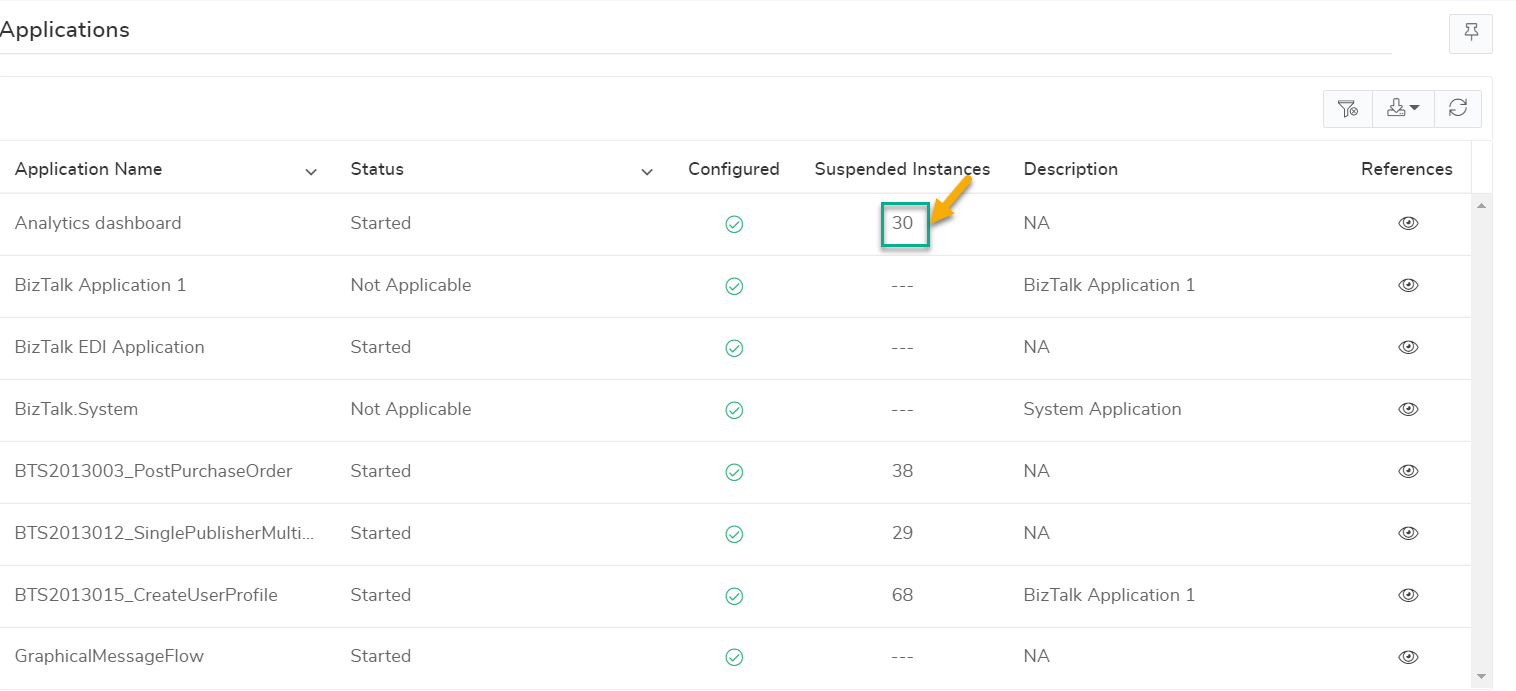
- Suspended Instances - The number of suspended instances within the application
- Description - A detailed description of the application. If the application is a System application, the description field will contain the text as "System Application"
- References - Provides information on the application references. For instance, consider an application 'Contoso'. The References section provides information on the list of applications that Contoso depends on, and the list of applications that are dependent on Contoso
- Refresh - Refreshes the application information in the list view
- Export Data - Allows users to export the list of available applications for the user along with their current operational and configuration status. Click the Export Data link and select either Export as PDF or Export as Excel download the report to your computer.
Application dashboard
The Application dashboard page serves as a centralized place to access and view the application details. Users can start the day by logging into the Application dashboard, its a control center where all the vital information about the applications is listed.
By simply clicking on the application name, users are directed to its dedicated dashboard. This dashboard provides insights about essential information such as Application status, Artifacts status, Service Instance Status, and Host Instance details through predefined widgets. Additionally, users have the flexibility to enhance their dashboard by adding widgets from various categories including Application Artifacts, Application Service Instances, Application Messages, Tracking, and Platform settings. These widgets offer comprehensive insights and enable users to efficiently manage their applications' health.
- Application Artifacts Widget- Provide insights about the application status to see if everything is running smoothly. The Artifacts Status widget provides details about the various components of the application like receive locations, send ports, orchestrations, and more.
- Application Dependencies - The user can keep track of dependencies between different application components using the Application Dependencies widget
- Application Services Instances - Service Instance count grouped by service name and status will be listed.
- Application Messages -Let's say you notice a spike in the number of failed messages. Using the Application Messages widgets, you can easily identify the source of these failures.
- Tracking Status - The tracking status widget lists the global and port-level tracking status.
- Platform Settings -The Platform Settings widgets provide insights into the underlying infrastructure, such as Host Instances, enabling you to optimize resource allocation and troubleshoot any performance issues.

Application Dashboard Reports
Users can map this dashboard to reports and get automated reports at regular intervals (daily, weekly, monthly).These reports serve as snapshots of the current state of the applications, highlighting key metrics, recent updates occurred during the reporting period.
Follow this article to know more about reports.
Manage BizTalk Applications
 Let's understand the Application Dashboard page in detail:
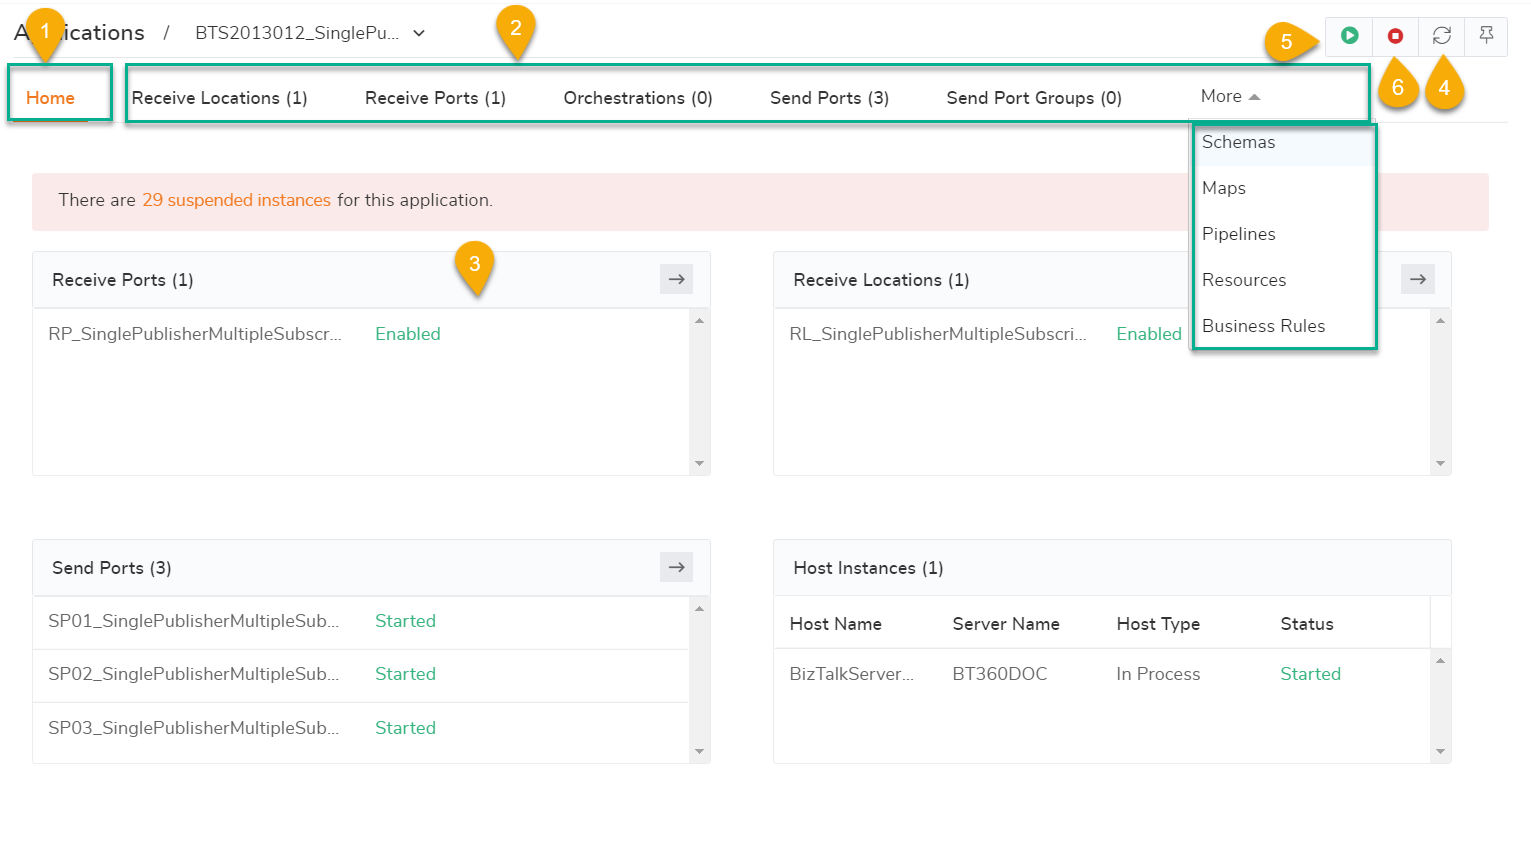
- Dashboard - Displays the counts and statuses of Receive Ports, Receive Locations, Send Ports, Send Port Groups, Orchestrations, and Host Instances. The grid for the respective artifacts only shows up when it contains any data for that artifact. If the application does not contain any artifacts for the respective category, then the home page will not show that category. Instead, it will display the message that “There are no artifacts configured for this application”.
- Artifacts - Displays the summary of different artifacts that are associated with the application such as Receive Locations, Send Ports, Orchestrations, Send Ports Groups, and so on. Also, Policies & Rules associated with the applications can be viewed. For this, the user doesn't need Business Rules Composer access. Click the artifact name to navigate to the screen where you can see the list of artifacts, their status, and other details.
- Artifact Details - Clicking the artifact details icon displays the artifacts section where the user can perform activities on the selected artifact (such as Enable/Disable and so on)
- Refresh - Forces a refresh of the status of the artifacts. When the status of the artifact is changed in the corresponding section, the status will get reflected on the Home screen. If the status is not reflected, click Refresh to force refresh the status of the artifacts
- Start - To start an already stopped application. When the Start button is clicked, a pop-up window appears where the user can choose the artifacts that are to be started (orchestrations, send ports, send port groups, receive locations). A tick mark will appear next to the items if the artifacts have started successfully. Once the artifacts have started successfully, click the X button at the top right corner of the page to close the pop-up window
- Stop - To stop a running application. When the Stop button is clicked, a pop-up window appears where the user can choose the artifacts that are to be stopped (receive locations, orchestrations, send ports, send port groups). Select the appropriate option from the list. Click the Stop button at the bottom right corner of the page to close the pop-up window
When an application has suspended instances, the number of suspended instances for that application will be shown. When the application name is clicked, the Home tab of the application displays the number of suspended messages for the application, including a link to Query Instances. When the Query Instances link is clicked, the system automatically navigates the user to the Message Box Queries section. In the Message Box Queries section, the query expression is automatically filled up and the query result can be generated by clicking the 'Execute Query' button.
Performing Operations under the artifacts section
Based on the user permissions, the users will have the ability to perform operations such as Start/Stop/Enable/Disable/Enlist/Unenlist the artifacts. The user can perform the required operation by selecting the artifact (checkbox) and clicking on the Operation buttons (Start/Stop/Enable/Disable/Enlist/Unenlist) at the top of the grid.

This example shows various operations that can be performed in a Receive Port in the application. Similarly, you can perform operations under other artifacts like Orchestration, Receive Location, Send Port, Send Port Groups, etc. Once the operation is performed in any of the artifacts, the user activities will get recorded. The recorded data can be shown under the Governance and Auditing (under Application activities) section.
Configure Service Window
One of the core capabilities of the Microsoft BizTalk server is to configure service windows for your receive locations and send ports. If you configure a schedule/service window for your receive locations, messages will be accepted only during that time window, all other times BizTalk either won’t pick up messages. The same applies to send ports, messages won’t be transmitted outside the service window.
You can configure a service window if you want to poll data from your SQL/Oracle database only during a certain period. Follow the below steps to configure Service Window from BizTalk360
1)Navigate to the Application and select the Receive Location/Send Port you wish to schedule the service window.
2)Click on the property(eye) icon, which opens the property blade. There you configure the Service window below
- For Receive Location the service window can be configured under the schedule tab by enabling the service window toggle
- Send Port the service window can be configured under the Primary Send tab by enabling the service window toggle
The below gif image will illustrate the service window configuration from BizTalk360. The Service Window time is aligned to the BizTalk Server Time Zone.

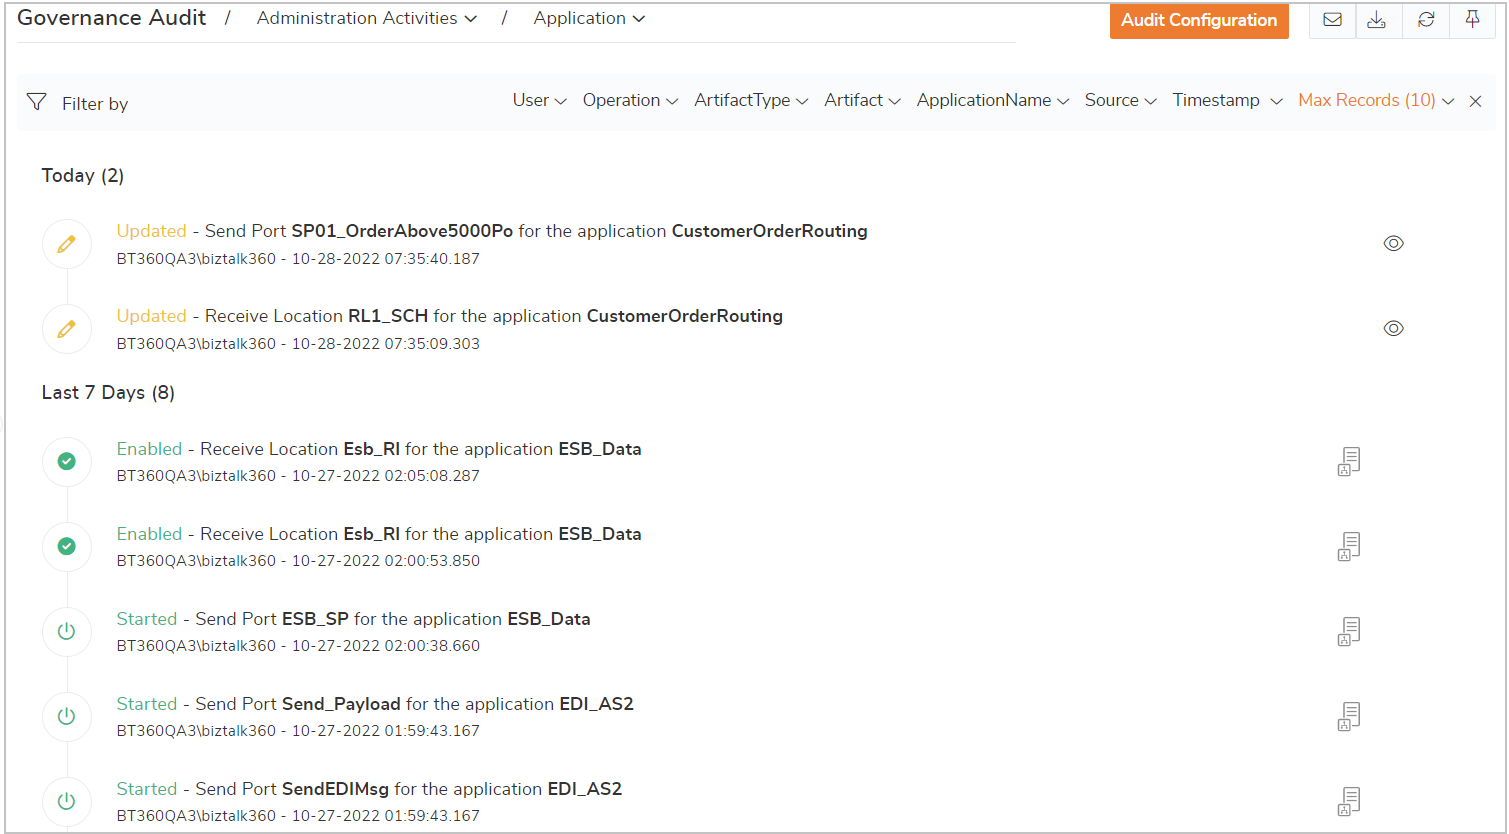
Auditing
All the operations such as Starting/Stopping the application, changing the artifact state as enable/disable/enlist, and scheduling the service window from BizTalk360 and from BizTalk Server 2020 will be audited. To view the audited details navigate to Environment settings->Governance Audit->Administrative Activities->Application.
User Access Policy
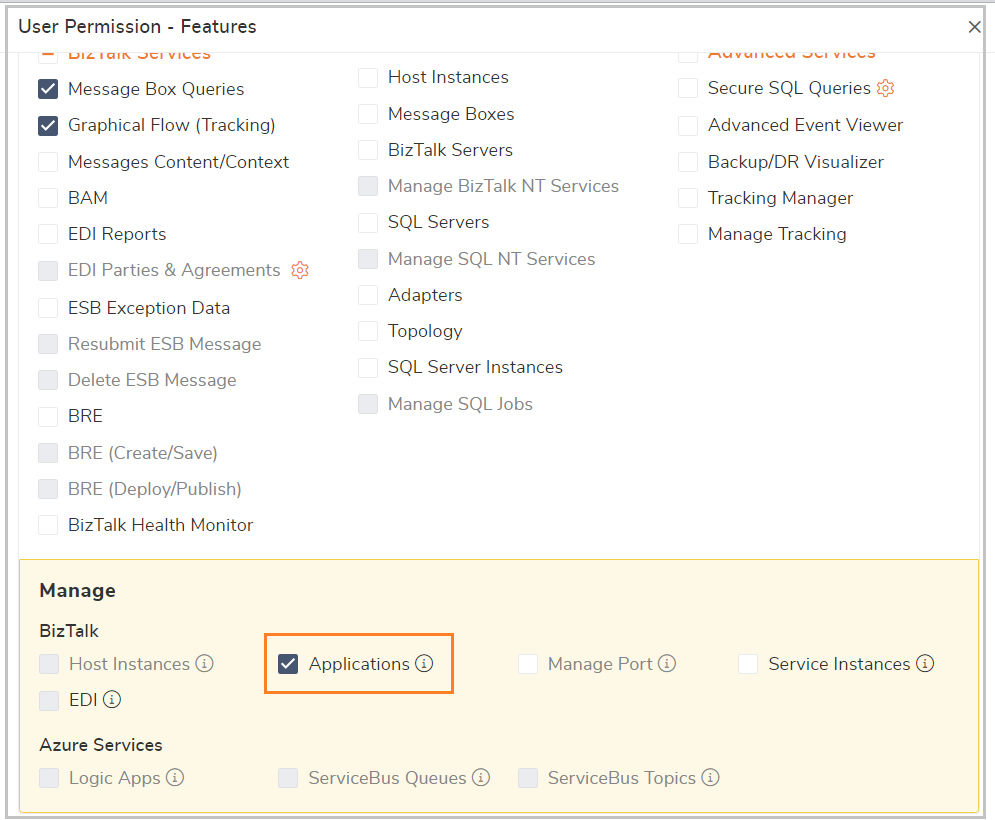
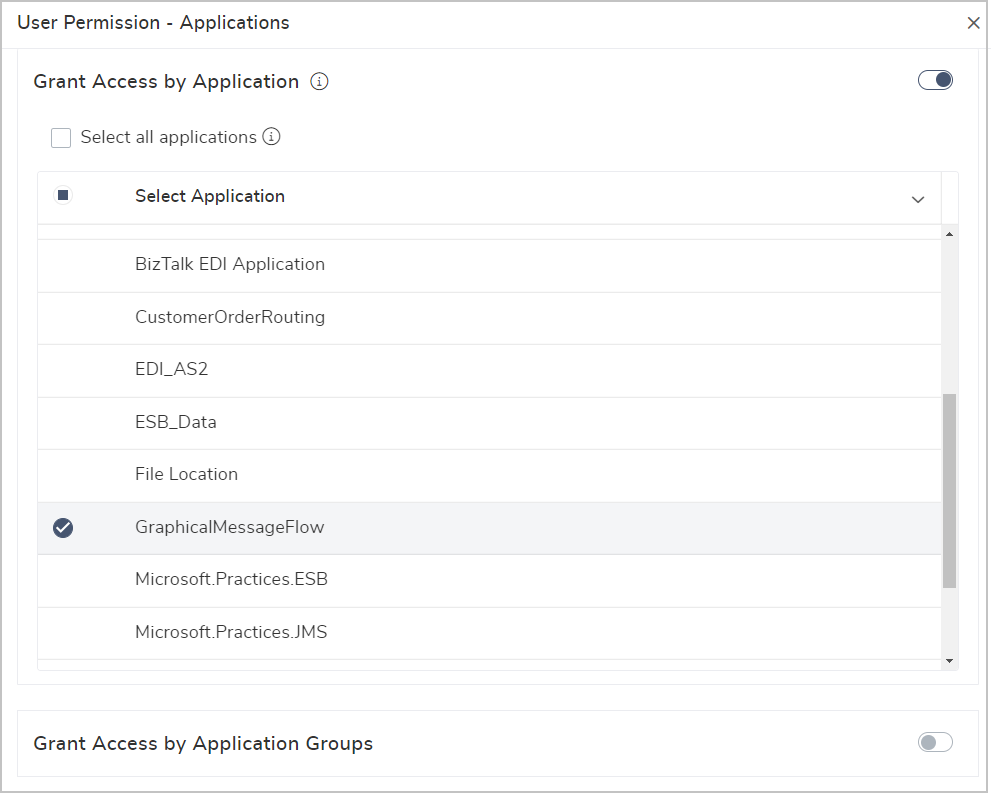
Super users can view and manage all the applications. However, to view /manage the BizTalk application from BizTalk360 the custom user need below access
View Application - The Applications must be added while defining the role of the custom user. The user can access only that particular application through BizTalk360
Manage Applications - To Start/Stop the application, to Start/Stop/Disable/Enable/Enlist/Un-enlist application artifacts, and to configure the schedule window user must have access to the Manage Application.