BizTalk360 allows you to send notifications through traditional channels like Email and Windows Event Log, as well as modern systems such as ServiceNow, Microsoft Teams, Azure DevOps, and generic Webhooks. But what if you need to customize something specific to the channel— like authentication settings, message formatting or you want to send alerts to other platforms? That's where custom notification channels come into play. You can build your own custom notification channels to send alerts to any platform of your choice and customize the message or action according to your need. For example, you can use custom channels to:
Call REST APIs to notify internal or external ticketing systems.
Trigger workflows in CI/CD tools such as Azure Pipelines or automation platforms like Logic Apps.
Log alerts to internal databases for auditing or reporting.
With this extensibility, you can easily integrate BizTalk360 notifications into your existing monitoring or incident management workflow. This guide walks you through creating a custom notification channel in BizTalk360 using our sample SDK.
Configuration Scheme
To control channel behavior, it's important to understand the structure of the configuration files used to define global and alarm-specific properties
Schema Structure
The Configuration file consists of one or more sections, where each section contains a data array of input fields.
Section Schema
{
  "name": "string",
  "displayName": "string",
  "data": [
    {
      "name": "string",
      "displayName": "string",
      "isMandatory": "false",
      "disabled": "false",
      "type": "input",
      "maxLength": "3000",
      "placeholder": "string",
      "value": "string",
      "isSensitiveField": "false"
    }
  ]
}
Supported Field Types
Each item in the data array defines a field in the UI, including properties such as:
name and displayName: Used for identification and labeling.
value: Specifies value provided for the field when rendered in the UI.
isMandatory: Determines whether the field must be filled in by the user.
disabled: Indicates whether the field is editable; if true, the field is read-only.
maxLength: Sets the maximum number of characters allowed in the input.
placeholder: Used for showing additional information.
isSensitiveField: Marks the field as sensitive; values will be masked (e.g., for passwords or API keys).
type: Defines the type of input control. Different options supported for
typefield are:input – Basic text input field
checkbox – Boolean toggle
select – Drop-down with selectable values. When using
select, include anitemsarray to populate drop-down values.
Example for select field type:
{
  "name": "payload",
  "displayName": "Payload",
  "data": [
    {
      "name": "requestMethods",
      "displayName": "Request Methods",
      "isMandatory": "false",
      "defaultValue": "POST",
      "type": "select",
      "items": [
        { "label": "POST", "value": "POST" },
        { "label": "PUT", "value": "PUT" }
      ]
    }
  ]
}
The image below illustrates how the user interface is rendered based on the provided configuration scheme.
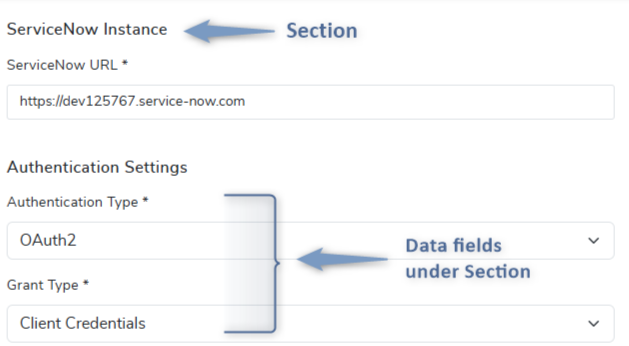
Now that you're familiar with the schema format, let's look at how global properties and alarm properties are defined using this structure.
1. Global Properties (GlobalProperties.json)
This JSON file defines shared Global Settings specified while configuring the notification channel such as Channel Name, Logo, Authentication Credentials, and Notification Settings.
Example for ServiceNow:
[
  {
    "name": "servicenowInstance",
    "displayName": "ServiceNow Instance",
    "data": [
      {
        "name": "servicenowurl",
        "displayName": "ServiceNow URL",
        "isMandatory": "true",
        "isSensitiveField": "false",
        "tooltip": "The instance where the incidents should be created.",
        "type": "input",
        "items": [],
        "placeholder": "https://dev.service-now.com"
      }
    ]
  },
  {
    "name": "authentication",
    "displayName": "Authentication Settings",
    "data": [
      {
        "name": "authType",
        "displayName": "Authentication Type",
        "type": "select",
        "items": [
          { "label": "Basic", "value": "0" },
          { "label": "OAuth2", "value": "1" }
        ]
      }
    ]
  }
]
2. Alarm Properties (AlarmProperties.json)
This JSON is used to override global settings or define additional configurations specific to individual alarms.
Note: The same can be used for Automated Tasks & Reports as well.
[
  {
    "name": "shortDescription",
    "displayName": "Short Description",
    "isMandatory": true,
    "type": "input"
  },
  {
    "name": "impact",
    "displayName": "Impact",
    "type": "input"
  }
]
Implementation Steps
In the provided sample SDK, a file named SampleChannel.cs is available, which demonstrates the implementation of a basic custom notification channel. You can use this file as a starting point and modify it according to your requirements.
Construct & Send Messages
The following methods can be modified to handle different types of notifications:
SendNotification(...) — Sends alarm notification messages
SendAnalyticsReport(...) — Sends dashboard or SQL query reports
SendAutomatedTaskSummary(...) — Sends automated tasks execution results
Each method allows you to build a custom message using data from the environment, the specific alarm/report/task, and the defined configuration files.
Let’s explore the parameters and structure of the SendNotification() method in more detail.
This method is responsible for taking the incoming alert from an alarm, combining it with configuration and environment data, and then constructing and sending a formatted message to your preferred external system—like ServiceNow, Microsoft Teams, or even a REST API.
public bool SendNotification(BizTalkEnvironment environment, Alarm alarm, string globalProperties, Dictionary<MonitorGroupTypeName, MonitorGroupData> notifications)Parameters Overview
Let’s understand the parameters that come into this method:
BizTalkEnvironment environment— Contains information about the monitored BizTalk360 environment.
Property | Description |
|---|---|
id | Unique identifier of the environment |
Name | Display name of the environment |
MgmtSqlInstanceName | SQL instance used by BizTalk Management DB |
MgmtSqlDbName | BizTalk Management Database name |
Alarm alarm— Contains information about the triggered alarm and configuration details.
Property | Description |
|---|---|
Name | The alarm name as configured in BizTalk360 |
Description | Description of the alarm |
AlarmProperties | Serialized JSON string of alarm-specific settings defined in |
Emails | (Optional) Email recipients for this alarm |
AdditionalProperties | A dictionary containing runtime values like |
IncidentDetails | Structured information used when escalating incidents |
NotificationPriority | Enum indicating the alert priority (e.g., High, Medium, Low) |
string globalProperties— Serialized JSON string of global settings defined inGlobalProperties.jsonDictionary<MonitorGroupTypeName, MonitorGroupData> notifications— It is a dictionary containing the monitor results grouped by monitor type (e.g., Application, BizTalk Server, Message Box Query, etc.), used to build the core content of the notification. A sample structure of the notifications parameter is shown below to help understand how monitoring results are grouped and accessed.var notifications = new Dictionary<MonitorGroupTypeName, MonitorGroupData> { { MonitorGroupTypeName.Application, new MonitorGroupData { name = "Application", monitorStatus = MonitorStatus.Warning, isAutoCorrected = false, monitorGroups = new List<MonitorGroup> { new MonitorGroup { name = "BizTalk EDI Application", monitorStatus = MonitorStatus.Warning, isAutoCorrected = false, monitors = new List<Monitor> { new Monitor { name = "Orchestrations", monitorStatus = MonitorStatus.Warning, isAutoCorrected = false, issues = new List<Issue> { new Issue { artifactName = "Microsoft.BizTalk.Edi.BatchingOrchestration.BatchingService", resourceName = "BatchingService", description = "Current State (Stopped) is not equal to expected State (Started).", optionalDetails = "Expected State :Started | Current State :Stopped", isNewViolation = true } } } } } } } } };
Construct the Notification Message
Let's see how to construct a notification message using the values from the provided parameters. This message can then be sent to the appropriate external platforms. The implementation should be done within the SendNotification() method of your custom notification channel class.
Some users may prefer to trigger actions or send notifications only when the monitor status is Critical or Warning. To accommodate this, the status can be retrieved and evaluated using the following approach:
MonitorStatus overallMonitorStatus = (MonitorStatus)Enum.Parse(typeof(MonitorStatus), alarm.AdditionalProperties["overAllMonitorStatus"].ToString(), true);

if (overallMonitorStatus == MonitorStatus.Critical)
{
    // Proceed to raise a high-impact incident
}
Next, use the BT360Helper class to construct the notification message. This class takes care of combining the relevant information from the environment, alarm, and monitoring results.
You can also define the message type and choose a format suitable for the external system (e.g., plain text, JSON, or HTML):
BT360Helper helper = new BT360Helper(
    notifications,
    environment,
    alarm,
    MessageType.ConsolidatedMessage,
    MessageFormat.Text // Change format as needed
);

string message = helper.GetNotificationMessage();
Message Formats
BizTalk360 supports several message formats that can be selected based on the requirements of the external system:
Format | Description |
|---|---|
Text | Plain text |
Json | JSON formatted |
Xml | XML formatted |
Html | HTML formatted |
HtmlText | HTML based text format |
Blocks | |
JsonCard |
Send the Notification Message
Once the notification message is constructed, the next step is to add the respective logic to send the message to the target external system. Below is an example of how to populate the required fields and send the request to create an incident in ServiceNow.
Step 1: Form the accepted message format in payload
Use a Dictionary<string, string> to define the required and optional fields for incident creation. These values can be populated from the global and alarm-specific settings.
Dictionary<string, string> dictionary = new Dictionary<string, string>
{
    { "short_description", alarmProperties.description },
    { "impact", alarmProperties.impact },
    { "urgency", alarmProperties.urgency },
    { "assignment_group", alarmProperties.assignmnet_group },
    { "work_notes", message} // Message constructed using BT360Helper
};
Step 2: Send the Request
Serialize the dictionary to JSON and send it using HttpClient to the ServiceNow Incident API endpoint:
string content = JsonConvert.SerializeObject(dictionary);
HttpClientHandler handler = new HttpClientHandler();

using (HttpClient httpClient = new HttpClient(handler))
{
    httpClient.BaseAddress = new Uri(<ServiceNowUrl>);
    httpClient.DefaultRequestHeaders.Accept.Add(new MediaTypeWithQualityHeaderValue("application/json"));

    HttpRequestMessage request = new HttpRequestMessage(HttpMethod.Post, "/api/now/table/incident")
    {
        Headers =
        {
            Authorization = CreateAuthorizationHeader(serviceNowSettings, proxy, channelSettings)
        },
        Content = new StringContent(content, Encoding.UTF8, "application/json")
    };

    HttpResponseMessage result = httpClient.SendAsync(request).Result;

    if (result.IsSuccessStatusCode)
    {
        LoggingHelper.Info("ServiceNow Incident Creation was Successful");
    }
    else
    {
        LoggingHelper.Error($"ServiceNow Incident Creation was Unsuccessful. \n Response: {result}");
    }
}
This approach can be adapted to integrate with other external systems as well. By following a similar pattern—validating alert criteria (if required), formatting the message, and invoking the appropriate API—you can implement custom logic to send notifications to any supported platform based on its accepted data structure and input requirements.
Once the project is built and tested, the generated DLL can be used to map the custom notification channel to a BizTalk360 feature such as Alarms, Reports, or Automated Tasks.
How to map the custom notification channel to the features?
To add the configured custom channel, navigate to Settings->Notifications->Notification Channels and click "Add New Channel", which will open the configuration blade.
In the configuration blade, you will find an option to upload the configured dll
Once the dll is updated successfully, update the channel name, initial status (enable or disable the channel), channel logo, and which feature this channel can be used for.
Map this channel to the feature - Alarms, reports, and automated tasks can all be notified via the custom notification channel. This option will allow you to update which features this custom channel can be used for.
Click next to configure the values you have updated in global properties. Click Save .
On successful configuration, this channel will be listed under Alarm/Report/Automated Task configuration. you can map this channel and get notified.
.gif)