- 13 Jul 2022
- 3 Minutes to read
- Print
- DarkLight
- PDF
Reporting Schedules
- Updated on 13 Jul 2022
- 3 Minutes to read
- Print
- DarkLight
- PDF
The first step in setting up reporting in BizTalk360 is to create Reporting Schedules. You can relate Reporting Schedules similar to creating alarms.
The Reporting Schedules functionality helps you to have BizTalk360 create a specific report at a specific time. Say, you can configure reports to be generated every day at 9 AM or on the 15th of every month at 6 PM. Also, you can define the email id of the person who should receive the reports.
Creating the Reporting Schedule
To create a reporting schedule in BizTalk360, follow the below steps:
- Log in to BizTalk360
- Select Analytics from the environmental panel
- Expand the Reporting section and select Reporting Schedules
- In the upper right corner, click Add Schedule to create a new reporting schedule
- On the right side of the screen, the 'Schedule Configuration' pane appears. The fields in bold are required
- Schedule Name - Enter a friendly name for the schedule
- Description - Enter the description for the schedule. This text will be sent in the alarm email
- Email Ids - Enter the email addresses (separated with commas ) of the recipients who should receive the reports
- Disable Schedule - Use the toggle to enable/disable the schedule. Alternatively, you can disable the scheduled execution by selecting the schedule and clicking the Status button to set the status of the schedule
- Schedule Frequency - This defines when you want to generate a report. The available options are:
- Daily
- Weekly
- Monthly
If a particular day is not present in the month (say, Feb 29), then the BizTalk360 Reporting service will skip that month and no report will be generated for that month.
6. Schedule Time - Pick the time from the drop-down to define the time to generate the report
- Click Save to save the reporting schedule

Edit the Reporting Schedule
To edit a reporting schedule:
- Log in to BizTalk360
- Select Analytics and navigate to the Environmental panel
- Expand the Reporting section and select Reporting Schedules
- Select the schedule that you wish to modify
- On the right of the screen, the 'Schedule Configuration' pane appears. The fields in bold are required
- Schedule Name - Modify the friendly name for the schedule
- Description - Modify the description for the schedule. This text will be sent in the alarm email
- Email Ids - Enter the email addresses (separated with commas and semicolon) of the recipients who should receive the reports
- Disable Schedule - Toggle the icon to disable the scheduled execution
- Schedule Frequency - This defines when you want to generate a report. The available options are
- Daily
- Weekly
- Monthly
- Schedule Time- Pick the time from the drop-down to define the time to generate the report
- Click Update to save the reporting schedule

Delete the Reporting Schedule
To delete a reporting schedule:
- Log in to BizTalk360
- Select Analytics from the environmental panel
- Expand the Reporting section and select Reporting Schedules
- Select the checkbox against the schedule name that you wish to delete
- Click Delete to delete the reporting schedule
- You will see the Confirm Delete pop-up screen
7. Click Delete to delete the reporting schedule. Click Yes if you wish to retain the reporting schedule

Configure the Report Schedule Status
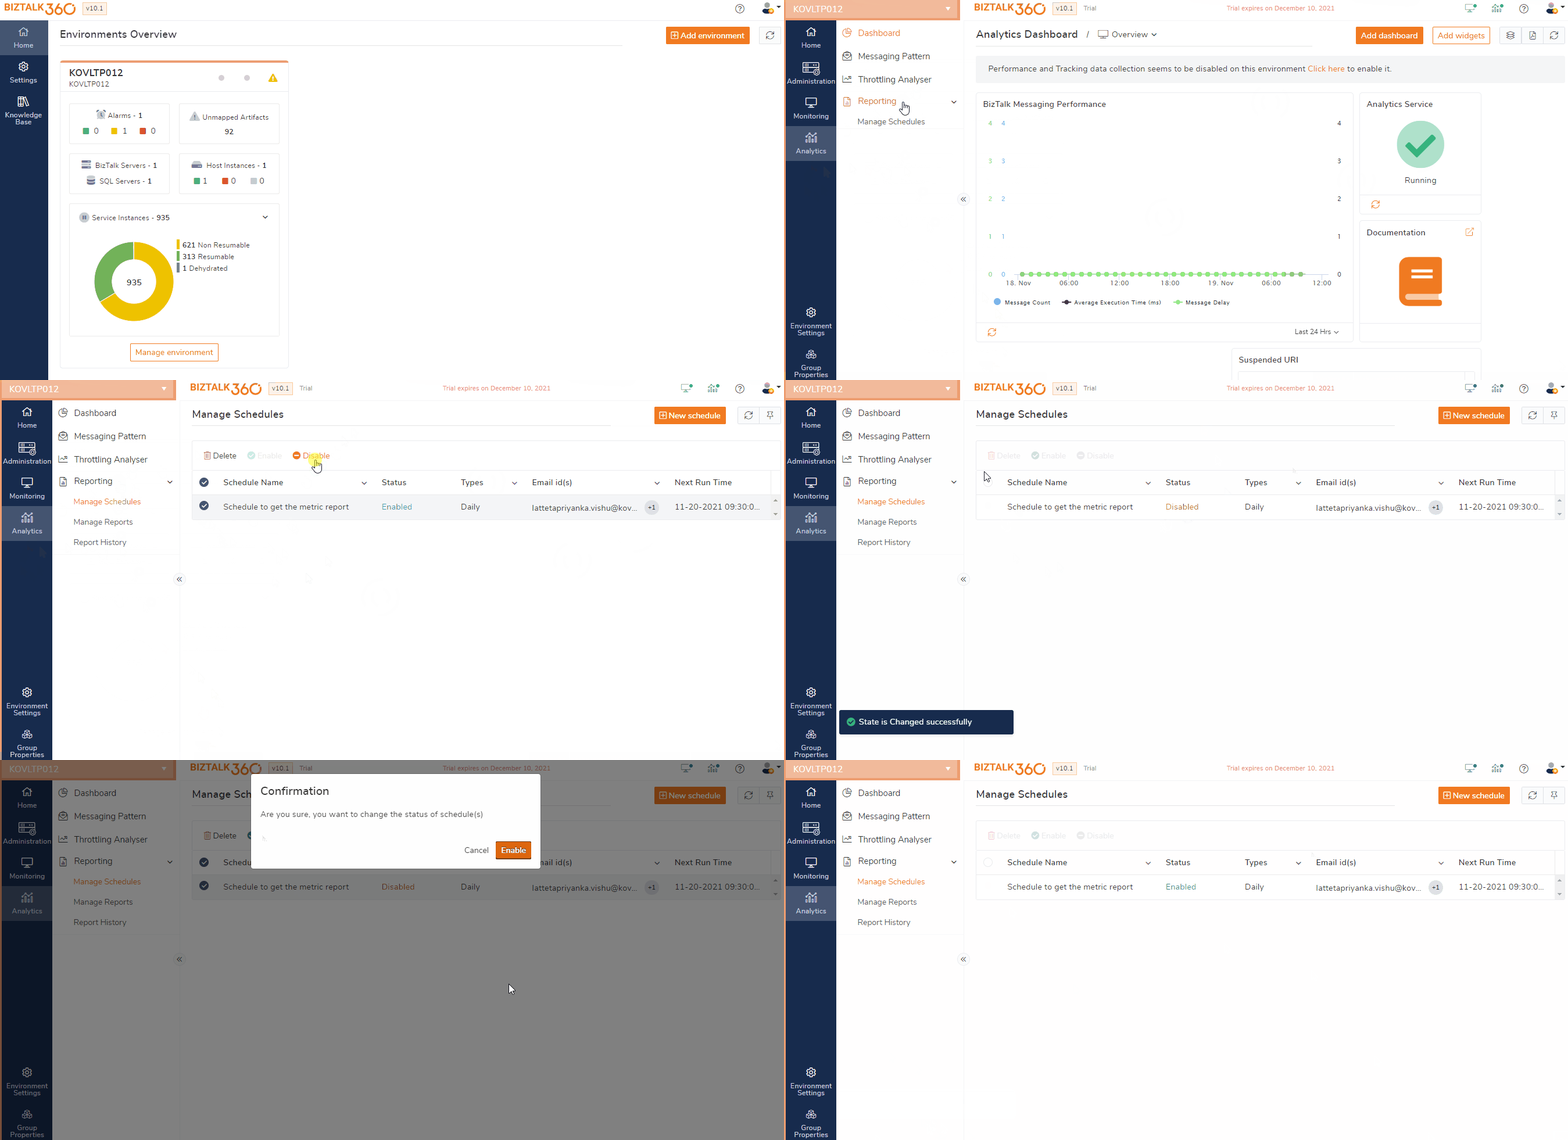
To set the status of your reporting schedule:
- Log in to BizTalk360
- Select Analytics from the environmental panel
- Expand the Reporting section and select Reporting Schedules
- Select the checkbox against the schedule name that you wish to set the status
- Select Enable (if you wish to enable your reporting schedule) or Disable (if you wish to disable your reporting schedule)
- You will see a confirmation popup for status change Click Delete to change the status of the schedule report. if y

Publish the Analytics Reports in the Notification channels
From version 10.2 onward the configured analytics reports can be published to Microsoft Teams, Service Now , SMTP notification channels. Follow the below step to configure the notification channel in reporting schedule.
- Navigate to Settings->Notifications->Notification channel to configure the Teams,Service Now, and SMTP notification channel in BizTalk360. Follow this article
- On successful notification channel configuration you should be able to see the channels in the schedule configuration
- In the schedule configuration blade update the schedule basic details such as name, description, enable/disable the schedule, schedule configuration daily/weekly/monthly. Then in the Notification settings enable the channel you wish to get the reports .
- Click save

You can see the report history to view the reports sent to the notification channel .
What is new in version 10.3?
From version 10.3 Analytics reports are merged with Analytics Dashboard .
User can directly map the Analytics dashboard with reporting .


