- 18 Apr 2024
- 4 Minutes to read
- Print
- DarkLight
- PDF
BizTalk Environments
- Updated on 18 Apr 2024
- 4 Minutes to read
- Print
- DarkLight
- PDF
BizTalk360 allows users to configure BizTalk groups that need to be managed. When BizTalk360 is installed, a default environment gets created in BizTalk360 (with the same name as the SQL server instance). The administrators need to Activate the license for the environment, once the new key is applied, the license will change to the appropriate license type.
Add an Environment
You can configure multiple BizTalk Environments within a single installation of BizTalk360. To add a new environment, follow the steps as shown below:
- Log in to the application.
- Click Add Environments from the top right corner.
- On the Add New Environment Configuration page, you can provide the following:
- Friendly Environment Name - Enter a friendly name that helps to identify the environment. Ex. Contoso-QA
- BizTalk Management SQL Instance Name - Enter the name of the SQL server instance that holds the BizTalk Management Database. Ex. BT360DOC01
- BizTalk Management Database Name - Enter the name of the BizTalk Management Database (BizTalkMgmtDb)
- Pick your Environment UI color - Pick your preferred color for the environment. Users can choose a color theme for their environment for easy identification purposes. The color-coding of the default environment is automatically created when BizTalk360 is installed for the first time. Similarly, when you create a new environment in BizTalk360, you can choose a custom color for the environment.
- Select the features that the user will be able to see - Select the features that need to be available for the particular environment, click the Select All check box to allow all the features.
- Test Connection - Test the connection once all the details are provided.
- Click Save to add the new environment to BizTalk360.

Edit an environment
Once an environment is added to BizTalk360, there may be a need to change the environment information or update the license key information. The Update Environment screen provides options to modify the environment information. To edit the environment:
- Select the Edit icon from the environmental panel.
- In the Edit Environment section, modify the information in the fields as required.
- Click Cancel to revoke all the changes made on the Edit Environment page.
- Click Save to update the environment information. BizTalk360 will first test the connection to validate the information and if all the information is valid, the environment information will be updated. Otherwise, BizTalk360 will display an error message.

Delete an Environment
As a Super User, you can choose to delete a configured environment depending on the business requirement. Deleting an environment automatically deletes all the data associated with the environment. Say, the user access policies, event log data, monitoring alarm data, threshold data, and so on. Therefore, you need to be very careful before deleting an environment. To delete an environment, follow the steps as shown below:
- Select the Edit icon from the Environmental panel.
- Select Delete Environment
- Popup displays as "The environment may be in use. All the configurations will get deleted, and it cannot be reverted. Are you sure, you want to delete the selected environments?"
- Select Remove if you wish to delete the environment.
- The environment gets deleted and BizTalk360 displays the message as "Environment deleted successfully."

BizTalk Group Topology
No need to create topology diagrams using Visio. The topology diagram is always in sync with the current environment configuration.
The topology diagram can be easily accessed from the BizTalk360 interface. This avoids the need to go and look into an external repository such as SharePoint and so on
Viewing the dynamic topology diagram
Follow the steps as shown below to view the topology diagram:
- Log in to the BizTalk360 application.
- Select the environment for which you want to view the topology diagram.
- Select the BizTalk Group Topology icon inside the grid.
- Depending on the environment configuration, BizTalk360 will display the topology diagram.

Environment Overview
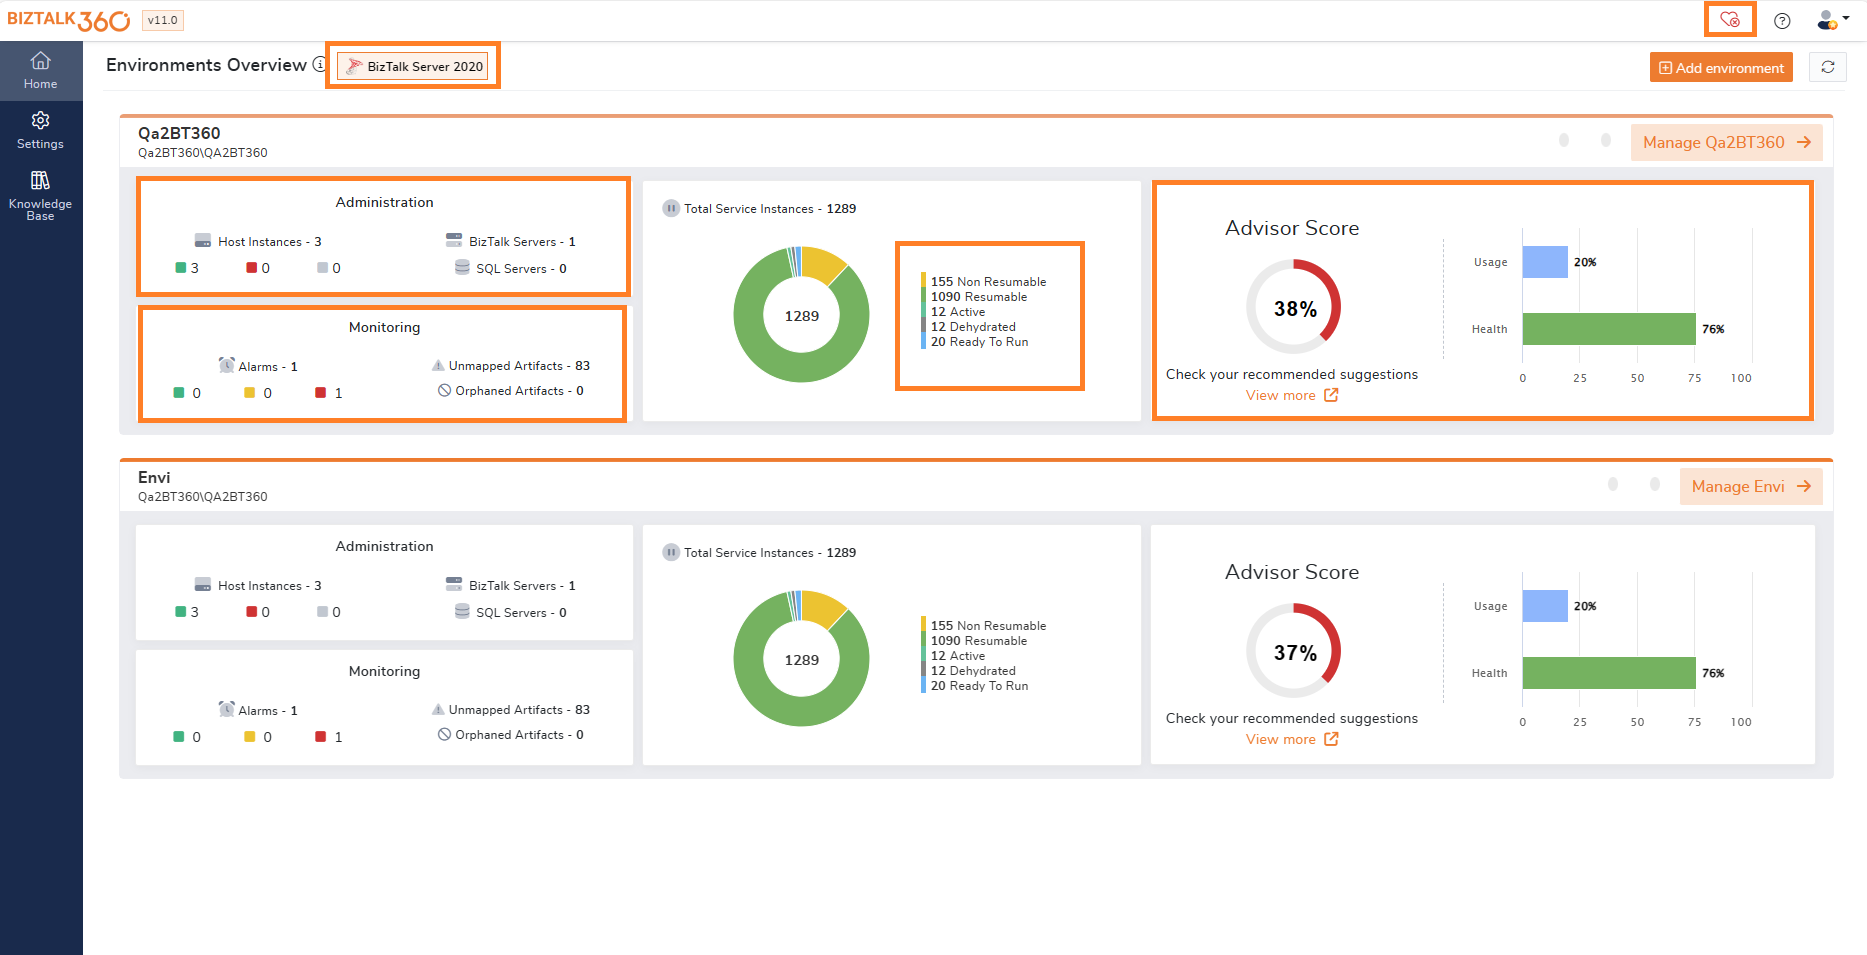
Selecting the nodes from the environment will navigate you to a particular section. Also, each section in the grid will give you the details.
- BizTalk Version - The version of BizTalk server configured is displayed near the Environment overview label.
- Administration - Clicking on Administration will take users to the Administration Dashboard.
- Host Instances - Count of host instances along with the status of each host instances.
- BizTalk Servers - Count of BizTalk servers in your environment and depicts the status of BizTalk server.
- SQL Servers - Count of SQL servers within the environment is shown and depicts status of SQL server.
- Monitoring - Clicking on Monitoring will take users to the Monitoring Dashboard.
- Alarms - This section will let you know how many alarms are configured in your environment and about the status of each alarm either Healthy, Warning and Error
- Unmapped Artifacts - If any of the artifacts are left unmapped for monitoring.
- Orphaned Artifacts - Coun t of orphaned artifacts within the environment is shown and on clicking over there routes users to the orphaned artifacts page.
- Total Service Instances - This grid helps you know how many instances there in your environment and the count of Active, Resumable, Non-Resumable, Dehydrated and Ready to Run service instances.
- Advisor Score - This Grid shows the BizTalk360 Advisor score of the environment based on its health and usage of modules. The Health and Usage of the environment is also shown as a graphical data.
- Health Status - The Status of Monitoring and Analytics services and Database health is shown in the health status blade. This helps users to identify issues in the services and databases and solve them promptly.


