This section describes the different installation options with the installation instructions and prerequisites
Installation Instructions
BizTalk360 Installation options
Installing BizTalk360 On A Stand-Alone (non-BizTalk) Server (Option 1)
Installing BizTalk360 On A BizTalk Server (Option 2)
Installing BizTalk360 on High-availability BizTalk Servers
How To Install Just The BizTalk360 Monitoring Service
How To Install Just The BizTalk360 Analytics Service
Installation Instructions and Prerequisites
Please make sure the BizTalk360 service account you are going to use during installation is part of:
Local Administrators Group (in all servers)
BizTalk Server Administrators Group
BizTalk Application Users Group
BizTalk Isolated Host Users Group
SSO Administrators Group
IIS_IUSRS group
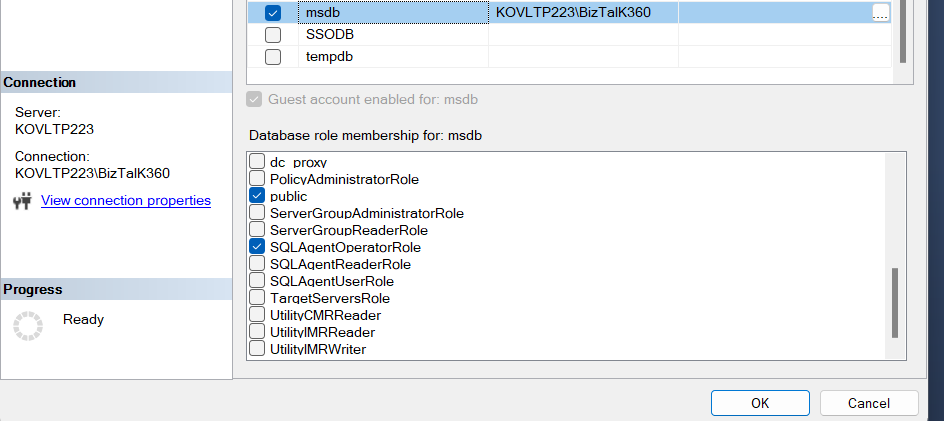
* You need to provide the SYSADMIN role to the BizTalk360 service account for creating BizTalk360 database under SQL Server.
In addition to the above, it is required to provide "SQLAgentOperatorRole" for the BizTalk360 service account as shown below in order to monitor SQL Jobs in BizTalk SQL Instances.
Check the Prerequisites section and make sure all the prerequisites are met before BizTalk360 installation.
BizTalk360 Installation Options
One of the common questions that customers raise to us is about the various deployment choices for BizTalk360. This is one of the common questions we have seen recently on our customer engagements. Here are the options:
Option 1 - Installation on a stand-alone server (our recommended approach)
Option 2 - Installation on the BizTalk Server environment
Note: It is recommended to login to the BizTalk360 server with the BizTalk360 service account for performing install/upgrade/uninstall operations to avoid any permission errors.
Option 1 - Installing on a stand-alone Server(Recommended)
Prerequisties
Install the same version of BizTalk Server components in the stand alone BizTalk360 Server.
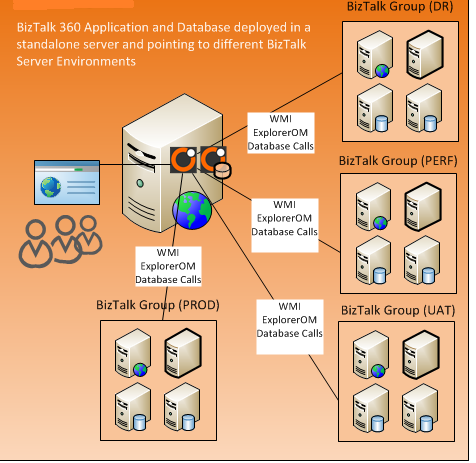
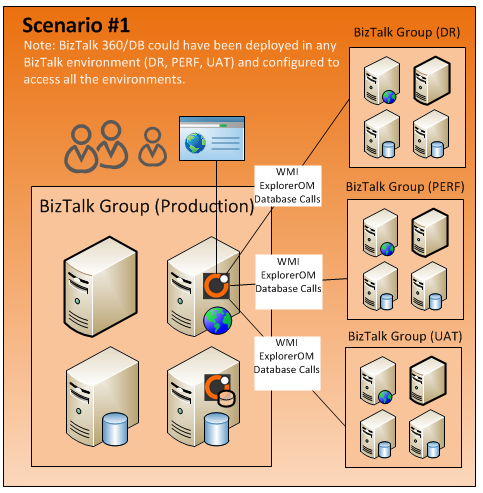
The most customers prefer to install BizTalk360 on a standalone server and point it to various remote environments. This gives them bit of confidence since nothing gets installed on the production BizTalk servers. BizTalk360 doesn't use any agents, so there won’t be any footprint on the real BizTalk servers. BizTalk360 recommends this scenario by allowing customers to install BizTalk360 on a standalone server and point to various environments.
Before you proceed with the installation, make sure that the below mentioned prerequisites are installed in the BizTalk360 standalone server.
Install .NET 4.6.1
To install .NET 4.6.1 on your server, follow the steps as shown below:
Open the Server Manager interface. Click Add roles and Features.
In the Select Features interface, select .NET Framework 4.6. Features
Click 'Install' in the Confirmation page. You will see the installation progress.
Click 'Close' to close the wizard once the framework has been installed.
Add IIS Roles
Once you have set up the .NET 4.6.1 Framework, the next step is to install IIS (Web Server) and the required modules to support running BizTalk360.
To install IIS, follow the steps as shown below:
Open the Server Manager interface. Select Roles from the left menu and click Add Roles. Click 'Next' in the screen.
Select Web Server from the list and click Next.
On the Role Services screen, select ASP.NET. This will bring a new popup window to resolve the dependencies as shown below. Click on Add Required Role Services
Select the following Role Services in addition to the default ones already selected — Security > Basic Authentication, Windows Authentication, Complete IIS 7 Management Compatibility (select all the items in the list)
Click 'Install' in the Confirmation screen.
Click 'Close' to close the wizard once the roles have been set up.
Once you have done Step 2 and Step 3, try to run the BizTalk360 Installer MSI once again. In the prerequisite checks section, you will notice that now most of the items will be verified and have the green tick mark against them. The only one item that will have the Red Error mark is Supported BizTalk servers (2006 R2, 2009, 2010, 2010 R2). To resolve this issue, you need to install the BizTalk admin components in your server.
Installing BizTalk Administration Components
Since BizTalk360 uses ExplorerOM component to fetch BizTalk applications and its artifacts, it is required to install BizTalk Administration components on the stand alone server.
It is required to run the setup.exe file of BizTalk and on the component selection screen, just select Administration Tools and Monitoring section and SSO components under Additional Software section as shown below.
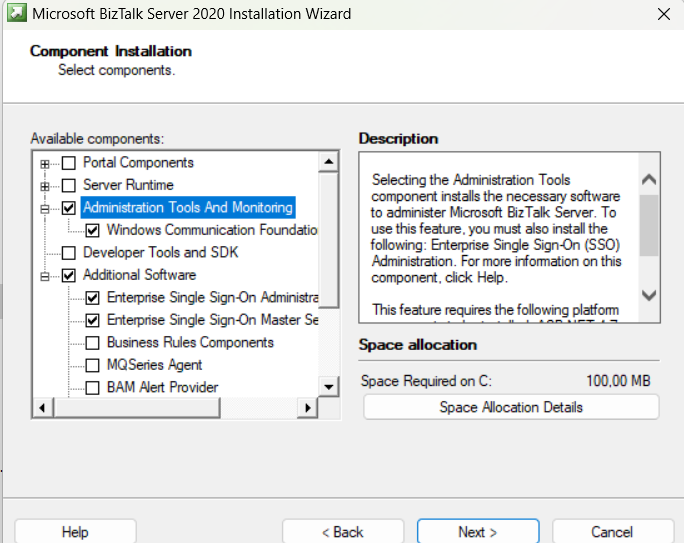
As you can witness, you don’t need to install any other components of BizTalk server. Make sure you install the correct version of BizTalk administration components.
Ex: If you are going to monitor BizTalk 2016 environment, then you need to install only BizTalk Server 2016 administration components.
Once all the prerequisites are met, log in to BizTalk360 server with the service account and proceed with the new installation.
Get the MSI ready, Start a Command Prompt with 'Run as Administrator'
Use the CD command to navigate to the drive/folder where the BizTalk360 MSI file is saved
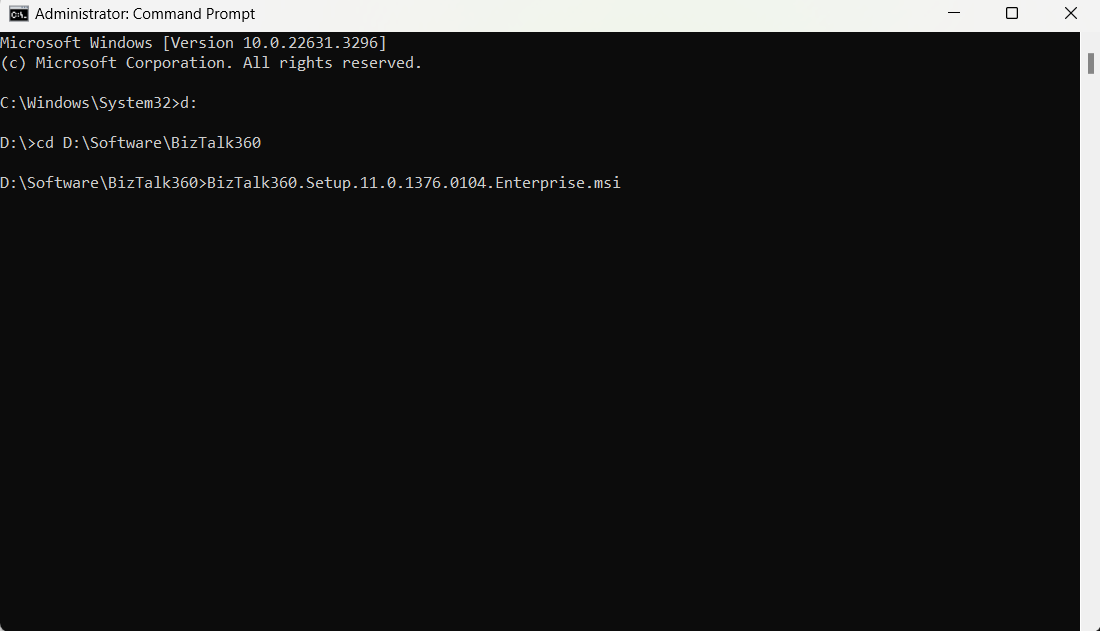
Execute the BizTalk360 MSI
In the Welcome to BizTalk360 Setup Wizard screen, click ‘Next’ to continue
Read the End User License Agreement and select ‘I accept the terms in the License Agreement’ to accept the license agreement. Click 'Next'
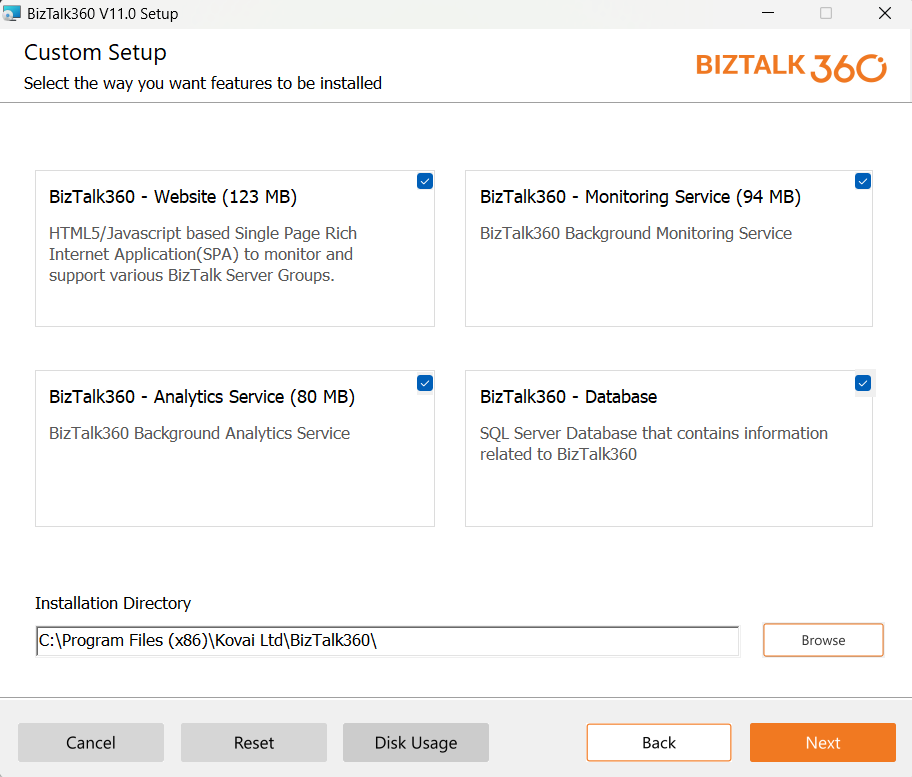
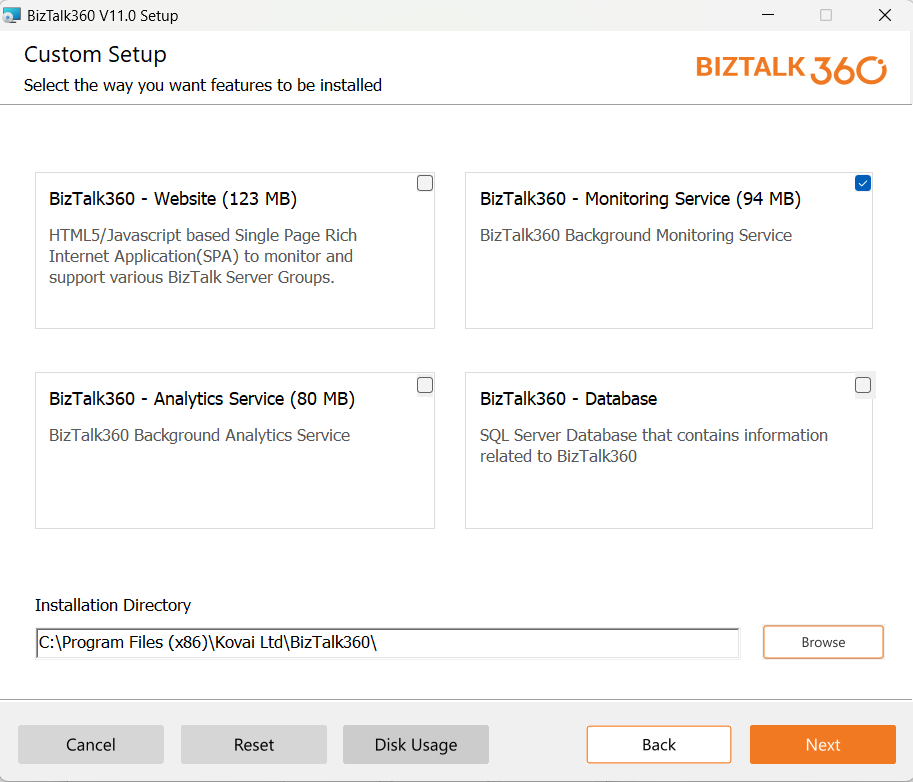
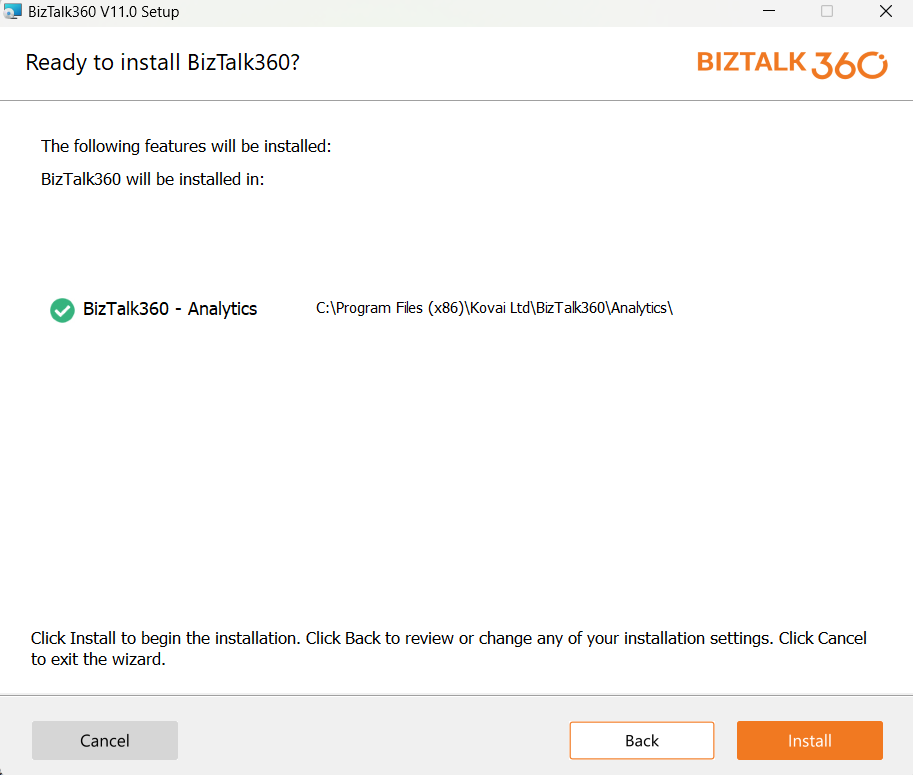
In the Custom Setup screen, you can choose whether you would like to install Website or Monitoring or Analytics or Database. If you would like to install BizTalk360 database in separate SQL server, then you can leave it 'unchecked' and select the Website, Monitoring and Analytics.
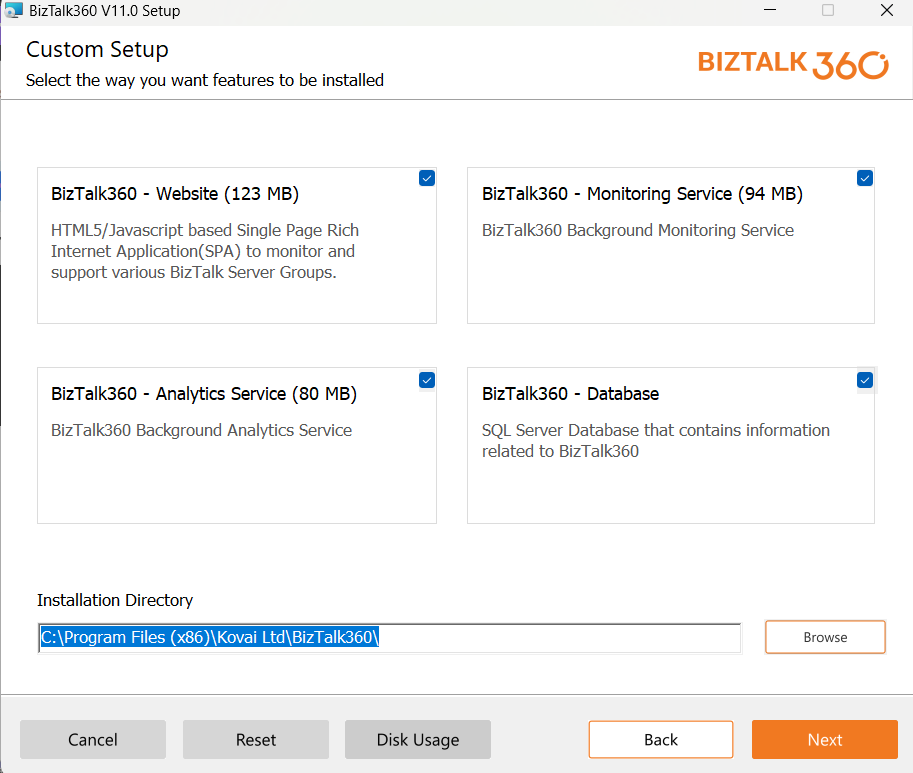
Once ready, click 'Next'.
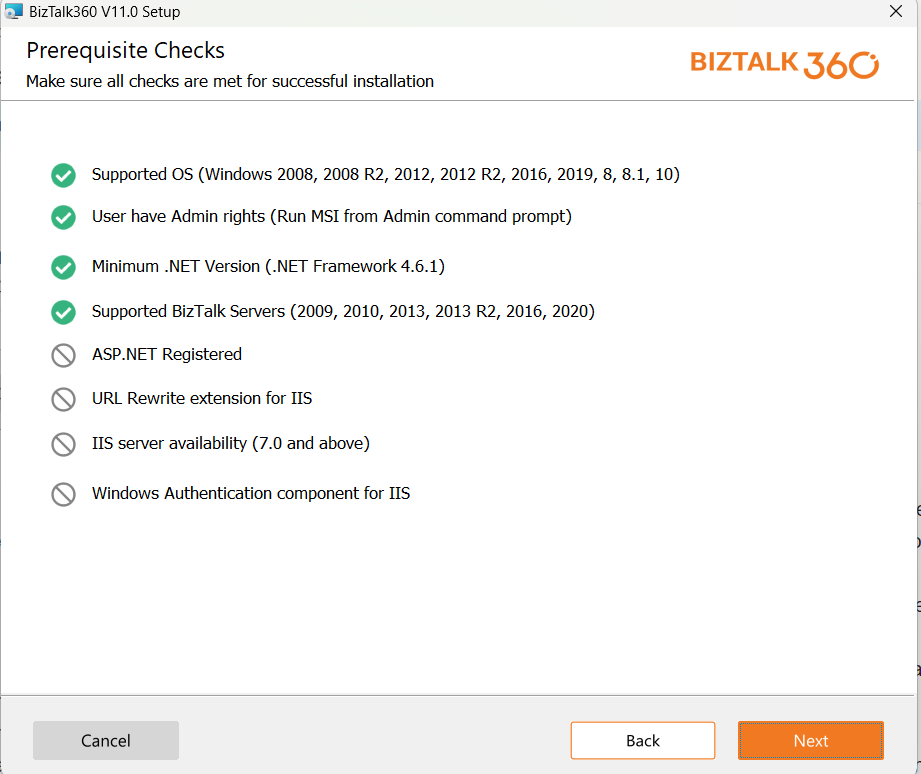
In the Prerequisite Checks screen, check whether all the prerequisites have been verified and a green tick mark is placed next to every item. If something is wrong, please cancel the setup, correct the errors, and re-run the setup. If everything is correct, click 'Next' to proceed to the next step.

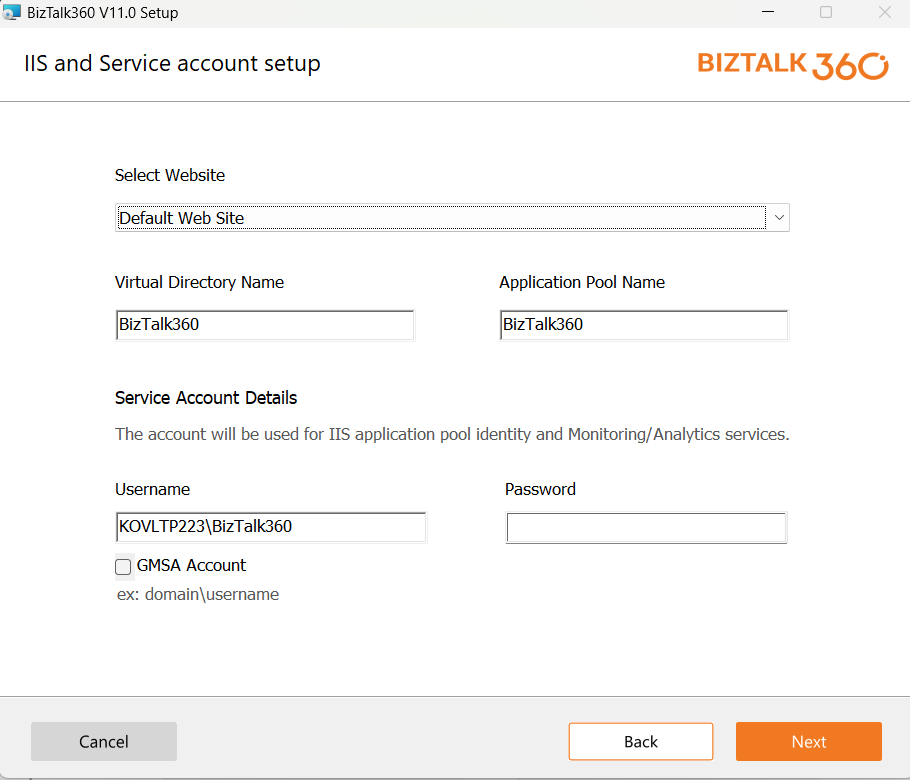
In the IIS and Service account set up,
In the select website dropdown, http/https websites in IIS will be listed. Select the IIS website where you want to create the virtual directory. Enter the virtual directory name and application pool name.
Enter Service Account details, this will be used to run IIS application pool and Monitoring/Analytics Service.
In the Database setup screen,
Provide SQL instance Name and Database name at which you want to install BizTalk360. You have the option to test whether the connection to the database is successful or not. If its successful Click 'Next' to proceed to the next screen.
BizTalk360, allows users to install Biztalk360 with Azure database. In the case of using Azure database, select SQL Server Authentication option under Authentication Mode and enter the Username and Password.

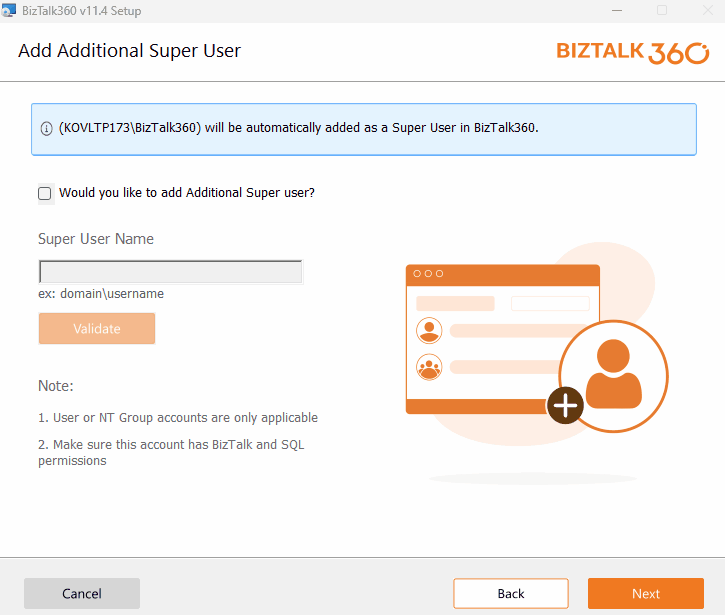
Log on user's credentials will be added as a super user to BizTalk360 Team Management by default.
If you need to add another super user to the team management, In the Additional Super user wizard, You can enable the Additional super user check box and add the user credentials.
The Specifications regarding the type of user/group who can be added as a default super user will be provided as a note for reference. Once after validating the additional super user credentials, click 'Next' for the final installation verification step.
Incase if the validation fails/ you wish to bypass this step, you can disable the additional super user checkbox and then proceed with the next step.
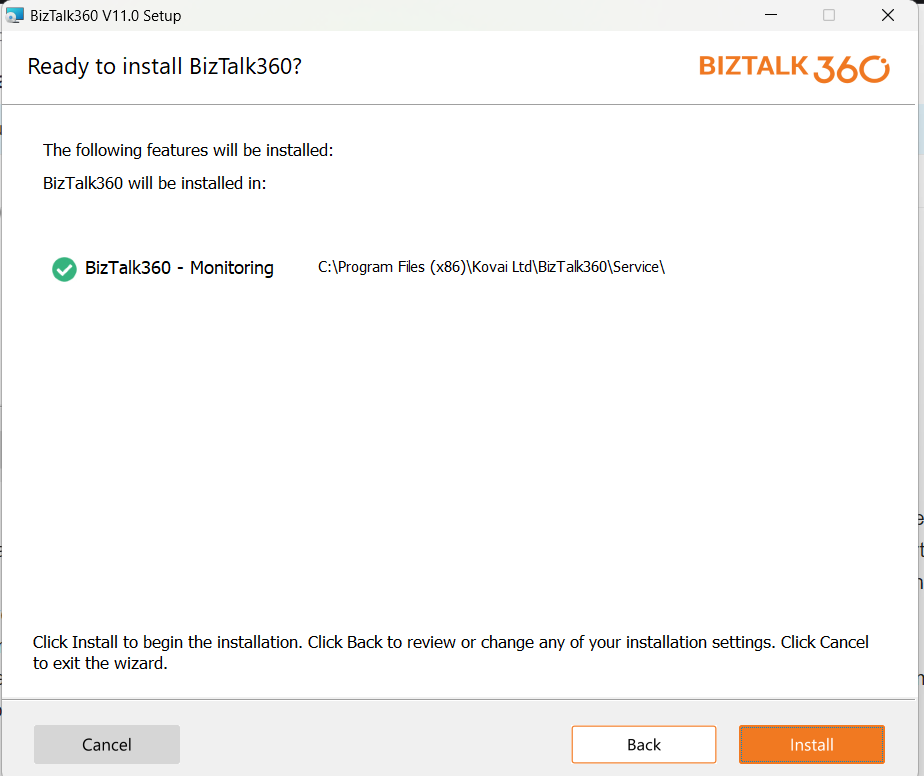
Review the information and click ‘Install’ to start the installation process. Once the installation is complete (it takes about 1-2 minutes), click 'Finish' to complete the process.
Verifying the Installation
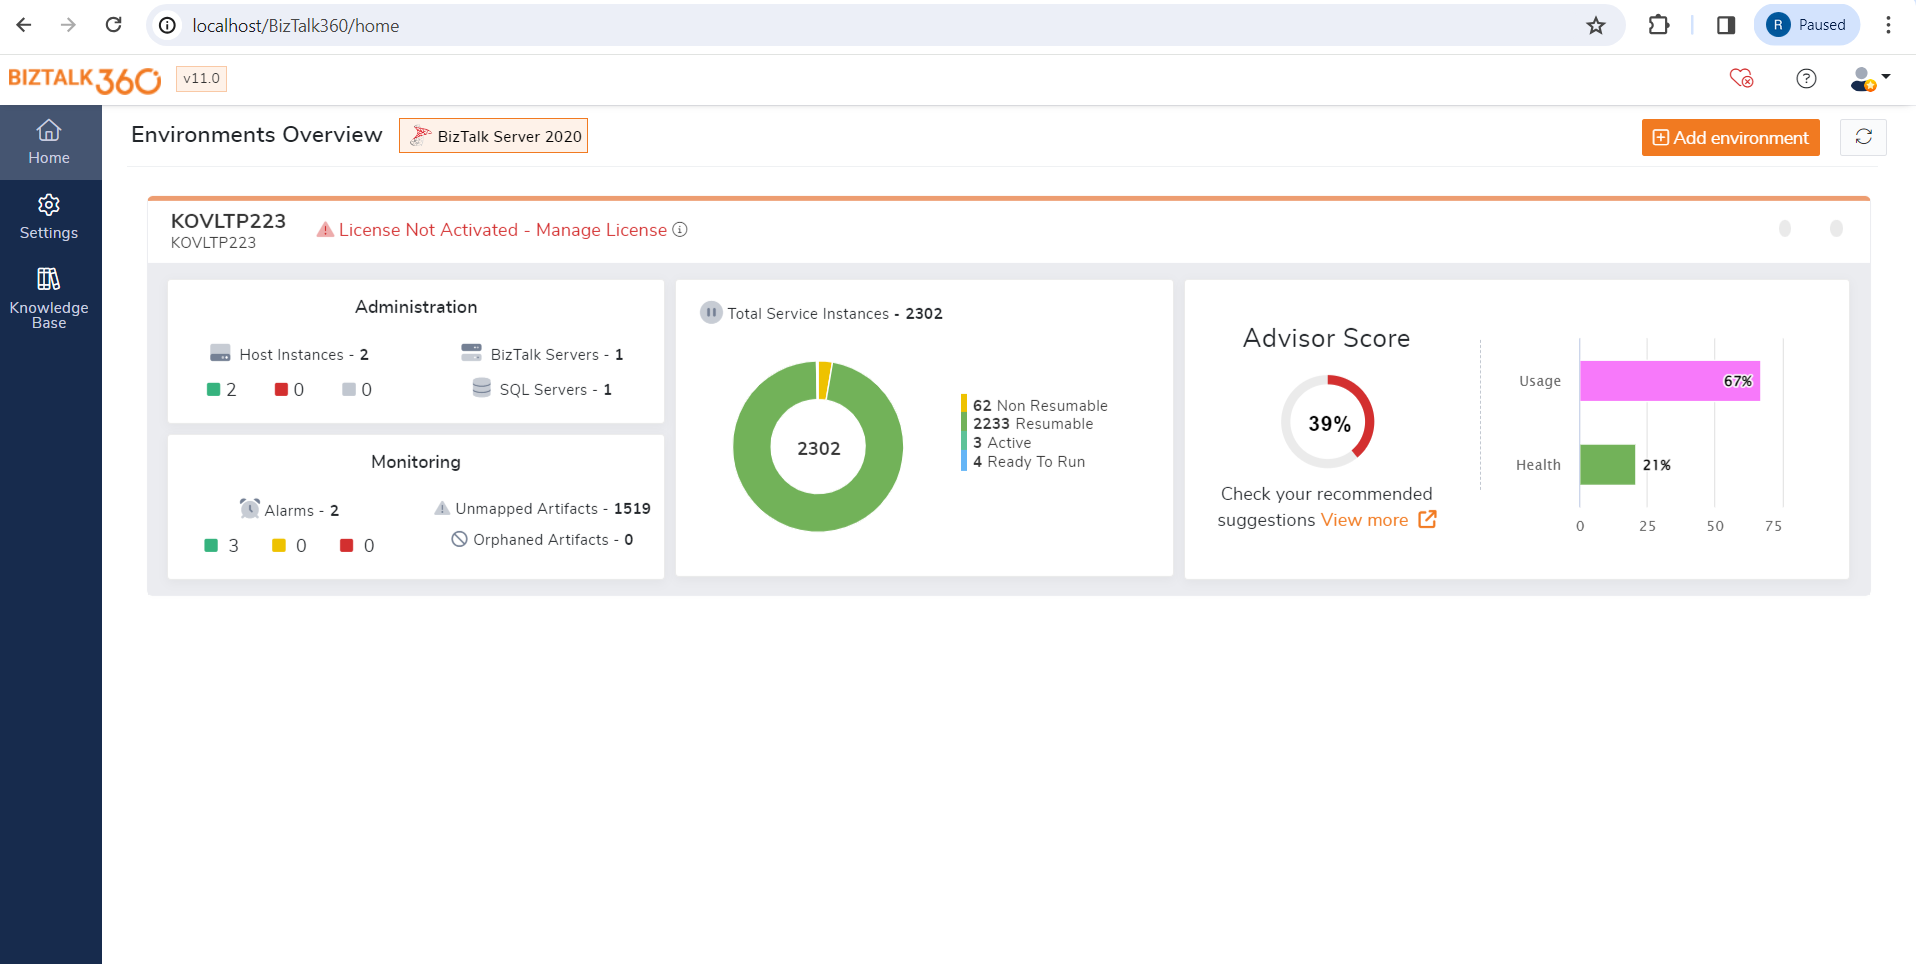
Once the installation is completed successfully, the installation wizard will open the BizTalk360 application in the browser.
You will see a screen as shown below (http://localhost/BizTalk360)
Default Super User
After installation, the log on user & Default super user provided during installation will be added as Super users of BizTalk360 application.
Option 2 -Installation on the BizTalk Servers
To install BizTalk360 in the BizTalk servers, you can simply run the BizTalk360 MSI in the BizTalk server as most of the pre-requisites would have already installed on the BizTalk server. You need to just ensure that the necessary permissions are given to the BizTalk360 service account and proceed with the installation. Follow the steps in the option 1.
Installing BizTalk360 on a High Availability BizTalk Servers
Installing BizTalk360 on the single server environment is an easy task when the BizTalk server and database are existing in same machine. You can simply run the MSI from the Administrator Command prompt. However, in most of the cases, we have seen our customers use BizTalk server in a High Availability mode where there are at least two BizTalk servers and clustered SQL servers for keeping databases.
This section explains the different scenarios in which you can install and configure BizTalk360 on a High Availability BizTalk server.
Installing BizTalk360 on the 1st Server ( Say, Server 1):
Run Command prompt in the "Run as Administrator" mode.
Use the CD command to navigate to the drive/folder where the BizTalk360 MSI file is saved.
Execute the MSI
In the Welcome to BizTalk360 Setup Wizard screen, click ‘Next’ to continue.
Read the End User License Agreement and select ‘I accept the terms in the License Agreement’ to accept the license agreement. Click ‘Next’.
In the Custom Setup screen, you can have everything checked as shown below.
In the Prerequisite Checks screen, check whether all the prerequisites have been verified and a green tick mark is placed next to every item. If something is wrong, please cancel the setup, correct the errors, and rerun the setup. If everything is correct, click ‘Next’ to proceed to the next step.
In the IIS and Service Account setup screen, select the IIS website where you want to create the virtual directory. Enter the application pool settings such as Name, username, and password. Once you have entered the information, click ‘Next’ to proceed further.
In the Database Setup Screen, specify the SQL Server Name and Database name. We recommend you to Test connection once the details are entered to make sure it is successful. Then, click 'Next' to proceed to the next screen.
In the Super User Name input field, log on user's credentials will be shown by default. You can change the user's credentials or provide a valid user/group to be added as a default super user. Incase if the validation fails, you can click on "Skip Add User" and then proceed with the next step.
Review the information and click ‘Install’ to start the installation process. Once the installation is complete (it takes about 1-2 minutes), click 'Finish' to complete the process.
Installing BizTalk360 on the second server ( Say, Server 2):
Run Command prompt in the "Run as Administrator" mode.
Use the CD command to navigate to the drive/folder where the BizTalk360 MSI file is saved.
Execute the MSI
In the Welcome to BizTalk360 Setup Wizard screen, click ‘Next’ to continue.
Read the End User License Agreement and select ‘I accept the terms in the License Agreement’ to accept the license agreement. Click ‘Next’.
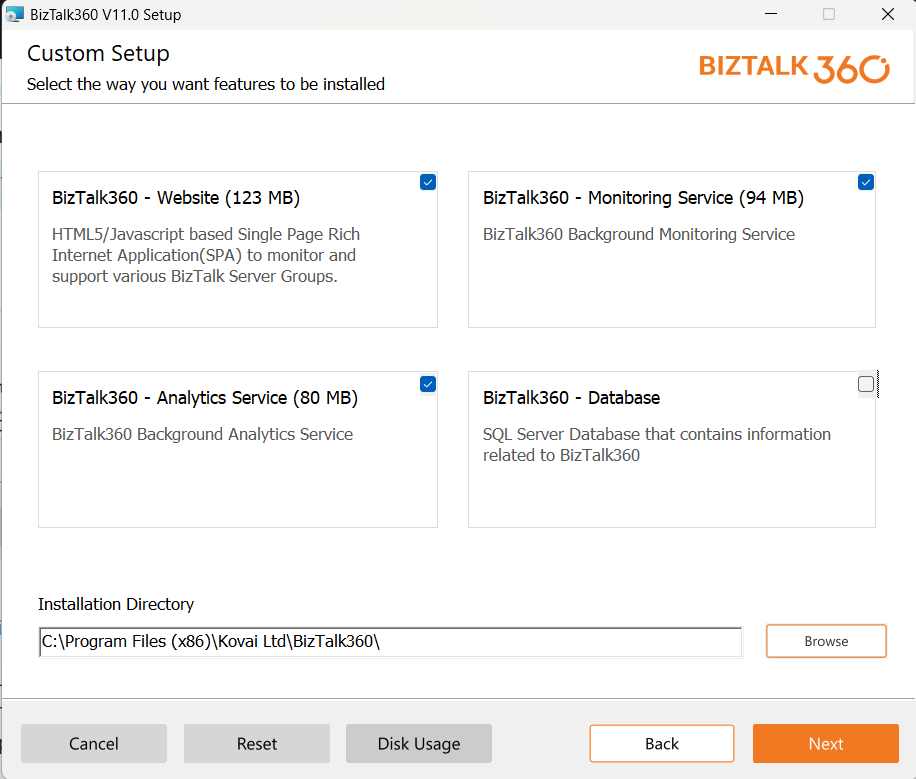
In the Custom Setup screen, uncheck BizTalk360 Database and leave other options as it is and then click 'Next'.
In the Prerequisite Checks screen, check whether all the prerequisites have been verified and a green tick mark is placed next to every item. If something is wrong, please cancel the setup, correct the errors, and rerun the setup. If everything is correct, click 'Next' to proceed to the next step.
In the IIS and Service Account setup screen, select the IIS website where you want to create the virtual directory. Enter the application pool settings such as Name, username, and password. Once you have entered the information, click ‘Next’ to proceed further.
In the Database Setup Screen, provide the existing SQL Instance Name and BizTalk360 Database name. We recommend you to Test connection once the details are entered to make sure it is successful. Then, click 'Next' to proceed to the next screen.
Review the information and click ‘Install’ to start the installation process.
How to Install the Monitoring Service Alone
In BizTalk360, the monitoring service plays the key role as it is responsible to fetch the status of artifacts from the BizTalk server.
Sometimes, you may need to install the monitoring service in more than one server for high availability. In this section, we can understand how to install just the monitoring service alone in another server.
Follow the below steps in order to install only the Monitoring service in the server:
Run Command prompt in the "Run as Administrator" mode.
Use the CD command to navigate to the drive/folder where the BizTalk360 MSI file is saved.
Execute the MSI from an Administrator Command Prompt
In the Welcome to BizTalk360 Setup Wizard screen, click ‘Next’ to continue.
Read the End User License Agreement and select ‘I accept the terms in the License Agreement’ to accept the license agreement. Click 'Next'.
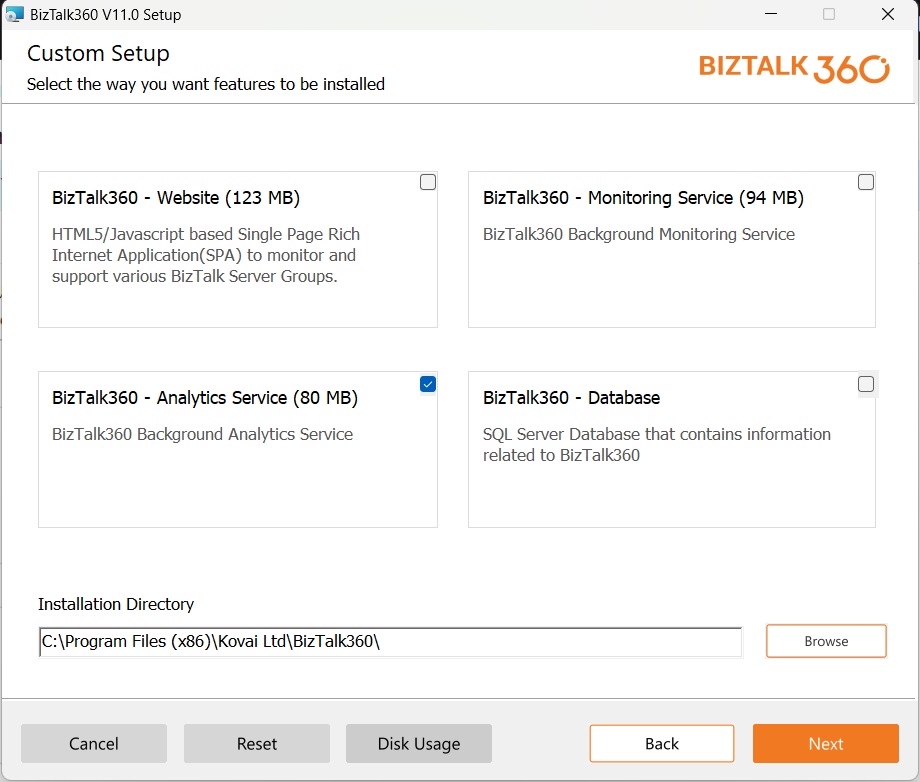
In the Custom Setup screen, uncheck BizTalk360 Website, BizTalk Analytics Service and BizTalk360 Database and select only "BizTalk360- Monitoring Service" as shown below and then click 'Next'.
In the Prerequisite Checks screen, check if all the required prerequisites to install Monitoring service have been verified and a green tick mark is placed next to every item. If something is wrong, please cancel the setup, correct the errors, and rerun the setup. If everything is correct, click 'Next' to proceed to the next step.
In the IIS and Service account Setup, select the IIS website where you want to create the virtual directory. Enter the application pool settings such as Name, username, and password. Once you have entered the information, click 'Next' to proceed further.
In the 'Database Setup' screen, specify the SQL Instance Name and Database name. We recommend you to Test connection once the details are entered to make sure it is successful. Then, click 'Next' to proceed to the next screen.
Review the information and click ‘Install’ to start the installation process.
How to install the Analytics Service Alone
Follow the below steps in order to install only the Analytics service in the server for high availability:
Run Command prompt in the "Run as Administrator" mode.
Use the CD command to navigate to the drive/folder where the BizTalk360 MSI file is saved.
Execute the MSI
In the Welcome to BizTalk360 Setup Wizard screen, click ‘Next’ to continue.
Read the End User License Agreement and select ‘I accept the terms in the License Agreement’ to accept the license agreement. Click 'Next'.
In the Custom Setup screen, uncheck BizTalk360 Website, BizTalk360 Monitoring Service and BizTalk360 Database and select only "BizTalk360 Analytics Service" as shown below and then click 'Next'.
In the Prerequisite Checks screen, check if all the required prerequisites to install Analytics service have been verified and a green tick mark is placed next to every item. If something is wrong, please cancel the setup, correct the errors, and rerun the setup. If everything is correct, click 'Next' to proceed to the next step.
In the IIS and Service account Setup, select the IIS website where you want to create the virtual directory. Enter the application pool settings such as Name, username, and password. Once you have entered the information, click 'Next' to proceed further.
In the 'Database Setup' screen, specify the SQL Instance Name and Database name. We recommend you to Test connection once the details are entered to make sure it is successful. Then, click 'Next' to proceed to the next screen.
Review the information and click ‘Install’ to start the installation process.
Database Mirroring
If Database Mirroring is used the connection string needs to be updated as below:
"Server=PRIMARY_INSTANCE;Failover Partner=MIRROR_INSTANCE;Database=BizTalk360;Integrated Security=True;"
Repair Installer from V11.1
You might face upgrade or launch issues due to missing files, DLLs, necessary files in the installation folder, IIS authentication issues, or missing entries in the BizTalk360 properties in the Registry. To resolve these problems, we've introduced an installer repair option that helps restore the necessary files or entries for a flawless BizTalk360 installation.
Below are the fixes that takes place if user opts to repair the installation.
Restoring Missing Files: After repair, any missing config files, XML files, or DLLs in the installation folder will be restored.
IIS Authentication: If Windows authentication is disabled in IIS, it can cause launch issues after installing BizTalk360. Once the repair installation is completed, the system will automatically enable Windows authentication in IIS.
Registry Entries: Registry entries store configuration settings and options for applications, enabling them to function according to user preferences and system requirements. If any required entries are missing, the system might encounter issues in the application's functioning. After repairing the installation, any deleted registry entries are recovered.
Database Schema Recovery: Database schemas define the structure of the data. Recovering database schemas is vital for maintaining data integrity and ensuring application functionality. In scenarios where users may delete constraints, indexes, views, stored procedures, or tables from the BizTalk360 database, the application may malfunction. Opting for a repair installation ensures that all deleted schemas are recovered, which ensures the proper functioning of the application.
Important Note
Database schema repair will take place only on servers where monitoring feature is installed.
To Perform repair installation, follow the below steps:
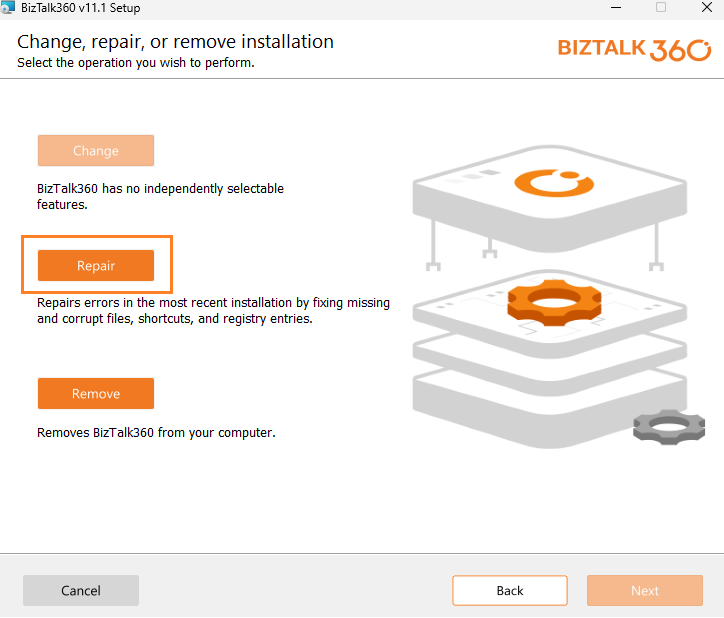
Run the BizTalk360 MSI again which you have already installed.
Click next from the BizTalk360 set up wizard.
You will find an option to Repair the installer. Click on Repair.
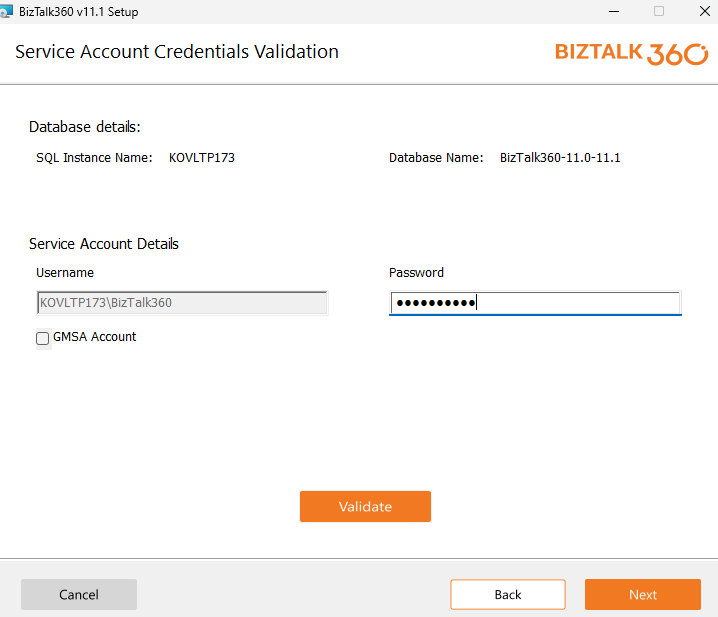
Provide the password of your service account and click next.
In the ready to repair wizard, verify the summary and click repair.
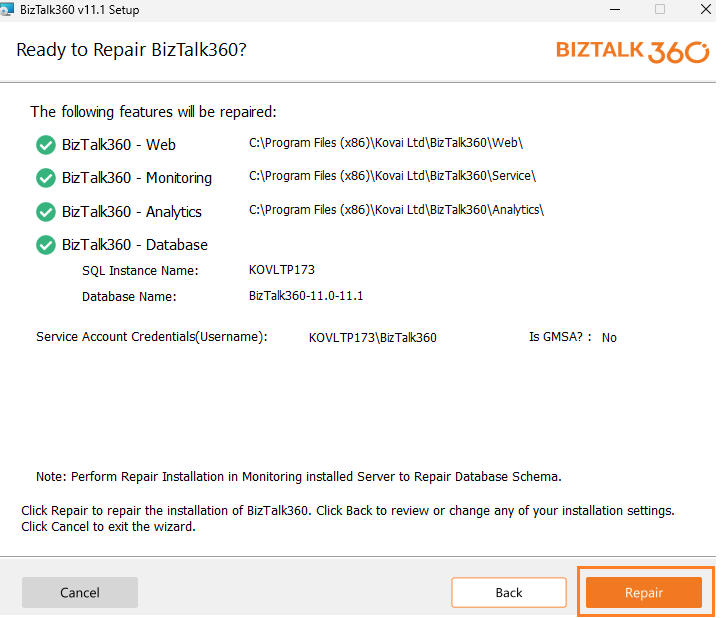
After repairing the installation all the above-mentioned fields will get repaired.
Points to be remembered while repairing installation
Repair installation is supported for GMSA users as well.
If BizTalk360 is installed in a high availability set up, then the installation must be repaired in all the servers.
To repair the database schema, perform repair installation in Monitoring installed server.
Repair installation can be performed only from version V11.1.
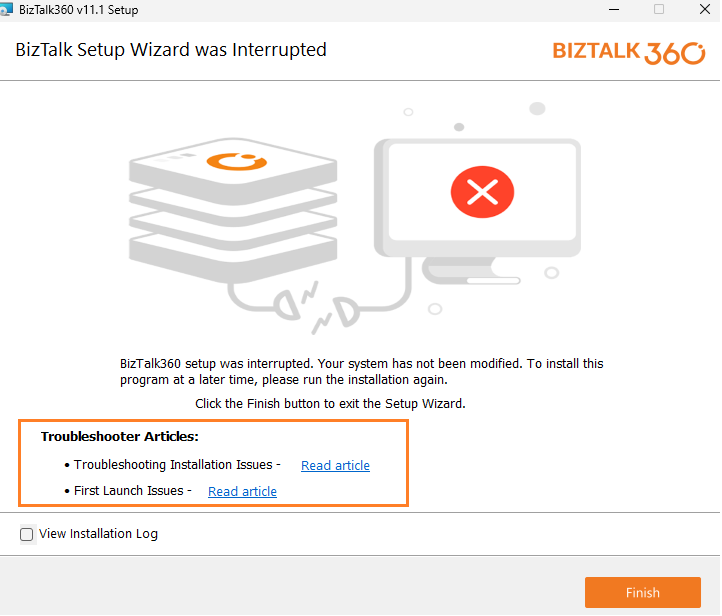
Troubleshooting articles in Installer
Set of documents has been published to troubleshoot installation and first launch issues based on the analysis of previous customer experiences. Whenever an installation fails, we provide a link to these articles in the installation failure wizard. This allows users to quickly refer to the articles and promptly address the issues they encounter during installation.