In the daily activities of a BizTalk administrator, you might come across integrations where FTP sites are used for receiving and transmitting messages. FTP sites are often used for cross-platform integrations. For example, when you have an SAP system on Unix that must be integrated via BizTalk Server with other systems, you might use FTP for receiving and transmitting of messages.
To keep the business process going, it is importance that the FTP sites are online, and the messages are being picked up. So, when you need to be constantly aware of whether the FTP sites are online and working properly.
Setting up FTP Monitoring
Log in to the BizTalk360 application.
Go to Monitoring -> Manage Mapping -> File Locations section.
You can see three tabs each containing port details of their respective adapters, which are File, FTP, and SFTP.
Click the 'FTP' tab to monitor FTP Locations.
Select the Alarm (Manage Alarms) from the drop-down, which you would like to associate the SFTP location for monitoring.
The receive locations and send ports that use the "FTP" adapters are displayed in a grid.
Click on the FTP location to configure the details and threshold rules for monitoring.

The FTP Monitoring Configuration contains the following sections:
FTP Configurations.
Firewall Configurations.
Monitoring Rules.
Restart Host Instance (Applicable only for Receive Locations)
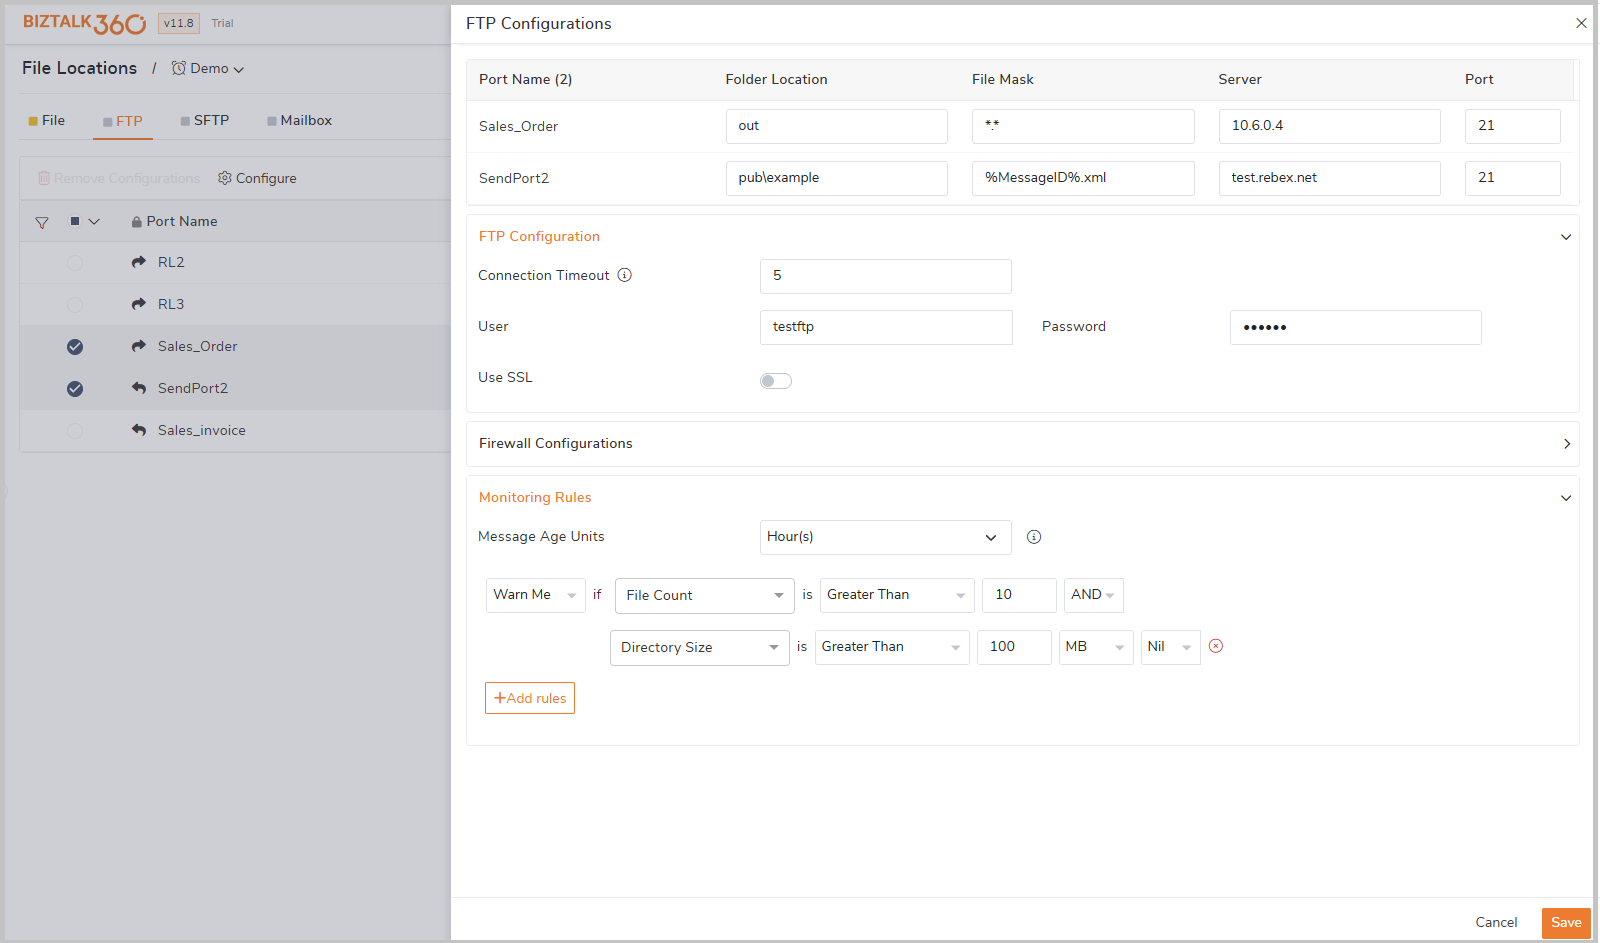
1. FTP Configurations
The Folder Location, Server, File Mask, Port, Connection Timeout and credentials for authentication that will be used for monitored is displayed here.
The folder location, server and port are automatically fetched and cannot be modified during configuration.
File Mask: If the folder might receive multiple types of files, but user wants to monitor only a particular type of files, they can overwrite the File Mask. All file extensions (e.g., CHPAPO*.txt, *.txt, *. *, *outbound322*, PPI*, Test*. *) and macros patterns are supported.
Adjust the Connection Timeout settings between 5 to 300 seconds, specifying the maximum time allowed for connecting with SFTP locations.
FTP has the simplest form of authentication using the username/password method. Enter the Username and Password to be used for authentication.
If the username and password columns are blank, it will be considered as anonymous authentication.
Toggle on the 'Use SSL' option for choosing between Explicit or Implicit SSL.
2. Firewall Configurations
In the Firewall Configurations section, Choose the 'Mode' (Active or Passive) and Type (Socks_4 and Socks_5)
The user can fill in gateway proxy details or just leave it blank. If the user wants to use the default proxy configuration given in 'Settings -> Gateway/Proxy settings', the user can click the 'Use Gateway Proxy' option.
3.Monitoring Rules
Users can configure the Warning and Error threshold rules for different metrics (File Count, Directory Size and Age) that they want to monitor.
Here is a combination of rules, that helps to identify the issue for the latter mentioned scenario. In this case, if any order stays in the FTP location for more than 30 minutes, it will trigger an alert to respective users.
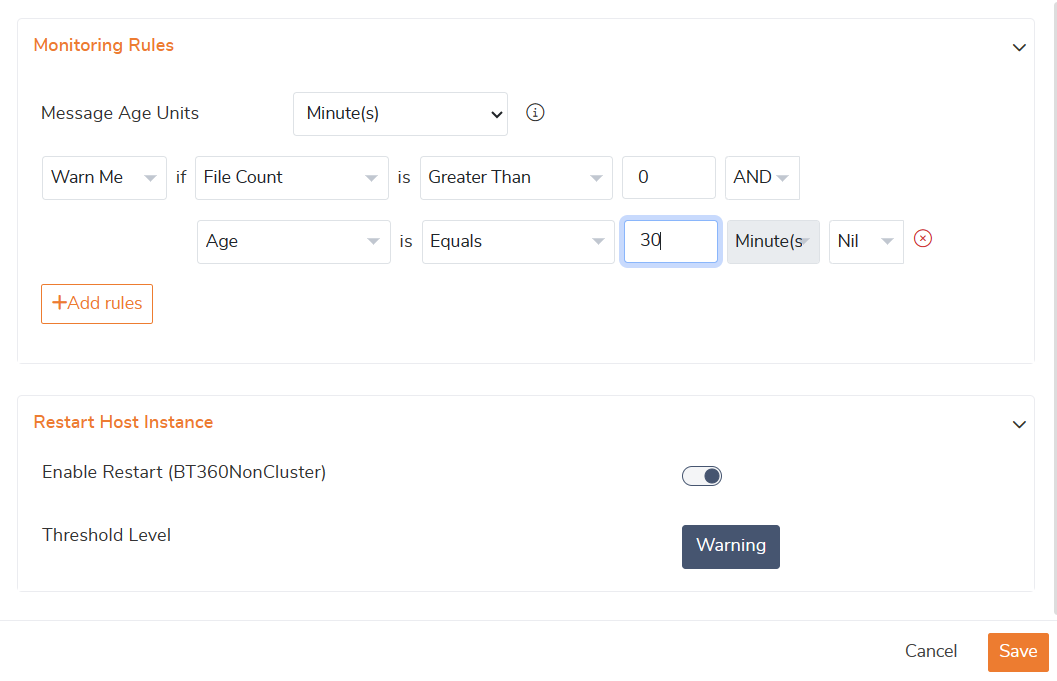
4. Restart Host Instance
Enabling the restart host instance option will automatically restart the associated Host Instance on detecting the violations, that will act as an immediate remedy to process the orders further.
Click the 'Save' button to complete the process. Once after saving the details and rules, if BizTalk360 can connect with the FTP location you can view the current File Count, Age and Directory Size of the location. Else the server will respond with an error code and details. This will be displayed in the name column with a small orange icon, and when you hover over it, it will show the error occurred during the connection.

FTP Server availability monitoring:
Basically, monitor status will show based on the monitoring rules, but Critical status will also indicate the availability of the FTP server on the below reasons,
Any of the provided Configuration or Security details are invalid - Ensure the provided details are valid and correct.
The FTP Server is not reachable at the moment - Check if the FTP server is reachable and allowed for remote connection using the provided authentication details.
A timeout occurred while attempting to connect with the server - Increase the 'Connection Timeout' in BizTalk360.
NOTE
The Count and the Directory Size will be displayed in the Alarm - File Location grid, only after the successful configuration of the FTP location. The values of the Count and Directory Size columns depend on the File Mask.
Both BizTalk FTP and nSoftware FTP adapters can be monitored using BizTalk360.
The FTP location will be moved to orphaned if the configuration is not successful.
Default Monitoring Configuration
When multiple FTP locations follow the same pattern, configuring monitoring rules individually becomes repetitive .
With Default Monitoring Configuration you can define rules once (e.g., File Count > 1, Age < 2 hours) and reuse across all FTP locations.
To Configure the Default Values
Navigate to Environment Settings → Monitoring → Mapping Configuration → EndPoint → Default Configuration->FTP
Configuration Includes
FTP Configuration -Configure common connection details such as Connection Timeout , Username and Password ,Firewall Settings
Monitoring Rule Configuration-Define threshold rules using File Count ,Directory Size ,File Age
The configured default values are automatically prepopulated when setting up monitoring for an FTP location. Users can also select multiple ports and click Configure to apply the same monitoring settings across all selected ports, enabling quick setup and consistent monitoring.