BizTalk360 provides the ability to import and export configuration between different environments. This feature helps users quickly replicate configurations across environments without manual reconfiguration.
The following configuration items can be exported/imported:
Monitoring
Alarm with mappings
Escalation Policies
Email Template
General
Application Group
User Access Policy
Knowledge Base Articles
Schedule Maintenance
Administration
Saved Queries
Secure SQL Queries
Admin dashboard
Custom widget
Automated Tasks
Analytics & Reports
Dashboards
BizTalk Report
The import and export configuration feature can be accessed only by the super user from the Environment Settings of BizTalk360 web portal.
Exporting configuration
When you click the Export option, the Export section will display all the configured features for the selected environment.By default,All configurations of the available features will be selected.
After exporting the configuration, the generated export file can be imported into a different environment, based on the user's requirement.
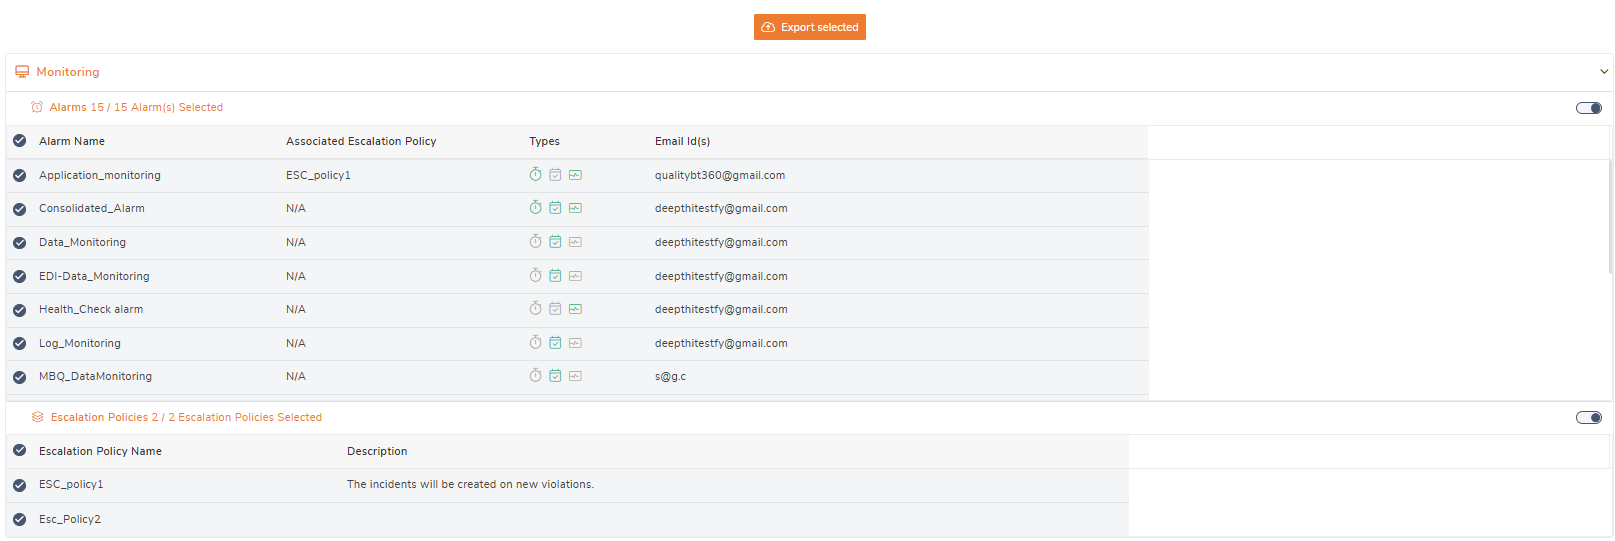
Alarms and Escalation policies
The Alarms grid contains the details of the alarms, alarm name, type and the configured email id.
In the escalation policies section, the grid contains the escalation policy name and its description.
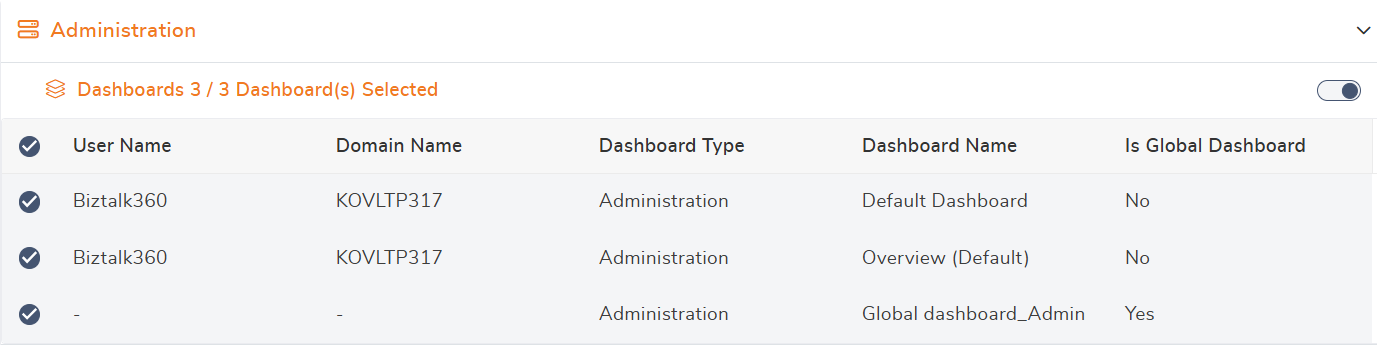
Dashboards
The first screen of the Export User Dashboard feature, the Dashboard grid, contains the details of the dashboards, including the Username, Domain Name, Dashboard Type, Dashboard Name and whether the dashboard is a Global Dashboard or not.
If the dashboard is a Global Dashboard, then the Username and Domain Name will not be displayed because the dashboard will be accessed by all the users under the environment. The dashboard details will be displayed according to the environment selection.
Custom Widgets
The export process of the Custom Widgets shows the names of the custom widgets. User can select the desired custom widgets which they want to export.

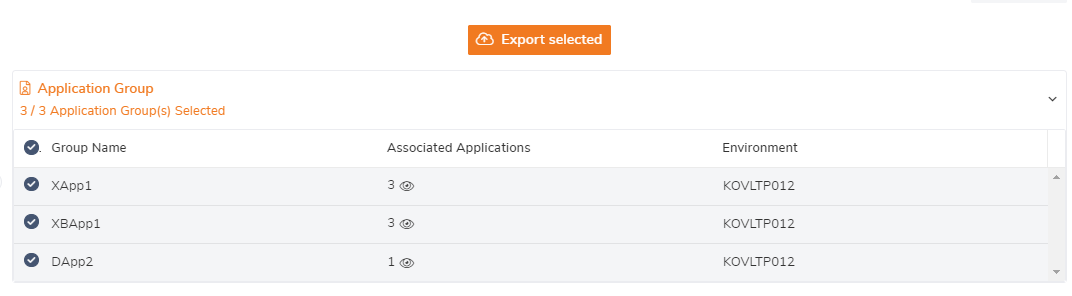
Application Group
In this section, the grid contains the group name, and the associated applications count which user can export the required.
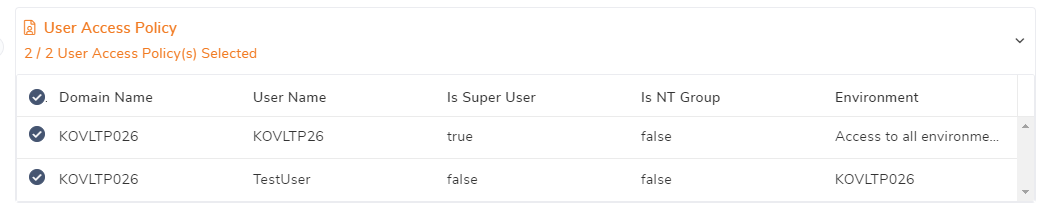
User Access Policies
In this section, the grid contains the domain name, username and whether the user is super user/NT Group and the environment access details.
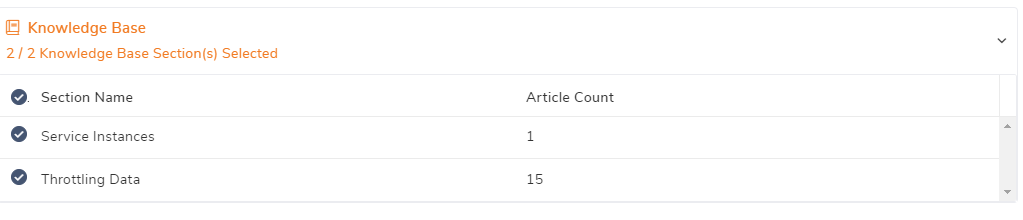
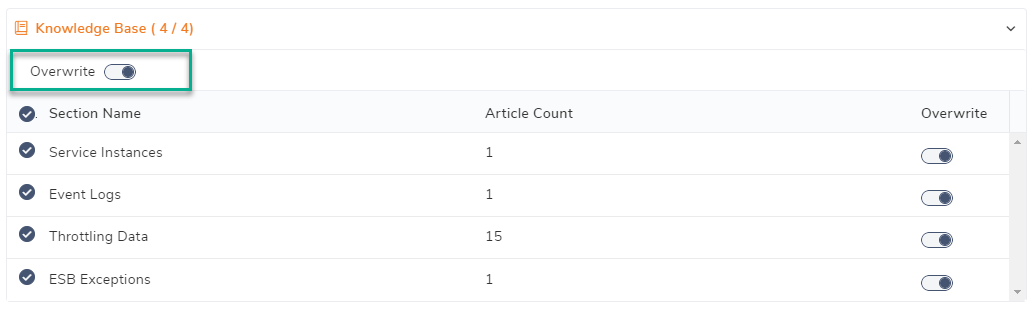
Knowledge Base
The number of available Knowledge Base articles of the selected environment will be displayed, according to the following sections:
Service Instances
Event Logs
Throttling Data
ESB Exceptions
Email Template
In this section, The Template name, description and the Email address details will be shown for exporting from an environment.

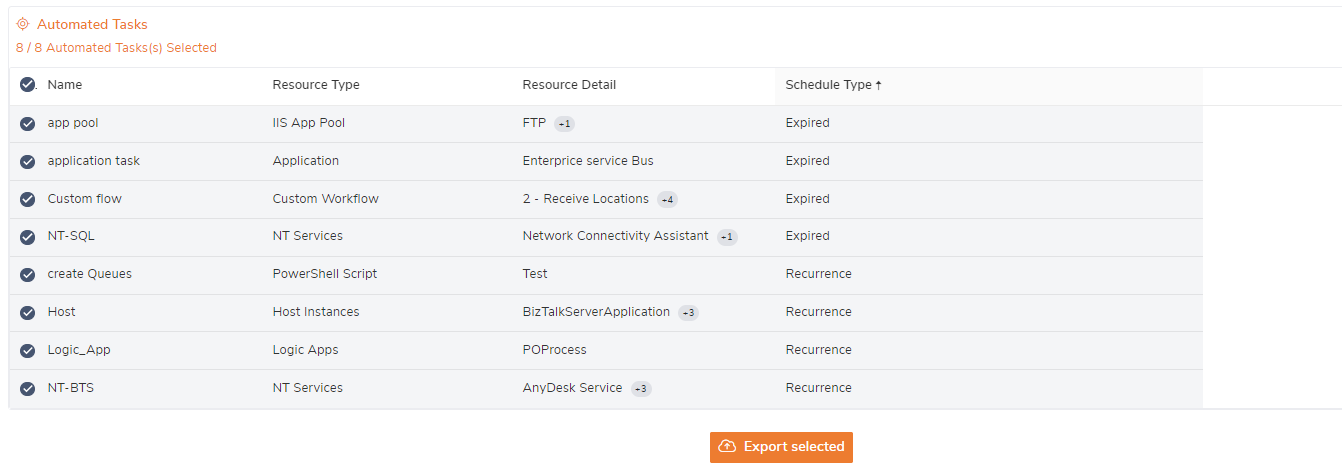
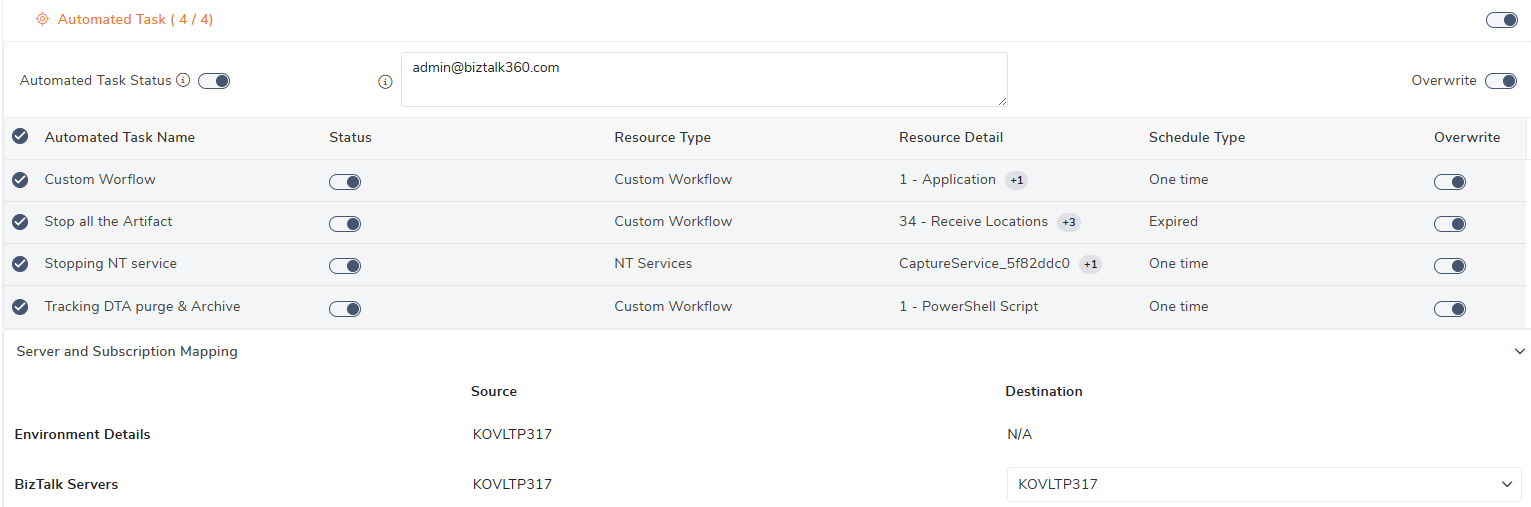
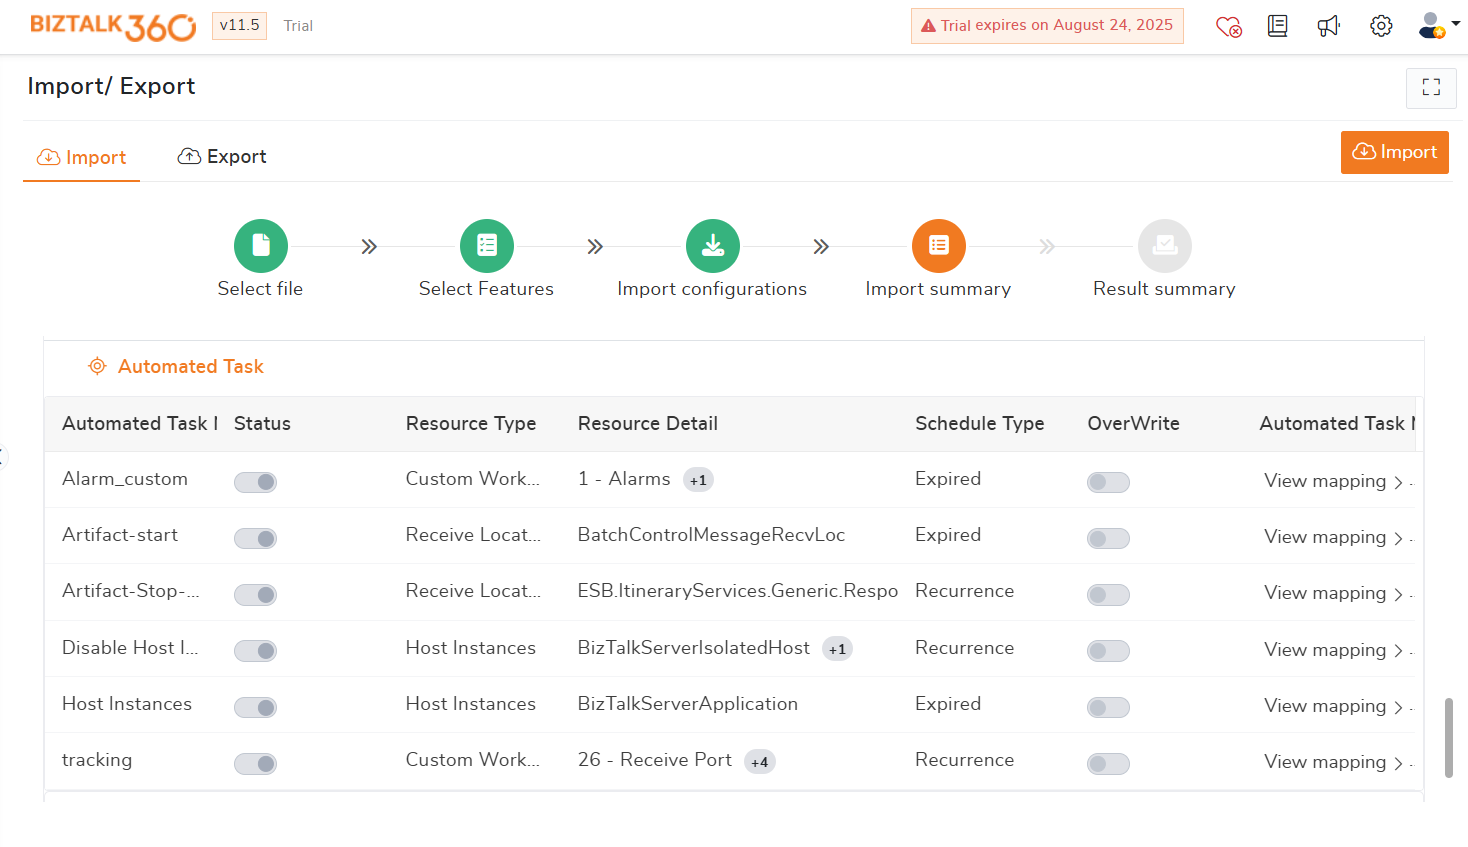
Automated Tasks
The number of tasks available in the selected environment will be listed from all sections like Application, Artifacts, Host Instances, NT services, PowerShell Scripts and Custom flows.
The automated task grid contains the details of the task like the task name, Resource type, Resource details, and Schedule Type.
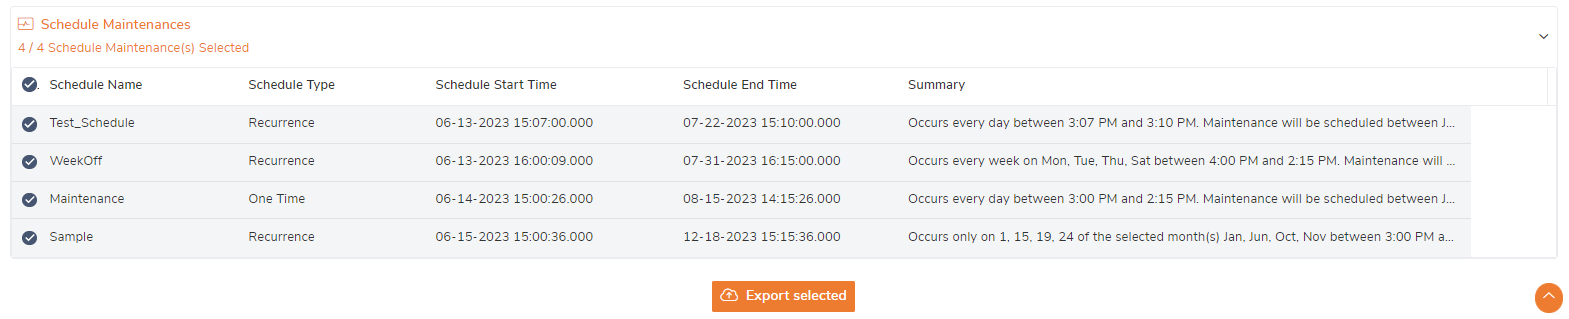
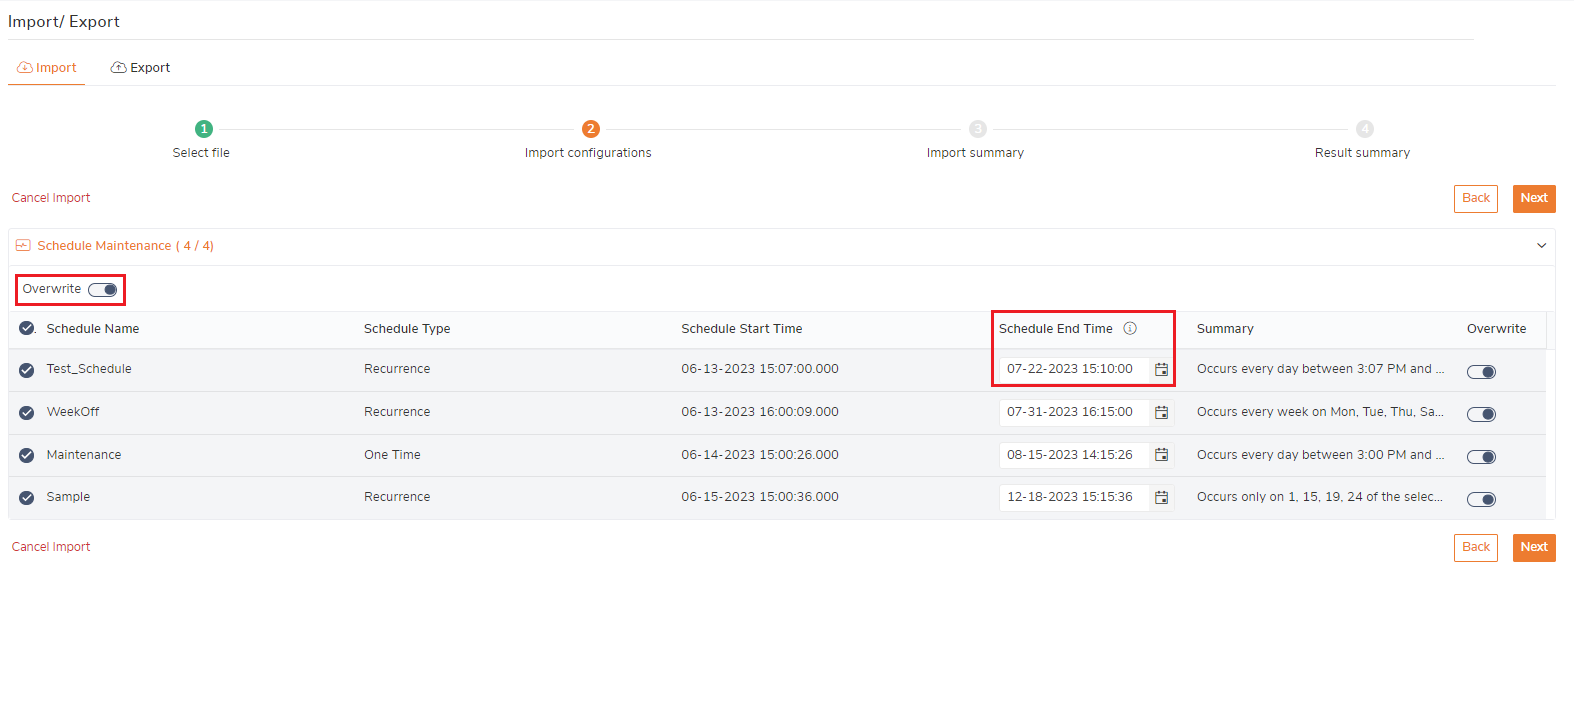
Schedule Maintenance
Users are able to export the available active one-time and recurrence schedules under maintenance. the expired schedules will be auto deleted so that won't be exported. The Export Schedule maintenances grid contains the details like Schedule name, Schedule type, Start time, End time, and summary.
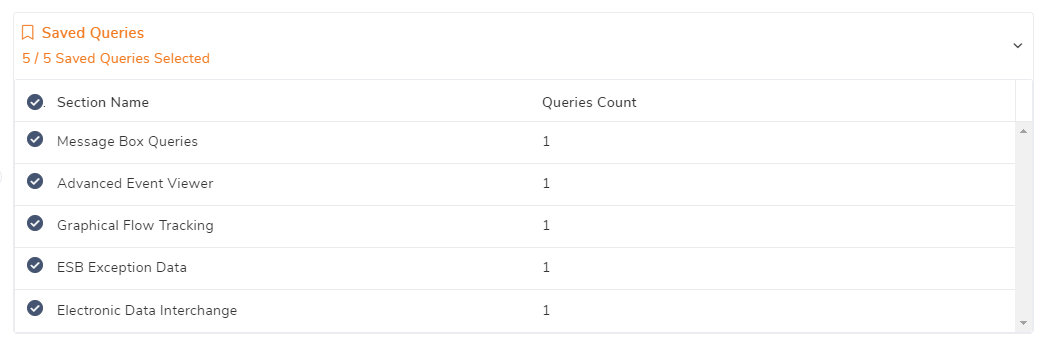
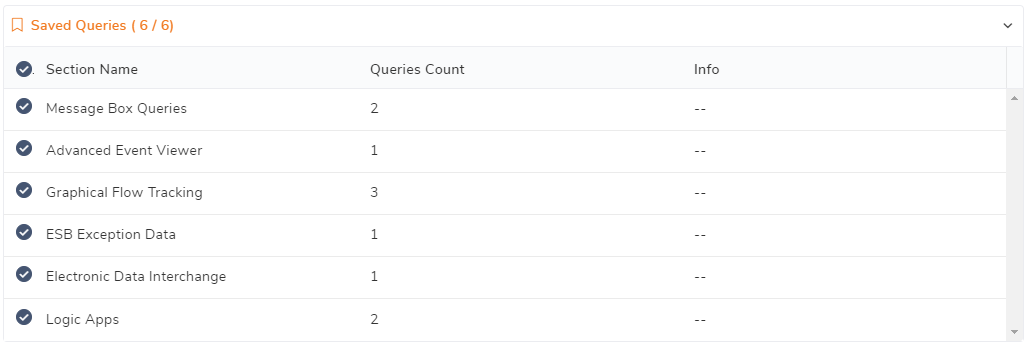
Saved Queries
In this section, all the queries of the selected environment will be displayed for the following sections:
Message Box Queries
Graphical Flow Tracking
Advanced Event Viewer
ESB Exception
Business Activity Monitoring
Electronic Data Interchange
Logic Apps
Secure SQL Queries
The Secure SQL Queries grid contains the secure SQL queries name, their corresponding data base and the SQL instance.

BizTalk Reports
The Reports grid contains the details of the Reports and their associated Dashboard, being the Report Name, Status, Type.

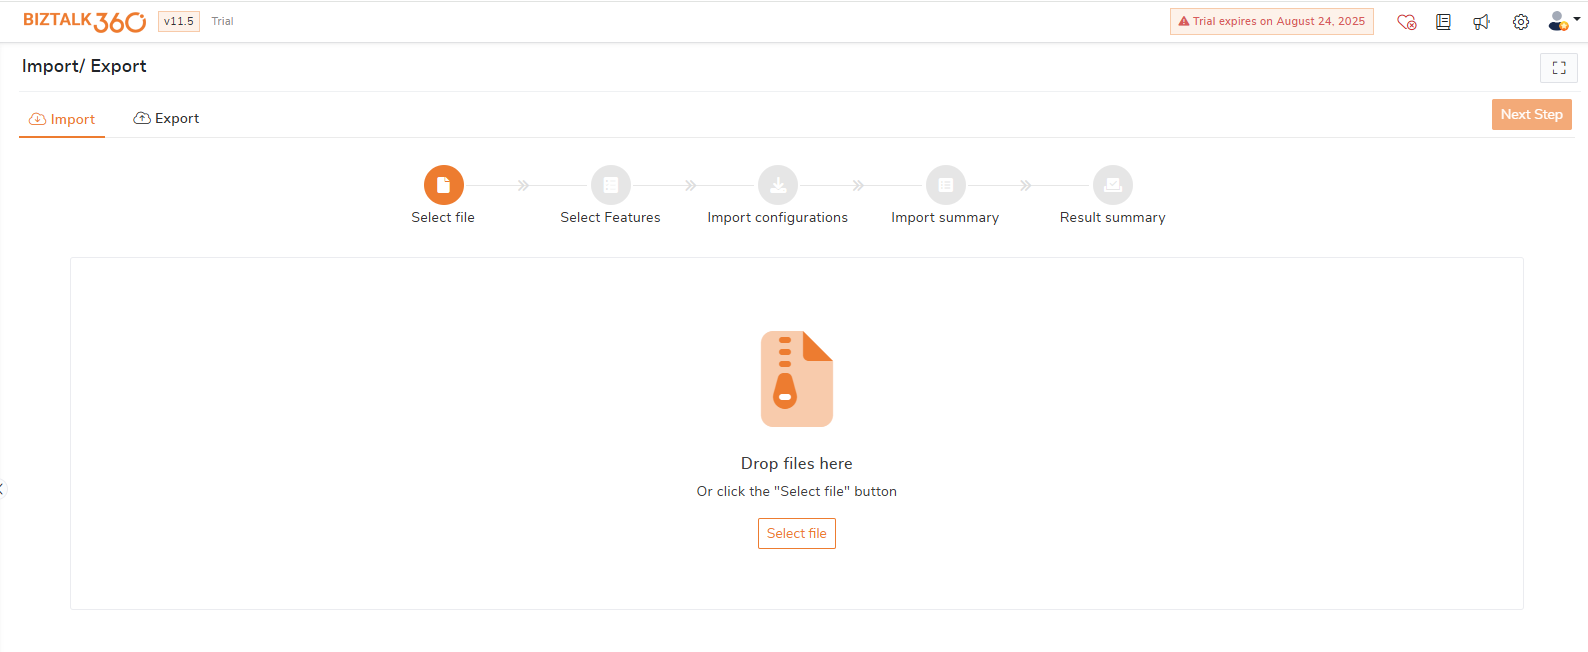
Importing Configuration
The import procedure consists of five steps, allowing the user to import a previously exported file. The user can have the flexibility to import these files into either the same environment or a different one.
Below are the five steps in the import process,
Select File - The user can select the exported file to be imported into the destination environment.
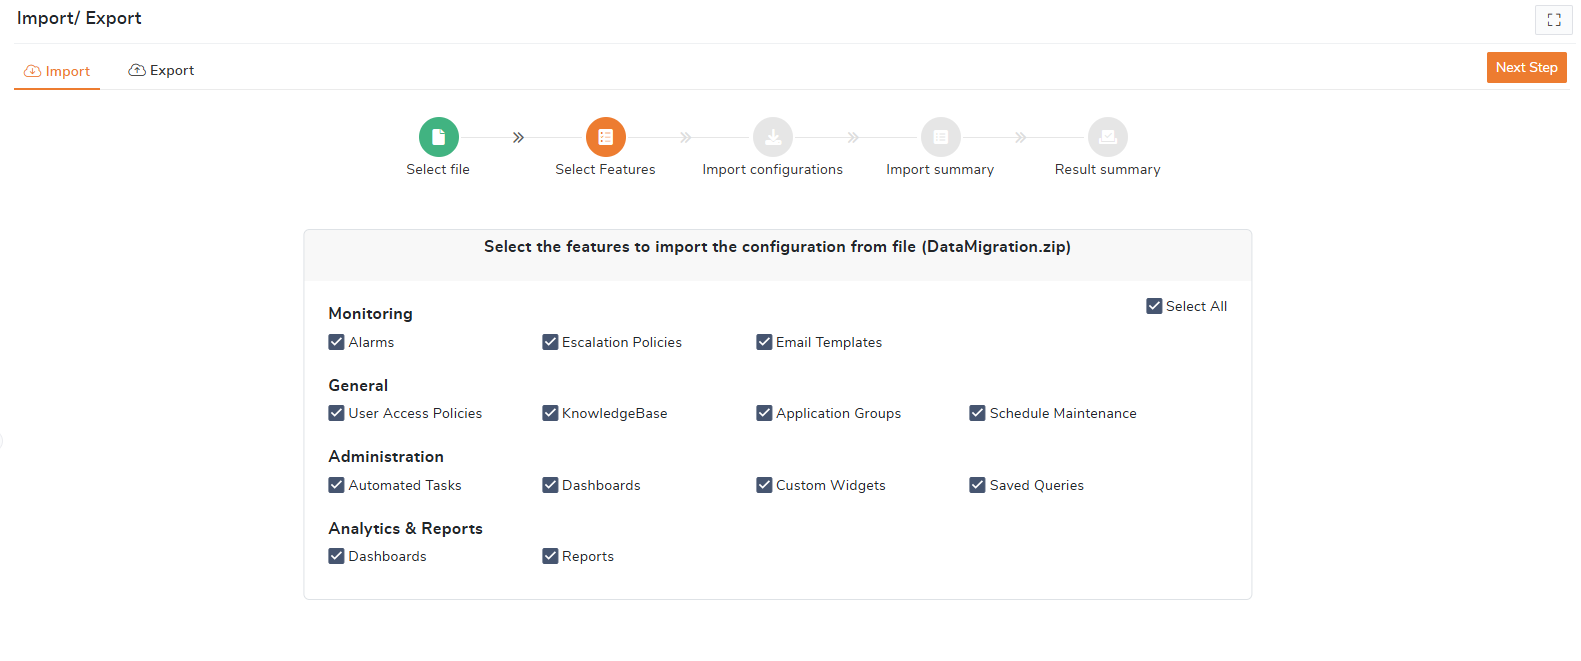
Select Features - This section allows users to import specific features. Here, users can choose the features that they want to import.
Import Configuration - In this section, the user can enable the feature and overwrite the import settings.
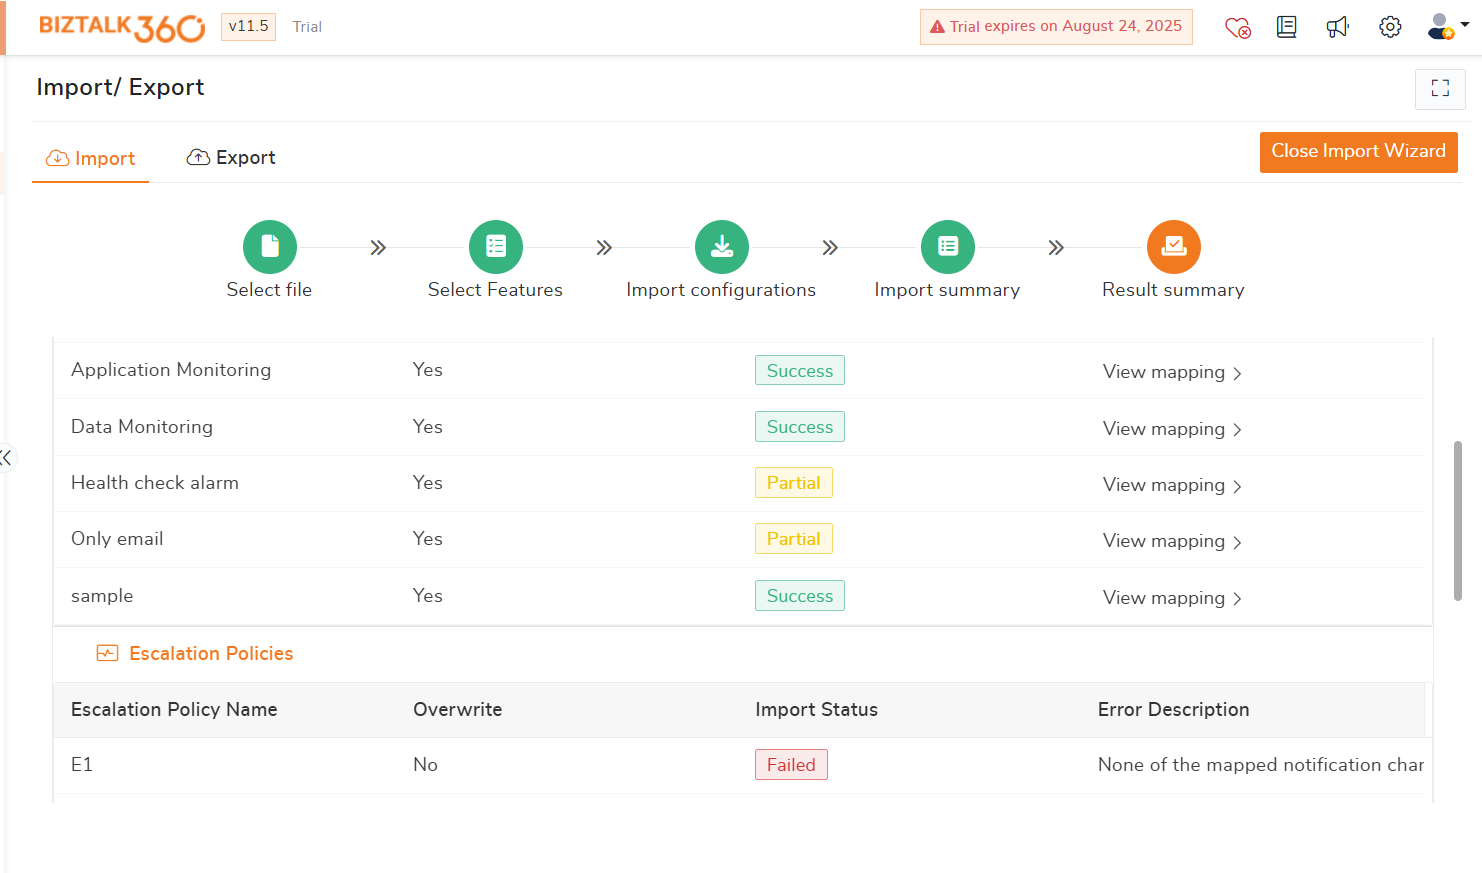
Import Summary - The User can view the artifacts get imported by clicking the view mapping or in the remark column.
Result Summary - The selected features and associated configurations will be imported into the destination environment. user will notice a confirmation message as 'Import process completed. See the result summary below! Click "Close Import Wizard" to close the import wizard screen and return to the Import and Export Configuration page.
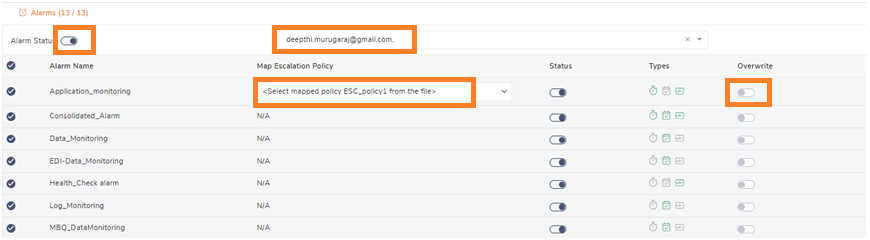
Alarm configuration
In the Import Configuration section, users can select the desired alarm(s) to be imported. Additionally, the following options are available:
Enable/Disable Alarms: Users can choose to enable or disable alarms during the import process.
Overwrite Existing Alarms: Alarms that already exist in the destination environment can be overwritten with the imported alarms, even if they have different mappings.
Email IDs: Users can modify the email addresses associated with alarms by entering a comma-separated list of new email IDs during import.
Escalation Policy Mapping: All available escalation policies are listed in a dropdown menu. Users can select one and associate it with the alarm being imported.
Rename Alarms: Alarms can be renamed as needed during the import process.
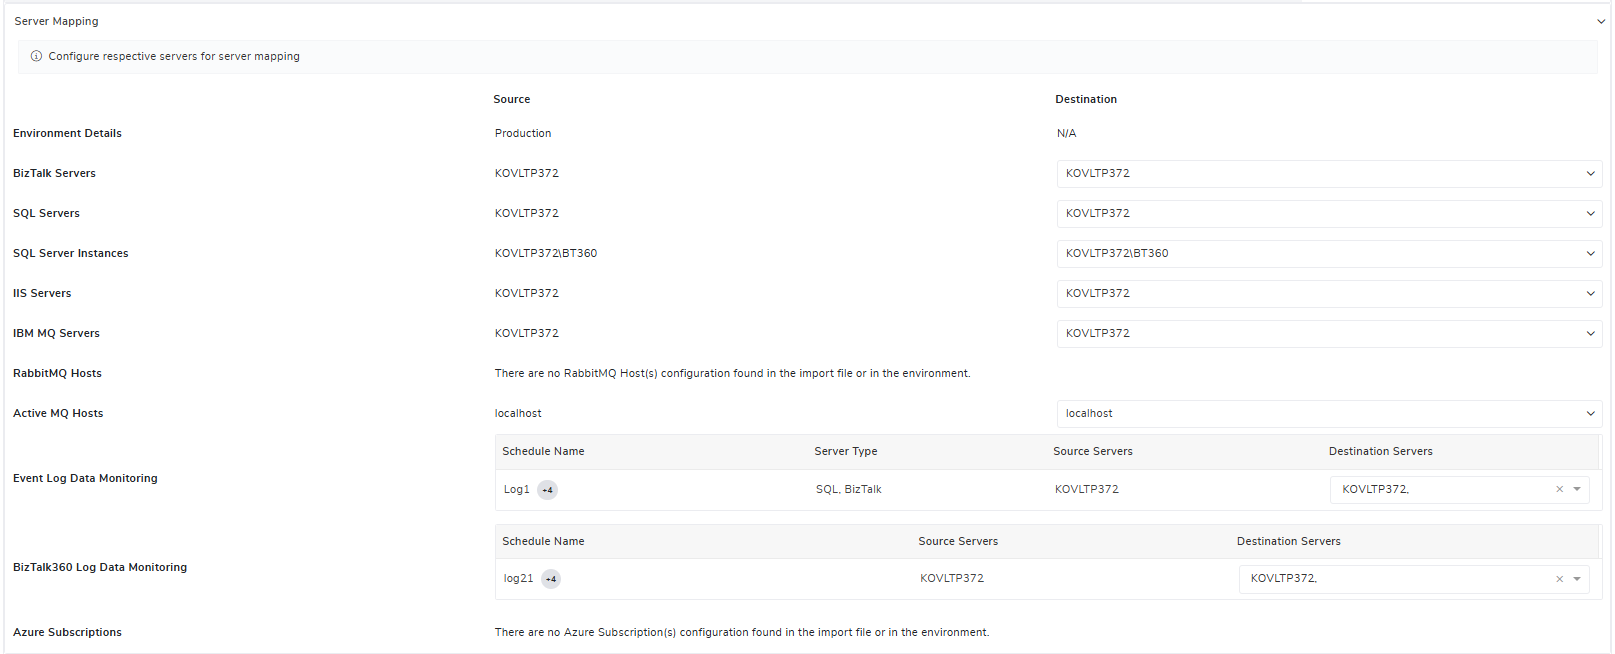
Server Mapping - User can map the BizTalk server, SQL, IIS servers available and the Event log data monitoring in the target environment. Once the selection has been made, the user can move to the next section by clicking the Next button.
View Mapping - User can view the mappings of each alarm from the different sections with monitoring with the artifact count along with its Orphaned count (which are not available in destination environment)
Orphaned details - When importing the alarm, if the mapped artifact in any feature is not available in the destination environment. Those artifact details will be shown in this blade and will be removed in the importing process itself.
Configure option - Configure button will be available in the import>>view mappings blade near the Artifact name - let’s say when import alarm with BHM mappings but in BHM is not configured in the destination environment the option is given there itself, which allows user to configure the BHM so avoid unnecessary orphaned.
Escalation policy
While importing the escalation policy, it will check the escalation policy name and email, and notification channel configuration are available in the destination environment.

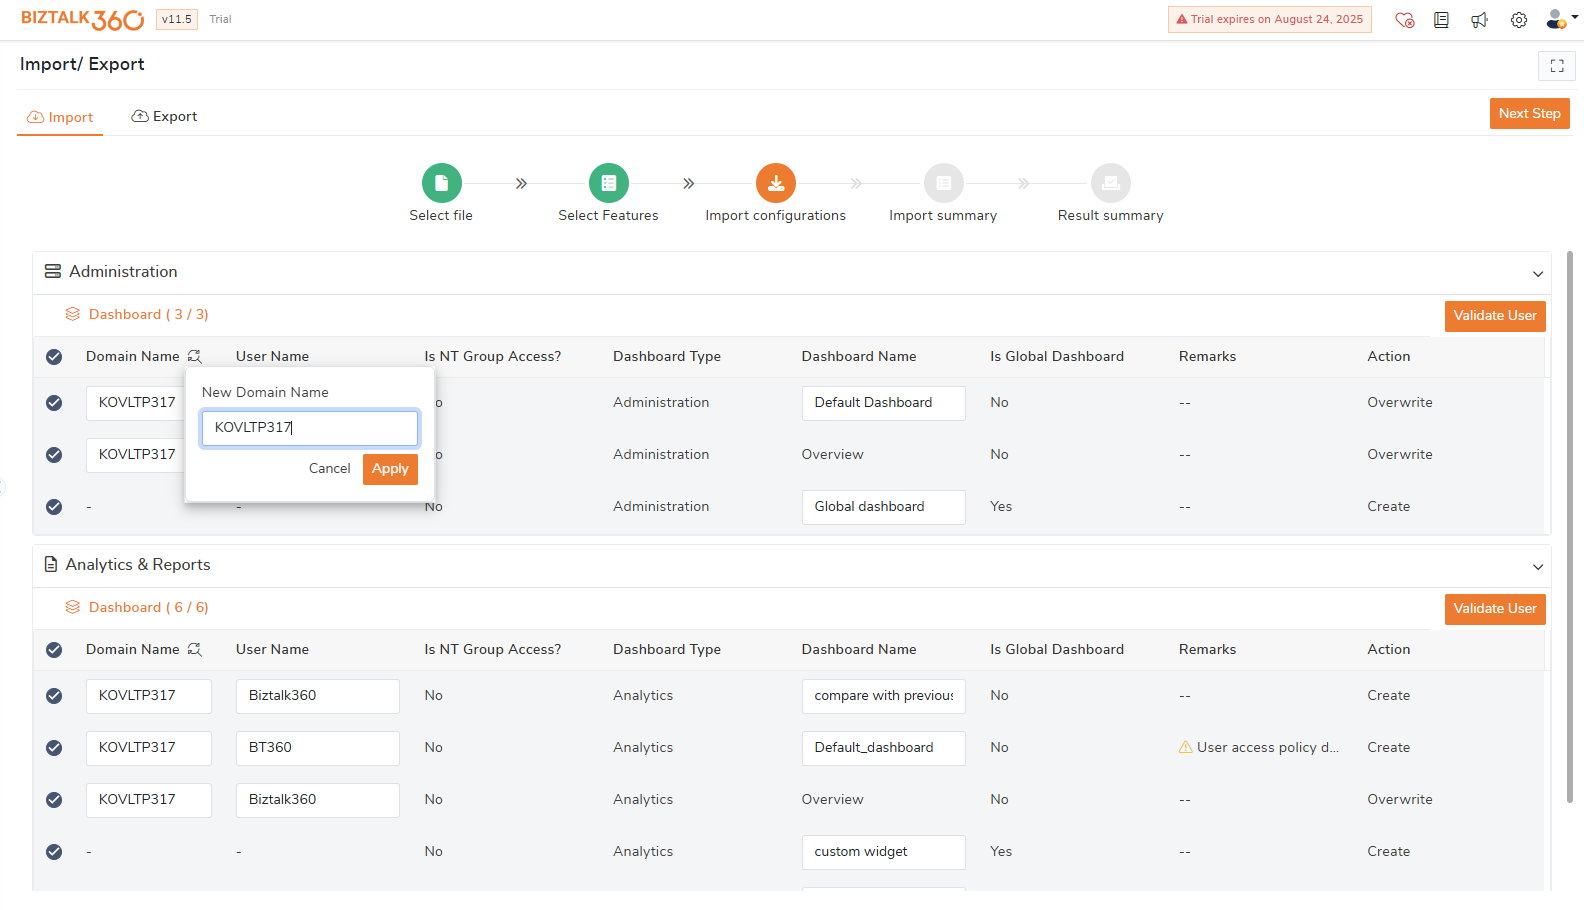
Dashboards
The user can import both the Administration and Analytics dashboards. The user can select the dashboard and can change the domain name in one go by clicking the settings icon near the domain name column, and the user name can be edited during import configuration. It will apply to the selected dashboard. The user can also edit the default and global dashboard except the overview dashboard. The Overview Dashboard for the types of Administration, Analytics, EDI, and ESB is the default dashboard, which cannot be created. The user can only overwrite the existing overview dashboard.
Once, after clicking the Validate user button, it will validate the user is NT group or not and check whether the domain name/user name exists in the environment, then it will show the proper information in the remarks column.
For importing the Dashboard(s), two operations can be performed:
Create - The user can create the dashboard when the dashboard doesn’t exist in the destination environment.
Overwrite - If the dashboard already exists in the destination environment, then the user can overwrite the dashboard in the destination environment.
Custom Widgets
While importing Custom Widgets, the process will check whether the widget already exists in the target environment. If it exists, the import process will overwrite the existing widget. If not, the widget will be created in the target environment.

Note
For Custom Widgets, Placeholders, and Logo will not be imported. Users should recreate the placeholder(s) in the destination environment and place the Logo in the respective path "BizTalk360\Web\Integrations\Logos"
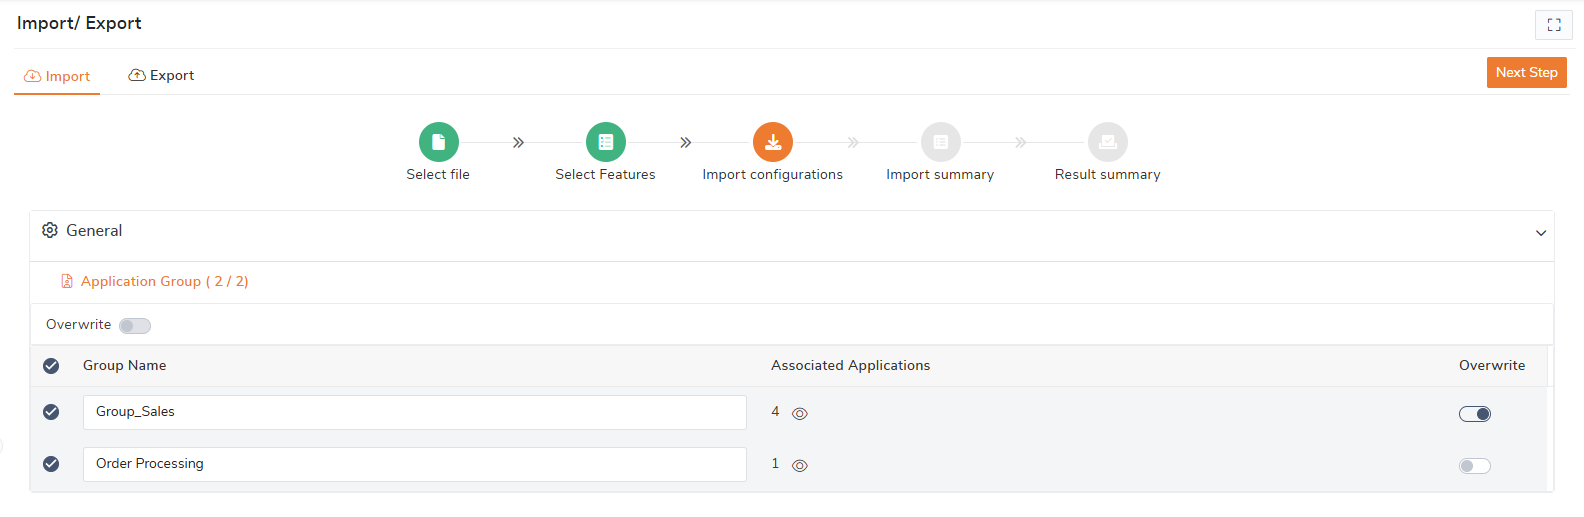
Application Group Import Configuration
While importing an Application Group from another environment, it will check the application group's name whether it is already exists in the current environment, and also check the associated application that it is available in this environment or not.
Once the file has been imported, the user can edit the application group name. For importing Application Group, there are two options.
Create - The create option is available for the newly imported application group.
Overwrite - This option will replace the existing application group.
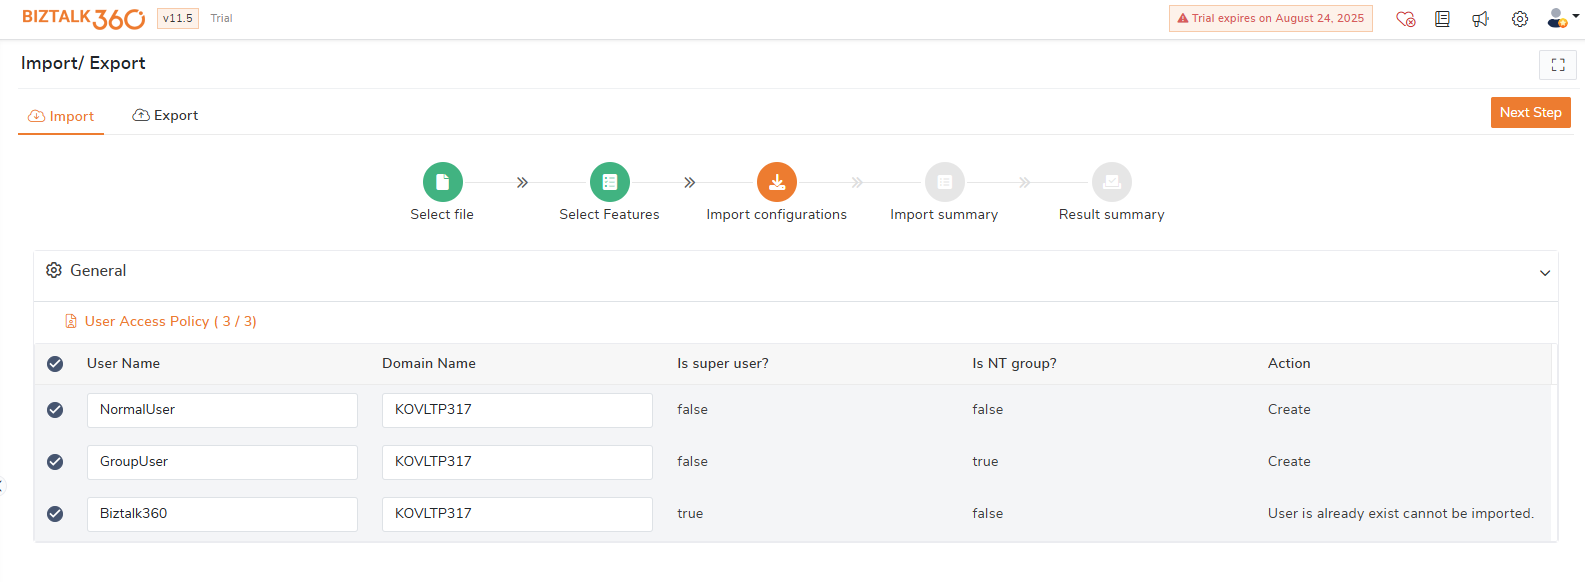
User Access Policy
Once the file has been imported, the user can edit the domain name and the username, based on their environment.
For importing User Access Policies, there are two options. For super user’s configuration, only the “Create” option is available (Access to all the environments and features based on the license policies).
Two options exist for Non-Super Users:
Create - The Create option is available for both super and non-super Policies
Overwrite - This option will replace the existing User Access Policy configuration of the non-super user.
Knowledge Base
The Import file will contain the Knowledge Base articles for the following sections:
Service Instances
Event Logs
Throttling Data
ESB Exceptions
Importing the Knowledge Base configuration allows user to select the desired Knowledge Base sections. Besides that, user have the following capability:
In case of an existing article, the user can choose to Overwrite or Ignore articles with the same name under the respective environment.
Automated Task
The automated task can be imported from one environment to another when the user wants to retain the same configurations. This helps save time by avoiding the need to create tasks manually.
During import, users can select the required tasks from the import configuration section and update them as follows:
Enable/Disable tasks during the import configuration process.
Update Email IDs to use different recipients while importing.
Rename tasks as needed during import.
Overwrite existing tasks in the destination environment with different mappings.
Server mapping allows the user to map BizTalk, SQL, and IIS servers, etc., in the destination environment.
Schedule Maintenance
Users can import scheduled maintenance from one environment/server to another to have the same configuration. The user can make the following changes during the import configuration:
Rename the schedule as required.
Overwrite existing scheduled maintenance in the destination environment.
Modify the schedule end time during the import process, preventing import failures for schedules with expired end times.
Saved Queries
The zip file contains saved queries from the exported environment for the following sections:
Message Box Queries
Graphical Flow Tracking
Advanced Event Viewer
ESB Exception Data
Business Activity Monitoring
Electronic Data Interchange
Logic Apps
Note:
While importing the Logic Apps saved queries need to make sure that the "Friendly Subscription Name" is same as in the environment i.e, from which the saved query is exported.
Secure SQL Queries
In Secure SQL Queries, the queries which come out of the box with BizTalk360 are not imported. So, only user-created Secure SQL Queries will be imported. Once the ZIP file has been imported, the grid contains the details of secure SQL query name, database name and SQL instance name which can be edited before moving to the next section.

BizTalk Reports
The import file will contain the BizTalk Report and the associated dashboards from the exported environment. The Import configuration section allows the user to select the reports. Besides that, users have the following capabilities:
Disable/Enable the BizTalk Report after import.
Overwrite existing reports in the destination environment.
Provide different Email IDs
The user can rename the schedule on import.

Import Summary
The Import Summary section in the Import/Export feature provides a consolidated view of all selected configurations that are to be imported into the destination environment. This summary includes critical details such as alarms, dashboards, Automated tasks, custom widgets, etc. Additionally, any mappings or changes as renamed alarms, updated email IDs, or modified domain/user names, are reflected here to ensure a smooth import process.
Result Summary
After completing the import process, the Result Summary section provides a clear overview of the actions performed. It highlights the status of each imported feature, such as alarms, dashboards and other features, indicating whether they were successfully created, updated (overwritten), or failed. The Error description for the failed features will be listed in the result summary so the users can review and take corrective action if needed. This final step ensures that the selected configurations were applied correctly across all environments.
Click Close Import Wizard to close the import wizard screen and return to the Import and Export Configuration page.