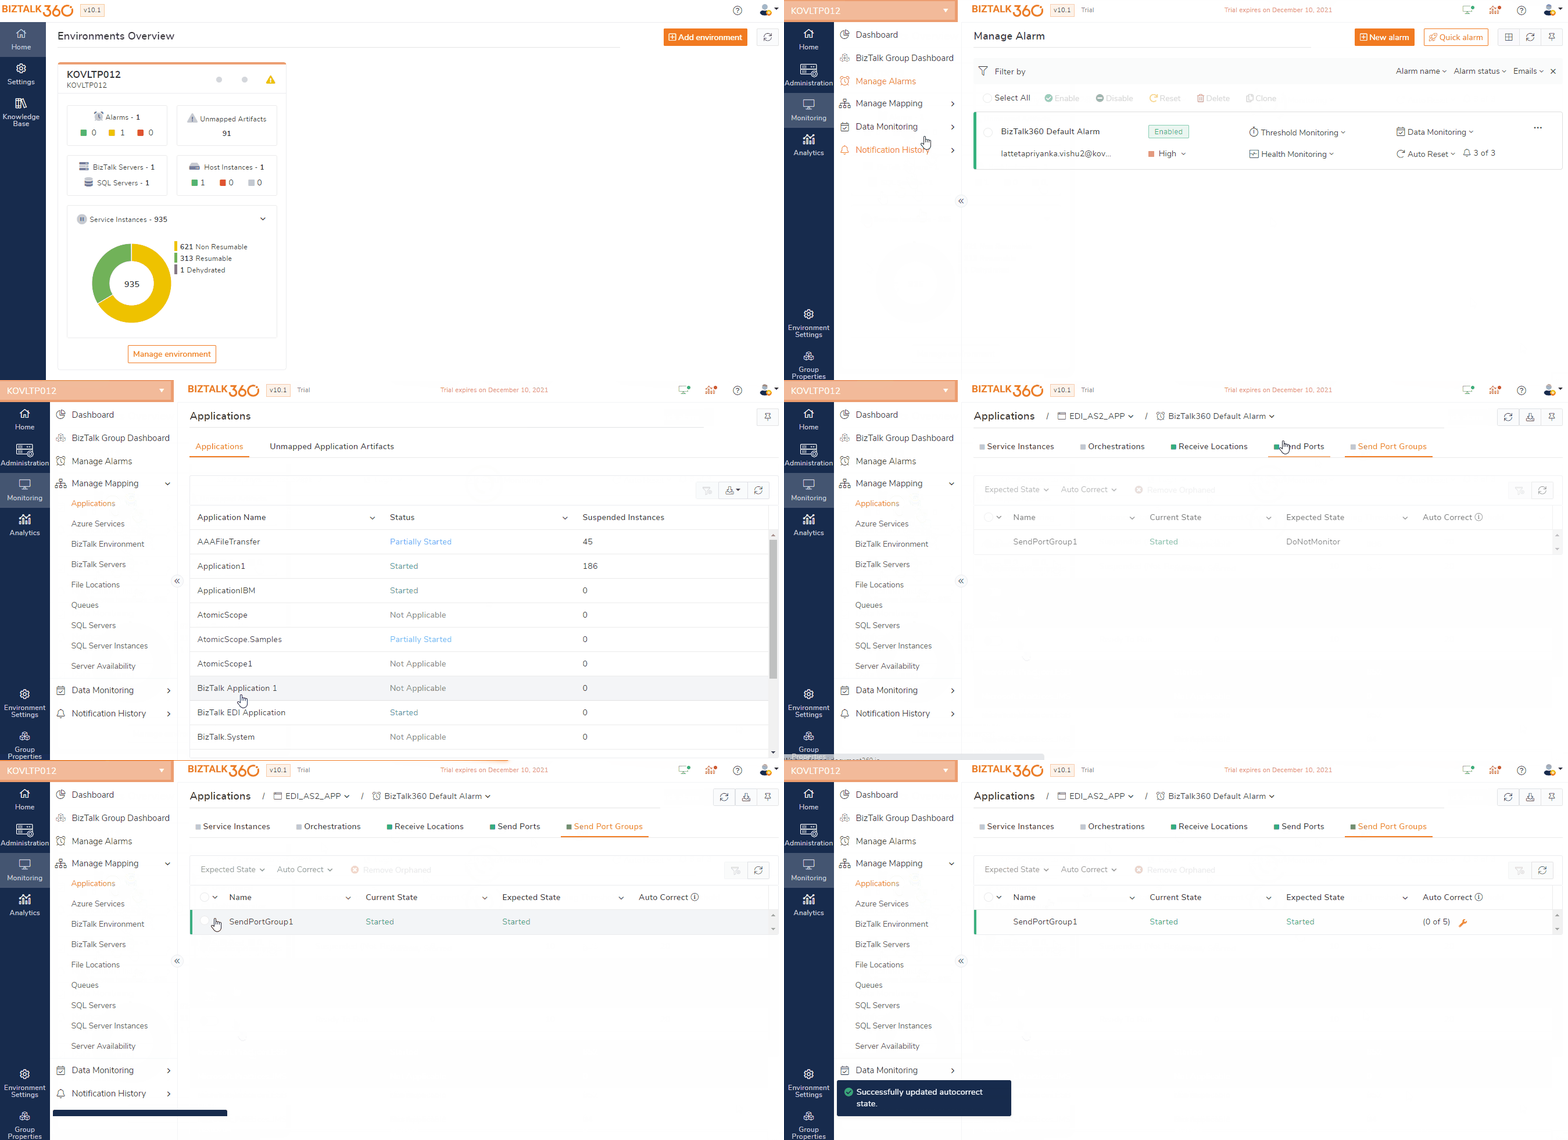
In this section, we will see how to set up monitoring on the application's Send Port Groups. Send Port Groups in BizTalk Server are a named collection of Send Ports that BizTalk Server can use to send the same message to multiple destinations in one configuration. To avoid any downtime, it is important to make sure the Send Port Group is healthy and running in its expected state to be able to send messages to external systems. Therefore, BizTalk360 assists BizTalk Administrators by monitoring the Send Port Groups against their expected status.
For instance, you want your Send Port Group to always be in the Started state and you want to be notified when it is not Started. This can be easily achieved by setting up the Expected State for the Send Port Group as Started. In this scenario, the system will trigger an alert as soon as the configured Send Port Group gets stopped.
BizTalk360 allows you to set up monitoring for any desired state, which is not necessarily just the Started state. So, when you are configuring monitoring for Send Port Groups, you can select one of the Expected States from the drop-down. The meaning of the states are:
- Started – The Send Port Group is expected to be in the started state
- Stopped – The Send Port Group is expected to be in a stopped state
- Unenlisted – The Send Port Group is expected to be in an unenlisted state
- Do not monitor – Selecting this option will disable monitoring for the selected Send Port Group
- Unmapped - This means that no monitoring has yet been set up for the selected Send Port Group
Setting Up Alerts for Send Port Groups
- Log in to the BizTalk360 application
- Click 'Monitoring' in the navigation panel
- Click the expand button against the 'Manage Mapping' tab and select the 'Applications' link
- Select the Application for which you want to set up the monitoring
- Select the Alarm name (see Manage Alarms) from the drop-down for which you would like to associate the alerts
- Choose the Send Port Group that you wish to monitor
- Select the check box against the Send Port Groups you wanted to monitor
- Set the value of the Expected State by selecting it from the drop-down. For instance, if the current state of the Send Port Group is Started and you want to get notified when it is not started, then you need to set the expected state as ‘Started’
Auto Correct Functionality
With the Auto Correct functionality, the user can set up monitoring on any 'State-based' artifact and let the monitoring service try to automatically heal the artifact any time when there is a mismatch between the 'Expected State' and 'Current State'.
For instance, users can set up monitoring on the Send Port Group(s) of an application and additionally set up the Auto Correct functionality for the Expected State. Whenever there is a mismatch in the state, the system will try to bring the artifact back to the expected state (Maximum try is 5). On successful operation, the artifact will come back to the Expected State within the next monitoring service cycle (60 seconds).
- Assuming you are still on the Send Port Groups screen, follow the below steps to setup Auto Correct for Send Ports Groups:
- Select the check box of the Send Port Group for which you want to set up Auto Correct
- Click Auto Correct drop-down, and select 'Enable'
- Auto Correct will be enabled for the Send Port Group with the default values for Max Retry as 5 and Retry Count as 0

When a Send Port Group is not in the Expected State
Attempt 1 - Auto correct will attempt to bring the Send Port Group to the expected state for the first time during the monitoring cycle. (Max Retry: 5, Attempt Count: 1, Reset Interval: 10 mins). Let's assume the attempt was unsuccessful. You will receive an Auto Correction Alert email with the information. At this point, the monitoring dashboard will display the state of the artifact as Critical (2). When you click on the count, you will notice the auto correction steps that have been performed on the artifact
Attempt 2 - Auto correct will attempt a retry for the second time during the next monitoring cycle (Max Retry: 5, Attempt Count: 2, Reset Interval: 10 mins). Let's again assume the attempt was unsuccessful. You will receive the second auto correction email with the information
Attempt 3 - Auto correct will attempt a retry for the third time during the next monitoring cycle (Max Retry: 5, Attempt Count: 3, Reset Interval: 10 mins). Let's assume this attempt was successful. You will receive the third auto correction email with the information. Within the next few seconds, the monitoring dashboard will display the state of the artifact as healthy. Lastly, the attempt count will reset to 0 (Max Retry: 5, Attempt Count: 0, Reset Interval: 10 mins)
Let assume the attempt was unsuccessful until the 5th time, then the Auto Correct functionality will get stopped and it will not retry the Send Port Group. However, by configuring the reset interval, for example, 10 minutes, the Auto Correct will get reset automatically after the configured interval and it will try to recover the artifact to its expected state.
Remove Orphaned Send Port Groups
BizTalk360 provides the ability to remove Orphaned Artifacts from the UI. Say, for instance, you have configured monitoring for Send Port Groups. However, later you either rename them or remove them completely in your environments. By doing so, the artifacts configured for monitoring move to an Orphaned state. The orphaned artifacts can be removed from the UI by clicking the 'Remove Orphaned' button. Until Orphaned artifacts are removed from UI, the user will get alerts.